| . 1 . 2 . 3 . >> |
| Author |
Message |
Rory
Member
|
# Posted: 5 Feb 2019 02:50am
Reply
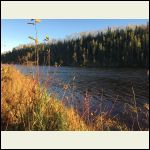
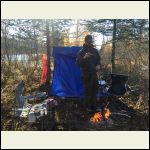
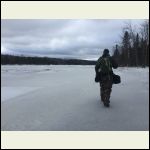
Hey everyone, I just found this forum a couple weeks ago and have had the chance to see a lot of beautiful cabins so far. Thought I would share my future project starting this spring I will be building a small 8x12 cabin on my 20 acre property along the kaministiquia river I purchased last fall. There will be a lot of challenges due to no road access and having to bring all materials in by river but it should be beautiful when its done. My internal countdown is on as I find myself spending most of my free time reading about other cabins and watching DIY videos on youtube haha. Ill attach some photos I was able to get of the property when I was out there and i'm looking forward to providing updates as I go along with the build. I also wanted to thank everyone i've had the chance to talk to so far for all the information i've received.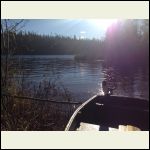
IMG_1159426.JPG
| 
IMG_2736.JPG
| 
IMG_2780.JPG
| 
IMG_1346.JPG
|
|
|
manny
Member
|
# Posted: 5 Feb 2019 08:04am
Reply
Looks like a great spot .Enjoy
|
|
fiftyfifty
Member
|
# Posted: 5 Feb 2019 09:03am
Reply
If you are on the Kaministiquia River, then we are neighbors of sorts, as we are across the border in Cook County, Minnesota. We love Thunder Bay, and go up for day trip. Tiny cabins, like 8x12, are a super fun size. Give us more info on what sort of design you are planning, what materials etc.!
|
|
Just
Member
|
# Posted: 5 Feb 2019 10:03am
Reply
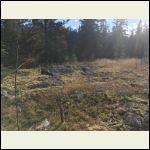
According to the Ontario building code it now allowes a bunky to be 10 sq. M. or 9x12 . The last two I have built are 9x12 and that little bit more really helps .Do you have a building sight with some exposed rock to build on , if so it could mean less material to bring in for a foundation?
|
|
Rory
Member
|
# Posted: 5 Feb 2019 02:21pm
Reply
Thank you manny im sure ill enjoy every minute of it!
Fifty- neighbors indeed! Cook county is beautiful I enjoy the drive every time. Grand marais is one of my favourite places to visit in the summer. Ill attach a picture of the layout I have so far. Ive already changed it a million times so we will see if it sticks haha.
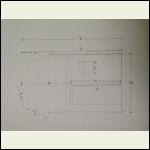
Just- Unfortunately the property is in a township that still follows the 100 sq ft at least that's what they told me when I called the office. However I doubt with the location that there would be anyone coming down with a tape measure to check it out lol. But for convenience sake the 8x12 is still fine with me. Luckily I do have a site with exposed rock so im hoping to get away with a very basic foundation. It will require some leveling for sure but there is one spot on a high point that is roughly the right size that is fairly flat. Ill attach a pic of that area as well. If you have any tips or suggestions for the foundation i'd love to hear it.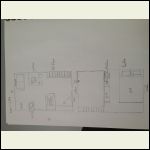
IMG_1343465.JPG
| 
IMG_1347464.JPG
| 
44870360390L.jpg
|  |
|
|
fiftyfifty
Member
|
# Posted: 5 Feb 2019 04:56pm
Reply
Rory, I like the design. Barn style makes a lot of sense to give more headroom, although more complicated to build. The couch you have reminds me of ikea's Askeby which is made of foam and folds out to sleep on. A friend on mine has one and it is quite comfortable to sit on, and not too bad to sleep on. For the big bed in the loft, in our case we were dreading hauling one up. We finally went with 2 single foam mattresses, and are so glad we did. We bought the kind that come in the mail and expand-Lucid brand 5 inch firm twin xl, I think. They were like $85. Foam mattresses are amazing in that if you push them together and cover them with a single sheet, the crack virtually disappears. But you can also pull them apart and use separate sheets if the adults don't want to share a bed. You can also cut them narrower if needed. Regular twin mattresses are ~39 inches wide, but European twin mattresses (and army bunks) are only ~30 inches wide and perfectly comfortable in my opinion.
|
|
Rory
Member
|
# Posted: 5 Feb 2019 05:21pm
Reply
That's a great idea for the bed I was planning on looking into the cost of a foam mattress but putting 2 singles together is a really good idea. That's a really reasonable price to. I went with the barn style for some extra head room for sure haha i'm 6'0 so every inch counts in the loft. I'm going to use 10' sidewalls and have the ceiling of the first floor at 7' which will buy me an extra 3 feet in the loft before the ceiling starts. With this design I should be able to stand in most areas up top which will be awesome. Luckily being forced to wait all winter has given me the chance to work out all the details of the roof. Well except for what I want to use to finish it lol.
|
|
creeky
Member
|
# Posted: 5 Feb 2019 05:22pm
Reply
Sound like  . .
|
|
|
neb
Member
|
# Posted: 5 Feb 2019 08:55pm
Reply
That looks great.
|
|
Just
Member
|
# Posted: 5 Feb 2019 10:18pm
Reply
looks great you could turn the roof the other way it would give you extra head room upstairs and allow for smaller shorter beams upstairs .
|
|
Whiskey Jack
Member
|
# Posted: 5 Feb 2019 10:46pm
Reply
Where abouts on the Kam are you? Any flooding risk there? We looked a few properties there over the years and almost put an offer in a house just West of the river. It's a beautiful area.
|
|
Rory
Member
|
# Posted: 6 Feb 2019 12:05pm
Reply
Thank you neb. WhiskyJack i'm sure you're familiar with where Kakabeka Falls are right? its just a few miles up the river from the top of the falls. I would assume with the falls so close by that flooding isnt much of a risk but even if the water level does get high I cant see it ever reaching the building site. Some pretty good fishing to from what I hear so i'm looking forward to that as well.
|
|
socceronly
Member
|
# Posted: 6 Feb 2019 12:09pm
Reply
There is supposed to be leveling of the rules in Ontario as far as I know. A unified set of Ontario rules vs the dogs breakfast of townships.
Have you seen the 100sqft on paper? I would do what you can to take that extra foot. It makes a big difference even though it doesn't sound like much.
There are also townships in Ontario that are giving way to the Tiny House stuff. Not sure how that will play with the unified rules that I heard about from my township.
I am still stuck building 108 or 800.
100 or 108, the fine print says you can't really do either without a primary residence. If they want to get you for whatever reason.... they will. Hopefully they are like most places and let it go if you are reasonable.
|
|
Rory
Member
|
# Posted: 6 Feb 2019 12:15pm
Reply
Well I saw the 100 sq ft on the townships website and the rep on the phone repeated the same information. But i'm not able to live at the property legally anyways given that there's no access by road and there for I cant even get issued a permit if I wanted to. So its only meant to be a camp for the weekends which is why having a primary residence isn't an issue for me. I do hope they look into changing some of these laws though. Its a shame to finally be able to buy some land only to be told you cant build something on it.
|
|
socceronly
Member
|
# Posted: 6 Feb 2019 12:31pm
Reply
I was just asking 'cause sometimes people just say 100 as a rule of thumb, but it's actually 108.
My understanding is you wont' be able to get a permit until you can get insurance, and you can't insurance unless fire & rescue can get there. You can't even get a permit on land with a road that is not cleared in the winter for the same reason.
|
|
Rory
Member
|
# Posted: 6 Feb 2019 01:25pm
Reply
I guess that's fair. But in my opinion if they wont issue you a building permit due to your location then there should be other options besides building a tiny structure. Either way though i'll be happy with the tiny cabin haha ill be outside most of the time anyways and it still beats staying in a tent.
|
|
socceronly
Member
|
# Posted: 6 Feb 2019 02:35pm
Reply
Oh you also posted the simple solar set up.
Look for a company called Microgreen solar in Ontario.
I saw them at the cottage life show. They have a DIY plug and play solar kit.
Comes all wired up. Plug in the panels, attach batteries. Done.
|
|
Steve_S
Member
|
# Posted: 6 Feb 2019 06:11pm
Reply
Just pipping in a bit as I'm in NE Ontario within an organized township and that "100 square foot" rule is applied here too but the codes states it in Metric and as such is actually more @ 108 square feet. Apparently the codes are being updated this year too, so who knows what they'll come up with now.
Now there is a bit of a trick in this though and how they view square footage and apply the rule. If you build a Story & Half 10x10 which is enough to provide you standing space upstairs but not a full ceiling height. As a half story (knee walls < 4') preferably at 3' it doesn't get counted. It's dancing with the technicalities and so it's possible stress if you have to deal with an idiot. My suggestion would be to build 10' high walls, put a floor @ 8' and give yourself a loft space with a cathedral ceiling. Do put windows in each gable ! LMAO !! and I have to plug the "Cool Roof" system because I did it and so totally happy I did ! It cuts the heat transfer in, in summer and prevents the heat from being leached out in winter.
REF: http://www.houstoncoolmetalroofs.com/cool-roof-information/cool-roof-design-texas/ A Very good explanation of how it works and the benefits.
As you said, it's unlikely any inspector would show up with a tape measure unless there was a cause. To that end, Ontario is now also starting to use a satellite survey system for property tax assessments. So if they pick up something that shouldn't be there.... It's just starting but it means in a couple of years our privacies will be lessened some more.
You may want to consider a Plug & Play Solar Generator system which is a small system capable of giving you basic 12v / 120v power that won't break the bank or your back trying to trudge it about. I've seen a couple of fairly respectable units around the $1000 price point. They do have several draw backs too though, such as recharge times with low capacity panels (typically 100w). IF your a DIY Guy and competent with Electrical & Electronics there are several guides to build your own.
One of our members here, Creeky has a small solar business in the Kemptville Area and he has a 24V "Camp System" which you might want to have a peek at.
REF: https://bobolinksolar.com/product/24v-camp-system/
Hope it helps, Good Luck.
|
|
Steve_S
Member
|
# Posted: 6 Feb 2019 06:12pm - Edited by: Steve_S
Reply
oops, double post. weird.
|
|
Whiskey Jack
Member
|
# Posted: 6 Feb 2019 06:21pm
Reply
Dave Green at Maier Hardware did our solar setup. We have three of the Canadian tire panels. He built the entire panel to hang on the wall with the inverter etc. All we had do was lug in the panels and plug in the system.
|
|
Rory
Member
|
# Posted: 6 Feb 2019 06:43pm
Reply
Thank you steve that's a lot of useful information. I did email the building inspector to get some clarification on the loft situation and whether it would be added to the sq footage and his reply was "If it can be considered a second story then yes" So when I for more detail on what would consider it to be a second story he provided no clarification. At least with documentation of me trying to build within the tolerances, if I was ever forced to deal with an idiot and had the inspector come out to check I would be more likely to get away with the 3' knee wall haha. And at least with height you cant see from satellite so as long as its in that 10 sq m footprint it should still be safe.
The problem for me with the plug and play solar systems is I already have most of the components so I would be a big waste of money to re purchase things lol. But I will see if I can find information on how there set ups look and attempt to copy them.
|
|
Rory
Member
|
# Posted: 6 Feb 2019 06:56pm
Reply
Whisky do you have a picture of the set up? Id like to see how he did it. I never thought of Maier Hardware maybe ill swing by and see what they have. Thanks for the tip!
|
|
rockies
Member
|
# Posted: 6 Feb 2019 07:35pm
Reply
Hello. I take it the long wall on the bottom is facing south? If so, I would move the door over next to the stairs to the loft and make it an outswing (saves a lot of floor space and you won't be walking in and faced with a hot stove 3' inside the door). Move the stove so that the back is against the south (?) wall (opposite the loft stairs and facing them and as near as code to the corner).
Then put the kitchen cabinetry on the loft stair wall under the loft, leaving the rest of the room open for dining and living.
|
|
Rory
Member
|
# Posted: 6 Feb 2019 08:12pm
Reply
Oh ya I really like that as a layout thanks for that. Sometimes its nice to get a new set of eyes lol. I'd assume in this layout you would have the back of the stove up against the east wall instead of the south?
|
|
fiftyfifty
Member
|
# Posted: 6 Feb 2019 08:35pm
Reply
Do you have the woodstove already? If not, you may want to consider a Grizzly cubic mini. They can be wall mounted and that saves a lot of space. Firebox is small, but they do put out the heat.
With your most recent sketch, the back portion is starting to look like one of those RV dining booths that convert into a bed. My parents have one and theirs is pretty comfortable.
|
|
Rory
Member
|
# Posted: 6 Feb 2019 08:42pm
Reply
I do have the stove already yes its a camp chef alpine or I would have done a little more research on the cubic mini. I saw it awhile ago online and laughed at it a little and then as I started watching a lot of tiny house videos on youtube I started to see how well they work and kicked myself for not getting one haha. I was thinking that to after drawing it. It would be nice to be able to use it as a second bed in case of guests. Something to keep in mind for the future for sure.
|
|
rockies
Member
|
# Posted: 6 Feb 2019 09:10pm - Edited by: rockies
Reply
Man, locating that wood stove is tricky. I've shifted everything around that room 3 dozen times trying to get clearances correct. There's only one thing to do to get a decent layout without bumping into that stove.
Put the wood stove along the north wall as close to the east wall as code will allow. Put whatever length of kitchen cabinetry you want next to it along the north wall (as close to the stove as code will allow). Between the west edge of the kitchen cabinetry and the west cabin wall build in a dining bench (maybe about 6' long) along the north wall.
Move the loft stairs to the south wall (same way you've placed them now on the north wall). I'm guessing that you want more of a staircase than a ladder to the loft. Instead of adding food storage shelves to the side of the stairs I would turn the entire staircase into storage, as in this picture.
Place a 4' long dining table in front of the 6' long dining bench (this allows you about 2' of space to slide in - use chairs on the other side), and on the south wall opposite build in a living room seating bench between the west cabin wall and the edge of the loft storage stairs (built-in seating benches only have to be 2' deep). Put the outswing door on the east wall next to the loft stairs.
This layout gets the stove a little more out of the way while still leaving circulation paths open. It also allows you to keep a lot of the center of the cabin feeling more open.
|
|
Just
Member
|
# Posted: 6 Feb 2019 10:12pm
Reply
I built this one in 04 sold it in 07. Back then the rule was 100 sq.ft. So I went with 12 ft by 8 ft. 4in. That makes room for two bedrooms in the loft with a wall in the center plus room to stand and change.The plan has a steep L shaped staircase in the in the corner. I believe it was 18in . wide .
|
|
Rory
Member
|
# Posted: 6 Feb 2019 10:37pm
Reply
Ya thats pretty close to what im looking for. Just curious how did you find the staircase was at 18in? I was hoping to do mine at 12-15" but i'm a little uncertain if that will to thin.
|
|
slatecreek
Member
|
# Posted: 7 Feb 2019 08:33am
Reply
18" staircase is pretty tight, we did a 22" staircase. I figured it out by having the wife hold a sheet of plywood against a wall and found what we could comfortably walk between. I didn't want the ladder thing to deal with and fall in the middle of the night to go pee. I'm 6' as well and we have 7' downstairs ceiling with about 4' at the high end upstairs. I can sit up on the mattress, lean against the wall and read at night. My outer high wall is 12' but lost 6" in the foam board floor with sleeper,plywood and laminate floor.
What Steve S said about "cool roofs" is a great idea too. We did the slope roof bunkie with 2x10 rafters installed 6" worth of R-10 foam (total of R-30) between the rafters. We have a 1" space above the foam board and purlins so the whole roof can breath. We heat it with a 1500 watt electric heater with it 0 degrees outside and only a fan in the summer. Outer walls are plywood, chalked joints, insulated.
|
|
| . 1 . 2 . 3 . >> |

