|
| Author |
Message |
helena
Member
|
# Posted: 27 Jan 2013 08:10pm - Edited by: helena
Reply
9' x 18' sauna and shower. Suppose it qualifies as a "small cabin".
Turf roof, 4x4 post/beam construction on concrete pad, waney edge larch cladding, straw clay infill with lime plaster.
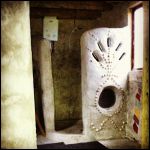
Freeform limecrete shower basin with cob shower walls and lime/tadelakt plaster.
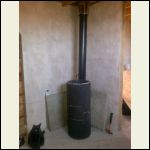
Recycled LPG gas bottle wood stove and tankless water heater/shower runs on lpg/propane.
Still a finish coat of plaster to go in shower side of cabin, lime wash over all, concrete flagstone stove hearth and roof insulation then she's finished. Currently being used as a workshop/office/shower for next building project.  we used this building to experiment with lots of different techniques. (and still are) Was great fun to build and first time I ever stick framed a gable roof properly with dimensional lumber. we used this building to experiment with lots of different techniques. (and still are) Was great fun to build and first time I ever stick framed a gable roof properly with dimensional lumber.  Only "power tool" used was gas powered cement mixer for concrete, lime plaster and clay slip. Only "power tool" used was gas powered cement mixer for concrete, lime plaster and clay slip.
Will post some interior photos soon.
|
|
helena
Member
|
# Posted: 27 Jan 2013 09:10pm
Reply
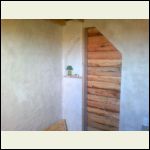
as you can see... Some unfinished business on the inside. (ok lotsa unfinished business on the inside)  no ceiling or roof insulation yet. Unfinished plasterwork, hearth and surround to experiment with and part of a wall we changed our mind on and now don't know what to do with it. Neither does the cat. no ceiling or roof insulation yet. Unfinished plasterwork, hearth and surround to experiment with and part of a wall we changed our mind on and now don't know what to do with it. Neither does the cat.  proper sauna benches will go in when we are ready to entirely devote the space exclusively as a sauna. proper sauna benches will go in when we are ready to entirely devote the space exclusively as a sauna.
this was taken in september and since then, this room has become an office! With a desk, lots of books and papers everywhere and loads of building supplies for a pending project!
More photos of the shower side to come later.
unfinished business
| 
sauna progress
|  |  |
|
|
Borrego
Member
|
# Posted: 27 Jan 2013 09:20pm
Reply
Very nice! I love saunas since my visit to Finland, where my mother was from. Nothing like a hot sauna followed by a dip in an icy lake. I may have to consider building one at my place now 
|
|
helena
Member
|
# Posted: 30 Jan 2013 11:49am
Reply
still working on the lime plaster work in the shower side of the cabin.Photos of the cob shower finished with lime plaster and freeform limecrete shower basin. i attached cob walls to timberframe with buried wooden block deadmen.
shower cubicle
| 
shower lime plasterwork with bottles and shells :)
|  |  |
|
|
yankeesouth
Member
|
# Posted: 30 Jan 2013 11:52am
Reply
Looks like a modern day sweat lodge.
|
|
Rifraf
Member
|
# Posted: 30 Jan 2013 06:57pm
Reply
Can you explain a little how you frame a roof for holding moss and such ?
|
|
helena
Member
|
# Posted: 30 Jan 2013 07:41pm - Edited by: helena
Reply
I can tell you how I do it, but, it can be done loads of different ways. This turf roof is my 5th turf roof I've done and all for shed structures, not houses or nothing but, principles the same. i've done some with drains, one with gutters but, the rest, I haven't messed about with that. I've decided along the way all of that is unnecessary with the exception of guttering over a door or entrance.
First off, as you can imagine, a turf roof is heavy!  especially when saturated with water. So, your structure holding it up needs to be beefier than a structure that would get a metal or shingled roof. As I mentioned in another thread, the load works out as 7lbs per square foot for every inch of turf depth. i usually cut turves 2-3 inches thick so, you're up to 21 lbs per square foot. However, this works well here in the north of scotland where it is extremely windy all the time. Light roofs have a habit of flying off here, so this is partly why I put turf roofs on everything (including my chicken coop!). especially when saturated with water. So, your structure holding it up needs to be beefier than a structure that would get a metal or shingled roof. As I mentioned in another thread, the load works out as 7lbs per square foot for every inch of turf depth. i usually cut turves 2-3 inches thick so, you're up to 21 lbs per square foot. However, this works well here in the north of scotland where it is extremely windy all the time. Light roofs have a habit of flying off here, so this is partly why I put turf roofs on everything (including my chicken coop!).
Then if you are building a roof under 30 degrees you can get away with framing the rafters as usual and sheathing with plywood or sometimes I use "first cuts" with the round sides up. On my water pumphouse I cut long willow shoots and wove them into the rafters and secured them with fencing staples then laid carpet straight on that.
Then I go for a layer of old carpet and tack it down well with some clout nails. Then you need a waterproof membrane. You can use thick gauge damp proof membrane, pond liner, or EPDM. There is actually a waterproof "product" for turf roofs over here you can buy which is basically a big plastic sheet that looks like an egg carton. Little dips in it are meant to hold water to keep roof nice and green but, man is it expensive! About 300 bucks a roll!
How you secure it will depend if you are putting gutters or a drain in. If you are happy for the run off to just run off, tack that up underneath the eaves, you can cover that with flashing tape if you want but, not necessary. Then you need a good sturdy fascia all the way around the roof forming a "box" to the top of the roof, mind and leave a tiny gap between the fascia and the roof covering so water just doesn't collect up there. Then you just cut turf, I usually cut them in one foot by two foot "tiles then trim the bottom with a spade to make them nice and flat and make sure no big stones in it and lay it on the roof and kinda use your hands to pound them gently together so they are nice and snug. Fill in any gaps between the turves with just soil or little divots. Remember if sunlight can get to your membrane it will break down fast so, make sure there is no gaps. i've heard of people just bucketing soil onto the roof and seeding it but, never have tried that, I usually just preserve the turf from the groundworks to put on the roof.
If you do a roof steeper than 30 degrees you need to lay battons horizontally over the rafters or the turf wants to slide down.
Simple really, quick and fairly cheap. Looks good too. Here we get a lot of rain so, die back is not really a problem however, I have had dry periods where it does die back and go brown but, it recovers really quickly after a bit of rain. Sedum could be used for a lighter roof and in dryer regions.
If you want to put a stove pipe through just attach a flue collar to the sheathing and bring the membrane up around the silicone collar on the flue collar and glue with adhesive then get a storm collar for your chimney and lower that down over the gap where the membrane is attached to the collar.
|
|
a_pyrkin
Member
|
# Posted: 3 Feb 2013 09:46am
Reply
Nice work!
I hope to build sauna in the foreseeable future 
|
|
|
|

