|
| Author |
Message |
rebar
Member
|
# Posted: 29 Dec 2019 02:20pm
Reply
Hello folks.
Ive read poured piers can slowly move depending on soil. Buried piers can actually be pushed up and out of the ground if the sides of the pier are rough enough for the frozen soil to grab, regardless if buried below the frost line. Ive also read sonotube offers a product that bells the concrete bigger at the bottom to resist lift and settling.
Has anyone experienced piers they buried settling or heaving over time? How much? And has anyone built on screw piers? Where can I find information how large one pier needs to be for given weight?
Thanks!
|
|
toyota_mdt_tech
Member
|
# Posted: 29 Dec 2019 02:42pm
Reply
Yes, just digging a hole and pouring in concrete will lift up. You can dig the hole larger then sono tube and then fill tube with concrete, the bottom will flow out and make a nice foot, that with smooth sides, its not heaving up out of the ground. Add rebar too.
|
|
rpe
Member
|
# Posted: 29 Dec 2019 06:25pm - Edited by: rpe
Reply
I haven't used these myself, but if I couldn't get to bedrock to pin my piers, I'd be going this route:
www.bigfootsystems.com
We had some sketchy piers on our cottage when we bought it. We've rebuilt those piers by excavating down to bedrock, pinning, and pouring a small pad, and then building piers using pier blocks filled with rebar and concrete. The area around the replacement piers was backfilled with gravel to improve drainage, and keep the evil clay at least a couple feet away.
|
|
toyota_mdt_tech
Member
|
# Posted: 29 Dec 2019 07:25pm
Reply
rpe had a good point on clay. I have no clay where I am at, but if OP has clay, you will need to take that into consideration.
|
|
rpe
Member
|
# Posted: 30 Dec 2019 08:57am
Reply
I've learned that with a source of water, and freezing temps, clay will expand a huge amount. We bought our cottage in summer, and didn't get to repair sketchy piers the first season. Before our first winter, I had stacked up four pier blocks on a piece of 2x12 under the one side of the cottage, leaving an inch gap under the beam. I was just mocking up ideas for pier locations, and thought I'd carry on in the spring. In winter we came up to check on things, and doors were binding, and wouldn't latch again once opened. I crawled underneath, and was shocked to see that the temporary pier block stack that was an inch below the beam had now lifted up and jacked the cottage right off the supporting piers by 3". That's an upward heave of 4"! We've since found there are veins of grey clay running under that side of the cottage. Any digging done since has used gravel for backfill, and two french drains have been added to assist in drainage. Everything appears stable now.
|
|
rpe
Member
|
# Posted: 30 Dec 2019 09:21am
Reply
Here's an alternate that looks better than the 'bigfoot' I posted earlier. This one uses a tapered plastic form for the entire pier, so there's no straight-sided surface for expanding soil to grab on to. If you can't get to bedrock, check this out:
https://foottube.com/
Also, as for load ratings, that depends on the soil type underneath the pier, and the area of the bottom of the 'bell'. The datasheet below shows those details.
https://foottube.com/wp-content/uploads/TechnicalSpecifications20102.pdf
|
|
Brettny
Member
|
# Posted: 31 Dec 2019 07:44am
Reply
If your getting frost heaving you have a rough sided tube or haven't gone some to frost depth. If you want a wider base below the tube you can dig the holes bigger than the sono tube, let them cure with rebar sticking out then place the tube over and pour them.
If your below frost line and are using a f
Concrete forum the frost will not grab the pier.
How deep is your frost depth?
|
|
AKfisher
Member
|
# Posted: 31 Dec 2019 12:39pm
Reply
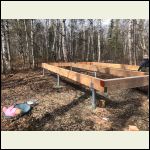
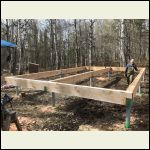
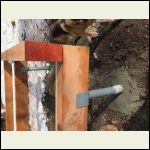
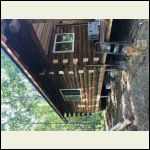
Helical piers work pretty well, they are spendy but worth it in my opinion. The auger acts as the footing, screw it below frost line, they add a plastic frost sleeve. The sleeve will slide up and down the pipe if the frost grabs it. I had 12 piers installed at our place, they are 5-6' deep and are about 2' above grade. We get a lot of snow so it is nice to be up higher. I was orginally going to drill and install 12" sonotubes 8' deep but ran out of time (winter came fast) so I called a helical pier company and they did it the next week in one day. Very minimal damage to your building site compared to sonotubes.
IMG_1414.jpg
| 
IMG_1413.jpg
| 
IMG_1403.jpg
| 
IMG_3258.jpg
|
|
|
|
Brettny
Member
|
# Posted: 1 Jan 2020 07:51am
Reply
Well how much did they cost?
|
|
rpe
Member
|
# Posted: 1 Jan 2020 08:30pm
Reply
Those screw piers look great. I really like the plastic sleeve idea as well. Did the installers hit any rocks during installation? How is that handled?
|
|
Brettny
Member
|
# Posted: 2 Jan 2020 06:44am
Reply
Akfisher. By notching that one beam you have made it very weak. Are you going to protect the beams from the weather? There not PT correct?
|
|
fitzpatt
Member
|
# Posted: 2 Jan 2020 12:24pm
Reply
I have used the big foot system mentioned above with success. They are great to work with and easy to set rebar within. We dug trenches down below frost and placed our bigfoots within then backfilled. Hasn't budged.
|
|
AKfisher
Member
|
# Posted: 2 Jan 2020 01:05pm - Edited by: AKfisher
Reply
Quoting: Brettny Well how much did they cost?
I believe $400 a stick, plus a couple $100 for travel.
Quoting: rpe Did the installers hit any rocks during installation?
Yes, they hit some rock, they can bend the auger and post around rocks depending on size. They had problems with surface rocks (we had a foot of snow during install) and they hit some 6-8" rock that threw the auger off of trajectory, so the pier wasn't exactly where I wanted it.
Quoting: Brettny By notching that one beam you have made it very weak. Are you going to protect the beams from the weather? There not PT correct?
Not terribly worried about the half lap joint. The overhang in the picture showing the joint is the largest overhang, that is where the pier got nocked off point by a rock. The cabin logs used on those runs are 16-20' in length so the majority of weigh/stress is transferred a long ways away. They are not PT, the cabin has a 2.5' eave overhang and they sit 24" off the ground. They were also stained with oil.
Interestingly enough, during construction (dried in) we had the 7.2 earthquake last year, the only thing that happened to the cabin was a ladder fell over and my door needed to be reset. We installed it the week before and it wasn't finished. Oh and the wood stove shimmied a few inches to the right.
|
|
Aklogcabin
Member
|
# Posted: 3 Jan 2020 11:20am - Edited by: Aklogcabin
Reply
Akfisher, you are correct in stating that log built structures lock together . Distributing the load . And probably less prone for having the pilings jack because they weigh more. We also had no damage with the 7.2 quake. Two cans off of shelf.
rebar ,over hang is important. On our 16’ wide cabin I used 16’ long two x twelves . Twelve, twelve pitch. Gives me well over three feet of overhang. With the drip line further away I also have a dry walk way or storage along sides. And also keeps the snow that comes off the roof from piling near cabin.
I used some used cedar utility poles that I got from local utility company that were replaced by larger ones. Drilled down four feet plus. As deep as the two man hand held auger I rented would go. Wrapped some heavy felt paper around pilings backfilled with premix cement. Still would like to put a cap of cement around pilings that would slope away, just so surface water would not go down along pilings.
Our cabin is remote so the techniques i used worked for me. I even built ours with the floor four feet off the ground so the windows are high enough so the bears can’t reach them. As easy.
Good luck on your repairs. Remember you are building memories.
|
|
Brettny
Member
|
# Posted: 4 Jan 2020 03:49pm
Reply
You put your posts into the concrete?
|
|
Nickels
Member
|
# Posted: 3 Feb 2020 11:43am - Edited by: Nickels
Reply
I didn't read all the responses but I am building a cabin on a budget in VT on a cement pier foundation. (24x24) I rented a backhoe from the Home Depot to make my life easier. The frost line in my town is 5'. Had to dig 8 holes 5' for 12" Sono tubes. Sono tubes and rebar cost me about 300 - 400$. Rented a laser level for $50.00. I was going to get bags of concrete and mix it myself to save money. But found out using 80lbs bags would of came out to around 1200$. Had a cement truck come out and it was only 600$. Plus I saved my back! The cement brackets that I used wasn't cheap. Think they cost me 20 - 30$ each. So all said and done with rental it cost me about 2000$ give or take. A lot cheaper with out rental of backhoe. Its solid and I don't think it is going anywhere. (only time will tell) But many people up my way have been building cabins like this for years with no issues.
I looked into getting screw piles and I did get two quotes. One was like $3800 and the second was over 4k. I am building a cabin on a budget. So I felt like it would be a waste. This is kind of new foundation process is new to construction. Wonder if there is any long term problems with screw piles?
I have also built a large shed on cements blocks and it has been standing fine for over 6 years. I have noticed a bit of shifting but nothing major. But with the heaving I witness from the shed. It probably would of cause Sheetrock (if used) to crack or stress on the cabin by using blocks. Wouldn't last the test of time. My property is near a old cabin and it is falling apart from neglect and frost heaving from blocks. But its probably 40+ years old. So if you want to build something that doesn't require maintenance every few years. Stay away from blocks in cold places that have heavy frost.
|
|
Brettny
Member
|
# Posted: 3 Feb 2020 05:51pm
Reply
$1200 for 8 12in sono tubes. Did you use the concrete calculator right?
Even at 8ft of 12in sono tube and 8 tubes. That's roughly 90 80lb bags. HD has them for just under $4 each. Roughly $360 in concrete. I would still use son to tube like you did. This is what I'm planing on my 20x24 with 8ft porch and 18-22 12in tubes 5ft tall.
|
|
Nickels
Member
|
# Posted: 3 Feb 2020 08:44pm - Edited by: Nickels
Reply
I messed up, it should of read 12 8' holes and 12" tubes. If I remember correctly it was 6 yards of cement we used from the truck. 12 80lb bags per tube. 4.97 a bag x 12 bags = 59.64. 59.64 x12 = 715.61 plus TAX. Yeah I messed up but still saved. Home Depot would of charged another 75.00 for delivery. The cement was $540 plus a delivery charge of 60.00. But they only gave me 45min on site then it was $1.25 a min. He only let me use one shoot so I had to wheelbarrow it. I worked my butt off and he was out in under 45mins. I need to get my notes, I thought it cost more.  lol I will check my notes. I want to put together a detail cost list at the end of the build. I have a book at home with all the receipts. Here is a video of the delivery Start at 2:30. It was a hot that day! My videos get better.. lol URL lol I will check my notes. I want to put together a detail cost list at the end of the build. I have a book at home with all the receipts. Here is a video of the delivery Start at 2:30. It was a hot that day! My videos get better.. lol URL
|
|
|

