|
| Author |
Message |
bobrok
Member
|
# Posted: 14 Mar 2011 07:12pm
Reply
I have a project I am contemplating for this summer and I would like to throw it out for ideas.
Last year through Craigslist I acquired at a very good price several pressure treated wood wheelchair ramps that were being removed
from a house. Each ramp measures 39-1/2" wide of 1 x 6 treads x 16' long with each ramp having three 16 foot stringers of 2 x 6 PT, the third running exactly down the center. The ramp boards are all butted together so there are no gaps and they are screwed to the
stringers with what appear to be non-galvenized screws (lots of rust and they break off). I have 3 full 16 foot sections and one cut into two 8 foot lengths. They are very solid and heavy.
Our cabin is literally on the side of a mountain. We're flat at the top where the building sits and at the bottom there is a flat stretch
before the lake, but we have a 45 degree slope of perhaps 75 feet in between. I am thinking of building a few simple 16' lengths of stairs, no railings or anything, to assist us in getting up and down the hill as it sometimes can be rather slippery. It is wooded with a lot of ground cover and old fall-down/rot but essentially it's stable granite underneath. I don't want to build one continuous flight and I don't even want to connect the lengths together. I could create a small clearing area between lengths sort of like a landing, and this would just be ground.
What would be the best and easiest (not necessarily the same) way to convert these ramps into stairs? I've been thinking of cutting them down the middle. That would make each 16' ramp into two 16' stair lengths of roughly 20" wide which I think is adequate. I already have a few additional 2 x 6 unused stringer lengths since I'd need 4 stringers where I now have only three on each ramp. I don't really want or need a 40" wide stairway and I was thinking that the 1/2 width stairs would be lighter, more portable, and I could take them up during the winters or reposition them as necessary.
I'm thinking very portable here. Just staking them to the ground with rebar and clamps and then I could reposition them if need be. They will not get a lot of extreme use. Need opinions and suggestions for holding them to the ground.
Obviously I have to deconstruct and rebuild the ramps into stairs. Do you think it better to notch the 2 x 6 stringers or cut wood wedges to mount the treads on the stringers (remember the 45 degree slope)? I don't fancy measuring all those notches and I think it would weaken the stringer. Have I overlooked another way to do this?
I appreciate all suggestions. Thanks.
|
|
Gary O
Member
|
# Posted: 14 Mar 2011 09:04pm
Reply
Dang Bob, that's a lot of words.
Got photos?
My first thought would be 40" isn't so terribly wide in regard to passing each other on the way up and down.
It'd be quite an education to see how Mtndon would approach it.
|
|
MtnDon
Member
|
# Posted: 15 Mar 2011 12:19am - Edited by: MtnDon
Reply
If some screws are rusted and some broken I'd first take it all apart and make a pile of lumber. Deck screws are hardened to resist tearing or stripping out the drive slots or sockets. The hardening makes them brittle. Rather than bend if there is wood movement the screw shanks snap; occasionally at inconvenient times. I have seen lots of this happen. That's why all the playground structures I designed and built when I was in that line of business, used hot dipped galvanized lag screws or through bolts to secure everything. I'd rather use hot dipped galvanized ring shank or spiral shank nails to secure treads, railings and the like on a forest trail than deck screws. The hot dip makes them about as rust resistant as you can get (short of stainless steel). The deformed shanks resist pull out and the slow lift out or rising of a nail with wood that goes through wetting and drying, expansion and contracting cycles. The nail shank will bend rather than break when subjected to shearing forces. That's also why houses should have their framing nailed rather than screwed. If you use screws for structural purposes, sometimes you are scr----.
If there is solid granite underneath everything I would remove everything down to nice solid rock. Then I'd use the PT lumber along with whatever timbers would be needed to bridge the difficult parts; gaps, rises and so on. Leave dirt that would be bridged. That might involve using a big hammer and star drill or a good battery powered rotary hammer drill to make some anchors for the wood parts.
Concrete (quikrete is handy, though heavy when it has to be carted uphill) can also be handy for stepping/bridging.
Someplace around here I have a forest service trail manual. I'll see if I can find a link one day soon.
Have a look around for any forest service trails covering similar ground. Take a hike and see how they did it. They tend to do good jobs that last a while.
Note the way water wants to flow and work with that in mind. Water wins in the end.
And hand grabs or rails at difficult points become more and more handy after you added up a good number of years. Also nice in the rain/snow.
|
|
MtnDon
Member
|
# Posted: 15 Mar 2011 08:22am
Reply
Eureka! I found it!
The Trail Construction and Maintenance Notebook, 2007 can be found right HERE. From that page you can read it online, or download a 300 dpi or a 72 dpi PDF version. Be warned the PDF files are large; 37 MB for the 300 dpi version.
As a bonus here's a link to an index of many other forest service publications.
Happy Trails to you....
|
|
bobrok
Member
|
# Posted: 15 Mar 2011 05:18pm
Reply
Thank you, MtnDon!
Once again you are here to offer us the wisdom of your experience. You're OK!
There is a lot of info to read here so I'll probably be getting back to you at some point (on both this and the solar we discussed some time ago...haven't forgotten that).
I'm trying to not over-engineer this project and even though I have scouted out and (somewhere) have photos of earthen wood-framed steps that would be perfect I don't really think I want to go to even that much trouble. My main requirement here is they need to be moveable just in case I need to, well, move them someday. I want functionality and portability. Thus the narrower width.
Can you tell me what are your thoughts on notching vs. wedging the stringers to mount treads?
Bear in mind also here that these will not be traditional stairs in the sense of 6" deep treads on 7-1/2" risers. I'm thinking more like no risers at all and about a foot or so height between treads...very minimal in structure and in usage.
You are obviously correct in that I plan to take my ramps down to material and rebuild. I couldn't pass on the opportunity given the price I paid vs. buying materials. Whatever ramps I don't use for the stairs will be a deck at the base of the hill and a dock for the canoe.
Thanks, again, MtnDon.
|
|
MtnDon
Member
|
# Posted: 15 Mar 2011 06:05pm
Reply
Actually there's not a lot about stairs in the trail guide, mostly it's about laying out trail elevations changes using rocks, logs and timbers.
As for stringers... As long as the wood is solid, no large knots in the wrong places cut stringers work well. The important measurement is to never make the throat measurement less than 5 inches. The drawing attached has the throat at 5 inches as an illustration to the point.
Not notching and using cleats fastened to the insides of the stringers makes for a very solid stringer. The down side is that the stair tread is then supported solely by the hardware in shear. That's okay as long as the hardware is up to the task and can not easily pull out. There's also the disadvantage of the fastener through the tread to the cleat being in the last inch or so of the cut ends of the treads. So it is a trade off.
Angle iron cleats secured with bolts work well.
A solid, but more involved stringer/tread could be made from a mortise and tenon technique. Cut a slot in the stringers. Cut the tread ends down to form a tenon that slips through the slot. Secure with large nails or drill a hole in the tread and hammer a wedge in. No pictures, but I can do a sketch if that is not clear.
Note: If the wood treads are likely to be wet and slippery there are self adhesive tread strips made to help with that. Look like sandpaper. I've used J weight cloth backed 80 grit sandpaper strips. Glue them down with a thin coat of epoxy. I have some here that must be 15 years old now.
stringer throat, min 5 inches
|  |  |  |
|
|
bobrok
Member
|
# Posted: 15 Mar 2011 06:51pm
Reply
Quoting: MtnDon never make the throat measurement less than 5 inches
Now you have me wondering if I have 2 x 6 or 2 x 8 stringers. Haven't had an opportunity to get up all winter and, being old and all that stuff, I tend to forget things. Will have to check on this.
At any rate, and even with 8" lumber, maintaining a 5" throat will leave an awful lot of unsupported overhang to those 1 x 6 treads and I think bordering on danger of collapsing. I am liking the cleats more and more. In addition the backs of the treads will rest on the ground for the additional support. As needed I can backfill underneath or even use large rocks to support the tread centers and forward edges. Low-tech.
Quoting: MtnDon mortise and tenon technique...I can do a sketch if that is not clear.
I know exactly what you are talking about here, but that is way more work than I want to get involved with for this project. Good idea though.
Quoting: MtnDon tread strips
My idea exactly.
Once again, thank you, sir.
|
|
MtnDon
Member
|
# Posted: 15 Mar 2011 08:22pm
Reply
Bobrok. Sorry but I should have mentioned that 2x12 is the size I'd use to cut stringers from. Ten inch might work for treads that are not very deep. For some reason it never occurred to me that anything less than a 2x12 would be used. Definitely go the cleat way.
|
|
|
bobrok
Member
|
# Posted: 16 Mar 2011 10:06am - Edited by: bobrok
Reply
Quoting: MtnDon Definitely go the cleat way
I presume something like these steel cleats (or angle iron as you suggested) would be the #1 choice for strength, but I'm thinking of the wooden cleat method. I'm going to space my treads farther apart than what is the norm. This will keep down the weight, time of construction, etc. I can even excavate out slightly beneath each tread to accommodate for ground and/or step clearance. I'm thinking this is easy and will do what I need it to do.
Cabinbuilder:
BTW: I used Google to find an image of stairs with wood cleats to use for my illustration and this image posted by KCCabin last fall on your forum was my first find! You're ranked!!!
KCCabin: Acknowledgements to you also for borrowing your illustration! I had forgotten about that thread.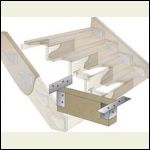
hardware cleats
| 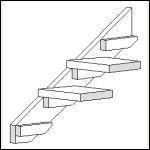
wood cleats
|  |  |
|
|
Just
Member
|
# Posted: 16 Mar 2011 10:32am
Reply
I built this one in 2002 the hill was on a bluff over looking lake huron .I used 2x10 for it all , with wooden cleats and 16 ft stringers ,22 in wide treads with a wooden hand rail on one side [you need that if there are any kids or old guys like me around]
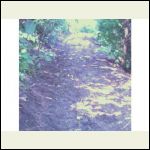
the bluff had a face length 300 hundred ft . with 72 ft of vertical drop. i built it with a series of 16 ft sections and 250 ft of lateral paths .. the most difficult part was finding areas steep enough to but the steps and mantain a 10 in tread with a 8 in rise ..prior this we could not us the beach..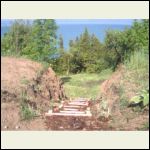
77 steps total
| 
250 ft of path
| 
I miss this place
|  |
|
|
bobrok
Member
|
# Posted: 17 Mar 2011 02:33pm
Reply
just,
How did you fasten your sections to the ground, may I ask?
|
|
Just
Member
|
# Posted: 17 Mar 2011 06:01pm
Reply
my soil type was heavy clay strewin with large rocks , i first temporarily fastened the two stringers together top and bottom 22in apart then used a 36 in ceder log 8 in in diameter at each end to level and support the ends,, then i drove in stakes along each side as deep as i could and nailed them to the stringers,[3 or 4] on each side. then you can lay out your steps with a square and a level. to fit the slope of each 16 ft section , they will likly be all different!!then nail on your cleats and steps . i used 3.5 in galvinsed nails and bent them over to lock them in . the steps were strong and sturdy..
|
|
bobrok
Member
|
# Posted: 17 Mar 2011 08:23pm
Reply
Dang, that's almost exactly how I was planning to build my steps but to be honest I was afraid I'd get made fun of for not prefabing them first and then installing them. It sounds as if you've got a very similar situation to mine (slope, length, etc) and you have to "run with the land".
Now that I know this has been done I'm not so afraid of trying it out. Glad to hear that they came sturdy for you, just.
BTW, I live near the shore of Lake Ontario and that photo looks like it could have been taken here as well. Drumlins, bluffs and escarpments, all left over from the last glacial period.
Thanks so much for sharing.
bob
|
|
Just
Member
|
# Posted: 17 Mar 2011 08:47pm
Reply
i'v sailed out of kingston east the bluffs there are impresive!! we have sold the place on lake huron now have one on lake erie on beach level no need for steps, but i miss huron .
good luck!!
|
|
PlicketyCat
Member
|
# Posted: 18 Mar 2011 07:24pm
Reply
For simplicity, I went with wooden cleated stairs on our paths. It's just way too easy to mess up a notch in a stringer and completely jack your staircase up... and waste your lumber. If you install your cleats and treads with deck screws, any little bloopers are pretty easy to correct.
Notched -stringer steps are great for looks and strength, but not needed for utility steps, especially if less than 2' wide. I laid out the stringer just like I was going to cut it, with a deep tread and a riser, but then just installed cleats below the line and left of the risers so they're open stairs.
Making cleated steps also lets you fudge the depth of your stringers if the treads end up being just a tiny bit longer than the cross section of the stringer at the angle you need. You just make the cleat longer and have it stick out the front of the stringer to accommodate the tread depth if needed and the entire tread is still supported (unlike free-hanging a tread off the front of a notched stringer).
I anchored my case using heavy eye bolts in the stringers (about every 2 feet), and drove about 18" of rebar down through them. I bent the top couple inches of the rebar over into an "L" above the eye bolt so the case can't slip up off the anchors. I can use a long prybar to yank the spike out of the ground if I need to move it later.
|
|
bobrok
Member
|
# Posted: 18 Mar 2011 08:56pm
Reply
Thanks PlicketyCat. That only firms my resolve to use this method to build my stairs. Appreciate your input.
|
|
Gary O
Member
|
# Posted: 18 Mar 2011 10:51pm - Edited by: Gary O
Reply
Glad to see you got a solution, bob.
We had a place with a steep grade to hike up to the cabin.
Like you mention, the slope was a bit haphazard, so we just carved steps into the earth where needed, and shored them up with PT boards. Pipe works pretty good in staking them in place.
We didn't disturb the terrain, and the steps fit well with the treed slope.
And minimal cash outlay.
|
|
bobrok
Member
|
# Posted: 18 Mar 2011 11:01pm
Reply
Yeah I figure the less work I got to do here the more likely it'll ever git done. Now I have time for more projects...if I ever git up there. Jeez I miss that place.
|
|
bobrok
Member
|
# Posted: 4 May 2012 11:00pm
Reply
Holy Thread Resurrection!
Well, its only a year later than planned, but here's my stairs. I used much the same method as Just did above.
49 steps, I think; I lost count after a while but that's close enough.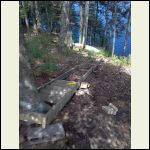
In the beginning
| 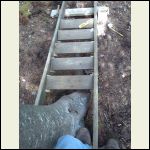
Looking from the top
| 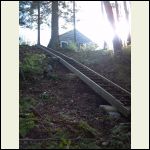
Looking from the bottom
| 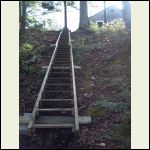
Stairway to Heaven (think Led Zep)
|
|
|
sparky1
Member
|
# Posted: 5 May 2012 07:41am
Reply
Question---;
is the tree @ the top step--always going to be there?.
sparky1.
great job-of doing Steps by the way.
|
|
bobrok
Member
|
# Posted: 6 May 2012 03:36pm
Reply
Thanks sparky1. Honestly I think that tree will be there long after both me and the steps are gone. If I see trouble coming I will be able to fabricate some other method.
|
|
Just
Member
|
# Posted: 6 May 2012 09:19pm
Reply
they look great bob, cograts
|
|
|

