|
| Author |
Message |
cluttonfred
Member
|
# Posted: 25 Jun 2019 10:00am - Edited by: cluttonfred
Reply
Does anyone one have a good go-to reference (book, web site, etc.) that details how to build simple windows and doors for cabins, tiny houses, etc. I don't mean how to install windows, I mean how to fabricate simple windows from scratch that won't leak. It may be something aimed more at sheds or barns that would be good enough for our purposes.
On a related note, I have seen those interior storm windows that just press in the jamb and are held in by friction because they are basically edged in weatherstripping. It seems to me that a simple single-pane glass window with a window insert of thin plastic (or even weatherstripping film) in a light frame edged in foam tape would be pretty good even in the cold and much cheaper than factory windows.
Cheers,
Matthew
|
|
Brettny
Member
|
# Posted: 25 Jun 2019 12:24pm
Reply
Commercialy made windows are so cheap or free used why would you want to make them?
I just picked up 6 vinyl sliders from the side of the road 2 weeks ago.
|
|
cluttonfred
Member
|
# Posted: 25 Jun 2019 02:06pm
Reply
Well....because it's fun to build things and nice to know that you can easily repair or replace something because you build it yourself from common materials in the first place.
Quoting: Brettny Commercialy made windows are so cheap or free used why would you want to make them?
|
|
Princelake
Member
|
# Posted: 25 Jun 2019 09:28pm
Reply
Pick up some glass or thermal panes cut a thick jamb like from 2x4 or 2x6 to fit around the glass leaving about 1/4" big. Cut cove or quarter rounds for each side. Silicone and nail and ta da you got a window. That's basically what regular windows are just out of vinyl
|
|
wvcookieman
Member
|
# Posted: 28 Jun 2019 02:37pm - Edited by: wvcookieman
Reply
Built this bathroom door for about 120 dollars. Only thing missing is the half moon that will be added. The thing is I built it from scratch! A 6 panel unfinished pre hung door from the box store was 200 bucks plus. Now granted I purchased the material for this door from said box store...My cabin is a labor of love and this door and everything else we build will always be a part of that love and make our cabin a special place for my family and friends
|
|
NorthRick
Member
|
# Posted: 29 Jun 2019 12:30pm
Reply
I don't have a reference to a book but I don't think you need one. Get a miter saw, a table saw, and a set of dado blades. Then:
Assemble a wood frame the size that you want the window to be with a rabbit cut into the frame on the inside of the frame.
Have a hardware store or window shop cut a sheet of glass about a 1/16" smaller than the inside of your frame.
Get some glazing compound (putty) and glazier's points.
Set the glass inside the frame and pin it in place with the glazier's points.
Add the putty and smooth it from the glass to the outside edge of the frame.
Whala! a window.
This may help in visualizing what I'm trying to describe:
https://www.popularmechanics.com/home/interior-projects/how-to/a8043/how-to-reglaze-a -window/
|
|
Steve_S
Member
|
# Posted: 29 Jun 2019 12:51pm
Reply
Ohhh I hafta chime in.
I've done some windows & doors and learned some hard lessons too. The condition of the wood your using, how dry it is and the type it is (how fast it will absorb moisture, depends on species) and a few other items will affect the end result.
Good instruction WILL cover such details as they are essential. Different wood behaves differently depending on environmental conditions. Mixing types of wood can result in some pretty wild warps and worse.
|
|
cluttonfred
Member
|
# Posted: 30 Jun 2019 01:52pm
Reply
Thanks, all, for the tips.
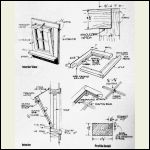
I found a nice design for simple hopper windows (bottom hinge, top latch, opens inward) in Building Small: Sustainable Designs for Tiny Houses & Backyard Buildings by David and Jeanie Stiles. That seems like a good option for smaller windows where the inward movement won’t be a problem, plus the bug screens can be fixed in place.
I think I could figure out how to adapt that design to awning (top hinged) or casement (side hinged) with a little head scratching.
I am still looking for both interior and exterior doors, something between slapping together some siding and Z- or X-bracing and a fine woodworking project.
|
|
|
Absolutely
Member
|
# Posted: 30 Jun 2019 04:12pm - Edited by: Absolutely
Reply
If it was me I'd go with the rail and stile type method. You'd need a solid router table and a strong router plus the appropriate bits. Using 1" or thicker stock you could craft very nice doors and windows.URL
|
|
Malamute
Member
|
# Posted: 30 Jun 2019 10:29pm - Edited by: Malamute
Reply
Ive used barn sash windows in my cabins, they are the simple wood frame with multi-light window panes. Theyve been from different makers, so arent all the same over time. Some arent easy to replace glass in, others are, with wood strips holding the glass in from the inside. If you want to make your own, you could buy one barn sash then copy it. Check different companies, prices can vary wildly.
I make the rough jamb/frame the size I need for the windows, hinge them at the top, hooks and eyes at the bottom, they swing outwards. I prop them open with a stick. I had screen made that go inside the stop pieces, they have a spring bolt on each side, i drill a hole in the jamb for the spring bolts.
I make my doors, entry doors from rough cut 2x material, inside doors from 1x tongue and groove. I make sliding latched from metal strap formed to duplicate wagon box bed extenders, and an oak bolt with peg handle. The rough cut boards, I measure the frame, divide by the number of boards, and rip them so they are all the same width. I make a small fixed window in the center board, and rip a spline groove with a stack of cheap blades used as a dado blade, and spline the meeting edges, they are caulked also. A spline is ripped in the table saw to match the grooves. I rip the Z brace material to a width that looks good with the door boards.
I bolt them together with 3/8" carriage bolts, I black the hardware with birchwood casey super blue cold blue for guns. It ruins the stuff when used, so do it all at once, and toss the liquid that was used. I use a butter tub to dip the exposed ends of the hardware in, and just dump washers and square nuts in to blacken. I bevel the edges of the hardware store T hinges and paint them flat black. The holes need to be drilled out for the 3/9" bolts. I think I used 5/16 bolts on the interior doors.
I use wood concrete float handles for door handles. Set them right below the slider bolt handle and use your thumb to move the slider, makes for easy one hand operation of the door latch.
Oil the hinges now and then, the doors are heavy and are hard on the hinges if not oiled once in a while.
A couple pictures may tell more. First two were in a place I built to sell, last one is home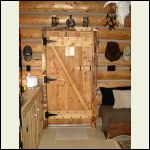
Exterior door
| 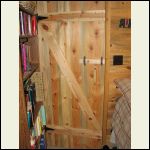
Interior door
| 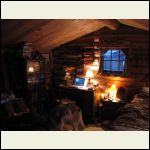
barn sash window in cabin
|  |
|
|
cluttonfred
Member
|
# Posted: 1 Jul 2019 07:23am
Reply
Thanks again, all. That looks like great work, Malamute.
Here are some pics to illustrate the Stiles hopper window setup that I was describing.
Question for those with more experience...with glass held in like this by retaining strips, is it necessary to use glazing putty or caulk on the exterior of the glass?
It seems to me like some sort of thin rubber strip between the glass and the rabbet in the sash might do the job.
Cheers,
Matthew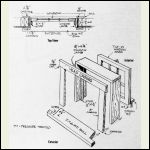
Stiles window 1
| 
Stiles window 2
|  |  |
|
|
Malamute
Member
|
# Posted: 1 Jul 2019 11:02am
Reply
The barn sashes seem like they generally have a thin caulk line on the outside of the glass where its in the wood, I do caulk to seal replacement glass in place before putting the retaining strips in to keep air and water out.
I use the compressible rubber bulb weatherseal for the sashes to frame. They have stickum, I use copper weatherstrip nails to hold them longer term after they are in place and held by the stickum.
Keep in mind that weatherstrip on a moving door or window may need to be on the edge instead of the face for the side that has the hinges. The movement on the face sometimes rubs the weatherstrip off quickly.
|
|
|

