|
| Author |
Message |
jayinwww
Member
|
# Posted: 8 Nov 2015 09:31pm - Edited by: jayinwww
Reply
First of all I need
a. sturdy, but not a permanent structure.
b. off the ground high enough so I get can underneath and do level adjustments over time.
Left picture below...
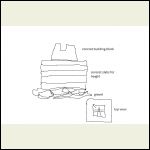
My only question is that picture of the wood I'd like to know the sizes and how they put it together, nails or screws etc. It looks very sturdy, that cut away concrete building block I would be putting it on flat concrete slabs stacked on top of each other as you can see in the detail bottom right picture. I just don't know if it would remain sturdy? or would it move around?
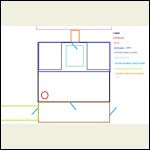
Right picture below...
In that drawing picture below you can see I get my height by using concrete slabs. and I don't need to use vertical 4x4 posts that could become unstable.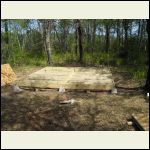
Untitled1.png
| 
Untitled4.png
|  |  |
|
|
cabingal3
Member
|
# Posted: 8 Nov 2015 09:34pm
Reply
perfect...
|
|
Don_P
Member
|
# Posted: 8 Nov 2015 11:12pm
Reply
Why slabs, is this recycled material? If the pier formed is as wide as it is tall it sure would take a lot to overturn it. If the slabs are mortared together that would restrain sliding. An anchor through the pier block and deep into the stack of slabs attached to the girder would restrain uplift. I think I'd form and pout the pier block onsite with a post saddle incorporated into the pour, stiffening that part up.
|
|
OutdoorFanatic
Member
|
# Posted: 9 Nov 2015 06:33am - Edited by: OutdoorFanatic
Reply
I have the same problem up here OP. We get 10' or more snow every winter. So I just dug six holes about 2' deep, filled them with quickcrete concrete and stacked concrete block. Then filled them with 4000lb quickcrete. Blocks were $1.35ea and quickcrete was $3.90 ea 80lb bag. One bag fills a 6x6x48" hole. (each footing 4' high with 3 bags for the hole, 12 blocks and 4 bags for filling blocks will cost you less than $50.)
My deck is about 5 feet off the ground now on 3 corners and about 3' high on one corner.
|
|
Don_P
Member
|
# Posted: 9 Nov 2015 08:12am
Reply
You ended up with unbraced piers ~8" thick x 7' tall? I'll push on yours, hook your truck to mine  . .
|
|
jayinwww
Member
|
# Posted: 9 Nov 2015 09:02am
Reply
The reason I wanted to do slabs was so I could raise and lower it with shims when needed. We get very cold winters here so I just would like to get under the cabin and check to make sure everything is level. I also worry about sliding as well. Maybe I can look around for concrete blocks that interlock maybe.
Quoting: OutdoorFanatic I have the same problem up here OP. We get 10' or more snow every winter. So I just dug six holes about 2' deep, filled them with quickcrete concrete and stacked concrete block. Then filled them with 4000lb quickcrete. Blocks were $1.35ea and quickcrete was $3.90 ea 80lb bag. One bag fills a 6x6x48" hole. (each footing 4' high with 3 bags for the hole, 12 blocks and 4 bags for filling blocks will cost you less than $50.)My deck is about 5 feet off the ground now on 3 corners and about 3' high on one corner
You don't by chance have a picture of this do you? We get cold winters as well. And I know if I poured concrete 2 feet in the ground it would move around when the ground froze. But I believe just up and down. As long as I can shim it every year when needed that seems like it would work for me.
|
|
fitzpatt
Member
|
# Posted: 9 Nov 2015 02:12pm - Edited by: fitzpatt
Reply
Have you considered adjustable supports? They would make raising and lowering simple and provide you with the height. I have used them on a few structures with great success.
|
|
Rowjr
Member
|
# Posted: 9 Nov 2015 05:30pm
Reply
I can dig it
|
|
|
OutdoorFanatic
Member
|
# Posted: 9 Nov 2015 07:24pm - Edited by: OutdoorFanatic
Reply
Quoting: jayinwww You don't by chance have a picture of this do you? We get cold winters as well. And I know if I poured concrete 2 feet in the ground it would move around when the ground froze. But I believe just up and down. As long as I can shim it every year when needed that seems like it would work for me.
I dont have a picture, just the video in the "I dont mind working" thread. You can see the piers about 1/2 way thru the vid.
Yeah, I thought the same thing, they might move around a bit in the winter frost but so what. Most stuff moves around up here in the winter but settles back in place in the spring. I have a door in my house that I have never been able to shut in the winter but clicks shut like a cabinet all summer long. Mine are all tied together with beams so the whole building will have to move and if it does it wont be enough to worry about..
|
|
jayinwww
Member
|
# Posted: 9 Nov 2015 09:47pm - Edited by: jayinwww
Reply
Quoting: fitzpatt Have you considered adjustable supports? They would make raising and lowering simple and provide you with the height. I have used them on a few structures with great success. Capture.JPG Capture2.JPG
I have not been able to figure out a way to build on top of vertical 4x4's that would be stable. I love the idea, but I need something solid, but easy to build. Do you have any pictures of how you made your foundation base using those? I'd like to see it.
Quoting: OutdoorFanatic I dont have a picture, just the video in the "I dont mind working" thread. You can see the piers about 1/2 way thru the vid.
I watched your video and sub'd. Looks great what you did there!
Quoting: OutdoorFanatic Yeah, I thought the same thing, they might move around a bit in the winter frost but so what. Most stuff moves around up here in the winter but settles back in place in the spring. I have a door in my house that I have never been able to shut in the winter but clicks shut like a cabinet all summer long. Mine are all tied together with beams so the whole building will have to move and if it does it wont be enough to worry about..
The thing is, it's not uncommon for near plus 40 degrees in summer and - 40+ degrees in winter where I am. Many cabins feel like your walking in a fun house after 3 years. I want to be able to avoid at all cost. I only need to be 18 inches off the ground so I can get underneath.
I wish there was easy interlocking concrete slabs made for this type of idea. Maybe there is?
|
|
OutdoorFanatic
Member
|
# Posted: 9 Nov 2015 10:10pm - Edited by: OutdoorFanatic
Reply
Quoting: jayinwww I wish there was easy interlocking concrete slabs made for this type of idea. Maybe there is?
I'm sure you can make those yourself. Just make a 2x6 frame and make one slab male and the next female. Put a key in the middle of one and a plug in the middle of the other one.
Pick up something like those 2' metal stars at walmart and use it as a key form and plug.
Fill it with cement and put it on one slab so that when you take it off theres a cement star on it.
Then sink it into the next slab and take it out after the slab sets up a bit.
Wont be perfect but it will stop them from sliding around.
Heck, you could even use a piece of tupperware.
If you want them to be real strong put some steel in them. Pick up some cheap steel fence and cut small squares out of it.
Just a thought!
|
|
jayinwww
Member
|
# Posted: 9 Nov 2015 10:20pm - Edited by: jayinwww
Reply
Quoting: OutdoorFanatic I'm sure you can make those yourself. Just make a 2x6 frame and make one slab male and the next female. Put a key in the middle of one and a plug in the middle of the other one. Pick up something like those 2' metal stars at walmart and use it as a key form and plug. Fill it with cement and put it on one slab so that when you take it off theres a cement star on it. Then sink it into the next slab and take it out after the slab sets up a bit. Wont be perfect but it will stop them from sliding around. Heck, you could even use a piece of tupperware. If you want them to be real strong put some steel in them. Pick up some cheap steel fence and cut small squares out of it. Just a thought!
The wife and I talked about your idea, it is a great idea and we were searching around the internet and came across this picture. I wonder if since they poured concrete in long sections. Maybe the frost will have a hard time moving a footing bed like this since it's a full square.
It's called seattle passive house placed footing. A nice ring to it. And cheaper than pouring a full slab.
|
|
Don_P
Member
|
# Posted: 9 Nov 2015 11:19pm
Reply
That looks to be a conventional strip footing, typically a crawlspace or basement wall is built on that. The walls then brace the structure above.
Log homes often use adjustable hardware for settlement, also look at how things like light poles and large signs are attached to the concrete with leveling plates and bolts. I'd pour solid and adjust under the girder. It would also be at least as broad as tall at the base. Notice the size of those light pole piers.
|
|
Julie2Oregon
Member
|
# Posted: 10 Nov 2015 01:42am
Reply
I may be way offbase but why not a concrete block perimeter foundation with rebar? You could do a decent crawlspace with a "trapdoor" inside the cabin so you have access underneath the cabin. That's what I'm planning to do.
|
|
OutdoorFanatic
Member
|
# Posted: 10 Nov 2015 06:11am
Reply
If you want to use that much crete then just do a 4" floating slab (Alaskan Slab) and lay some block up on it as piers or a complete wall.
Sounds like a good project you got going there.
|
|
beachman
Member
|
# Posted: 10 Nov 2015 06:18am
Reply
We used cement blocks with no rebar, just dry. We scratched the surface of the land and put down large patio blocks for a base. We get about the same temperature swings but the land is sandy and well draining. I am sure that over time the whole place will move a bit but so far (4 years) so good. Either scratch the surface or go deep - below the frost line with screw piles or cement posts. If you go with cement - make sure they have a bulb at the bottom or are tapered. Frost is one of the most powerful forces around.
|
|
Don_P
Member
|
# Posted: 10 Nov 2015 08:39am
Reply
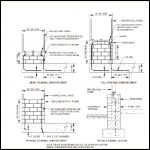
I'm late for a date laying floor. A couple of pics from the codebook attached,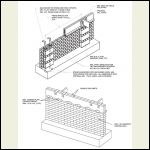
FIGURER404_1_5_1.jpg
| 
IRC_CH6603_Bitmap_.jpg
|  |  |
|
|
jayinwww
Member
|
# Posted: 10 Nov 2015 08:54am
Reply
Quoting: beachman We used cement blocks with no rebar, just dry. We scratched the surface of the land and put down large patio blocks for a base. We get about the same temperature swings but the land is sandy and well draining. I am sure that over time the whole place will move a bit but so far (4 years) so good. Either scratch the surface or go deep - below the frost line with screw piles or cement posts. If you go with cement - make sure they have a bulb at the bottom or are tapered. Frost is one of the most powerful forces around.
How high did you stack concrete blocks? Have you had any issues with it sliding?
|
|
JJHess
Member
|
# Posted: 10 Nov 2015 04:34pm
Reply
Jay, where are you located?
Do you want to have to continually adjust to keep things level? Why not just build it right the first time an avoid having to make annual adjustments?
Just curious.
|
|
jayinwww
Member
|
# Posted: 10 Nov 2015 04:50pm - Edited by: jayinwww
Reply
Quoting: JJHess Jay, where are you located?Do you want to have to continually adjust to keep things level? Why not just build it right the first time an avoid having to make annual adjustments?Just curious.
I live in Northern Alberta. In order to property build it, I would have to pour concrete 7+ feet below ground (Past the frost line.). I not even sure if they have an auger that can dig down that far. I'm thinking the cost alone will be equal to the cost of the cabin materials itself...
I guess I could do concrete piles with adjustable supports. And not dig down so far. It would just take more work as in I will have to remove a lot of tree roots/stumbs etc in that area. I was just thinking concrete slabs if it doesn't slide. It would be quick, easy, and cheaper.
|
|
beachman
Member
|
# Posted: 10 Nov 2015 04:50pm
Reply
No sliding yet and blocks are at least 3ft at the front and about 1.5 to 2 ft on average. Our old camp was laid out on rocks and stones held together with cement. After about 70 years, we had to level it up. The land was a little more level there but I think the newer place will go at least 20 years before a little adjusting.
|
|
jayinwww
Member
|
# Posted: 10 Nov 2015 10:21pm
Reply
Quoting: beachman No sliding yet and blocks are at least 3ft at the front and about 1.5 to 2 ft on average. Our old camp was laid out on rocks and stones held together with cement. After about 70 years, we had to level it up. The land was a little more level there but I think the newer place will go at least 20 years before a little adjusting.
Well that's good to hear. Maybe I will just stick to my original idea lol. 5 feet apart in every direction should be ok.
|
|
Julie2Oregon
Member
|
# Posted: 10 Nov 2015 10:29pm
Reply
Don_P, Is that a pier with curtain wall foundation you posted?
|
|
Don_P
Member
|
# Posted: 10 Nov 2015 11:10pm
Reply
The left hand one is. This is the accompanying text from my state code;
R404.1.5.3 Pier and curtain wall foundations.
Use of pier and curtain wall foundations shall be permitted to support light-frame construction not more than two stories in height, provided the following requirements are met:
1. All load-bearing walls shall be placed on continuous concrete footings placed integrally with the exterior wall footings.
2. The minimum actual thickness of a load-bearing masonry wall shall be not less than 4 inches (102 mm) nominal or 33/8 inches (92 mm) actual thickness, and shall be bonded integrally with piers spaced in accordance with Section R606.9.
3. Piers shall be constructed in accordance with Section R606.6 and Section R606.6.1, and shall be bonded into the load-bearing masonry wall in accordance with Section R608.1.1 or R608.1.1.2.
4. The maximum height of a 4-inch (102 mm) load-bearing masonry foundation wall supporting wood-frame walls and floors shall not be more than 4 feet (1219 mm).
5. Anchorage shall be in accordance with Section R403.1.6, Figure R404.1.5(1), or as specified by engineered design accepted by the building official.
6. The unbalanced fill for 4-inch (102 mm) foundation walls shall not exceed 24 inches (610 mm) for solid masonry or 12 inches (305 mm) for hollow masonry.
7. In Seismic Design Categories D0, D1 and D2, prescriptive reinforcement shall be provided in the horizontal and vertical direction. Provide minimum horizontal joint reinforcement of two No. 9 gage wires spaced not less than 6 inches (152 mm) or one 1/4 inch (6.4 mm) diameter wire at 10 inches (254 mm) on center vertically. Provide minimum vertical reinforcement of one No. 4 bar at 48 inches (1220 mm) on center horizontally grouted in place.
Link to that chapter;
http://codes.iccsafe.org/app/book/content/VA/2012_VA_Residential_HTML/Chapter%204.htm l
|
|
Julie2Oregon
Member
|
# Posted: 11 Nov 2015 07:47pm
Reply
Thanks! I thought it was! I ran into curtain walls when I was poring through foundation and code info. It kind of influenced me toward a block perimeter with footers and piers.
|
|
Don_P
Member
|
# Posted: 11 Nov 2015 10:37pm
Reply
A pier and curtain wall is the minimum prescriptive masonry foundation. Piers on a continuous footing that joins everything together on the same snowshoe of concrete. The piers are firmly braced by walls short enough and just thick enough not to buckle if called upon to brace the piers. That's the reason for those limits on the masonry curtain wall for that 4" thickness. I was specific in mentioning that the section was from my state's code. It is not a good seismic foundation.
A "permanent wood foundation" is another to consider. Treated lumber and plywood walls on a gravel footing. The walls provide the resistance to gravity, sliding, uplift and overturning (your considerations in the design)
If it's small and doesn't have to meet code, a well retained deep level base of gravel, over plastic, over a domed naturally well drained area, will keep the water out of the soil under you. Dry soil can't heave. A log cabin lapped layup of 6x6's would provide bearing and a firm foundation under you. Mobile home type twist in anchors would restrain the other 3. Basically, a very short permanent wood foundation that ignores frost rules.
|
|
jayinwww
Member
|
# Posted: 21 Nov 2015 11:54pm
Reply
Well, it's the weekend people... I had planned to cut many trees for the road leading to my new cabin spot as well as cutting the trees for the cabin area itself...
I have a stihl chainsaw MS250 but the chain finally broke. 25 cords of wood later. So I am sad because no store is open on Sunday where I can get a new chain lol. My fault, I should have bough an extra chain! Monday I will be there first thing and then head to my property to smash trees.
Anyways I thought I would share my MS paint layout of what I am planning to do. I will add before and after pictures to this thread of what it looks like before I clear out all the trees and after the trees have been cleared out as well. Either way I will keep updating this thread until my floor base is finished.
My Ideas!
1. Cabin is just one empty room.
The cabin will be a place to chill and sleep. It will be able to sleep 8 in beds and more on the floor if needed. I am not building a kitchen or bathroom in the cabin because I am making a wooden corridor built to the cabin that will connect to our RV. The RV will have velcro stickers all around the door so I can connect with insulated tarp for that inch or so space between the corridor and rv. It will be air tight but as you can see in the pictures the cabin door opens to the inside of the cabin. I believe this to be the best solution because if I want to down the road I can buy another RV at auction and it would be like replacing my whole kitchen, bathroom shower etc in one shot.
2. Facing south.
I faced the cabin south for the most sunlight and the deck area you can still see the sunset through the trees.
3. My rotating wood pile is for using old wood first and new wood last. I cut a lot of firewood as it is a hobby of mine. I have already made many quad trails in the bush so they will all connect to that south trail.
4. My sea can is off behind some trees. I never leave a lot of expensive things at my property but I do have some tools in my sea can, so I just have it out of sight from the cabin hoping that if someone does want to steal something, they won't find the sea can.
5. Round about.
The road will have two round about driving areas. I think this is convenient and worth it. If friends bring there own RV, they can park it off to the side of the road and when they leave they just go forward. Totally worth it, especially after a night of drinking.
6. Fenced in kids area
We do get bears, coyotes, wild boar, etc in the area. So we are going to chain link fence in the area as well as spike the bottoms of that fence 12 inches into the ground so we can have the kids there unsupervised. We just gonna have a trampoline and playhouse/swings.
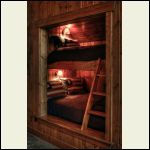
The last picture you can see how I want to do the bottom bunks. On that main floor.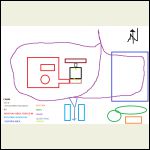
Untitled.png
| 
Untitled1.png
| 
best_photos_of_the_w.jpg
|  |
|
|
|

