|
| Author |
Message |
Steve_S
Member
|
# Posted: 29 Oct 2014 09:54am
Reply
Good day folks,
I'm looking for suggestions, tips & thoughts from veteran resident cabin builders.
I'm just finishing my Pump House and will be starting my build next week (yes 1st week of November) and have only the month to get it built & me in it for winter.
Trying to be detailed here so you get a good picture of the project
The property is in North Eastern Ontario near Pembroke... so we get serious winters ! (may it hold off till Dec 15th or more)
My Base Foundation
I will be building on a prepared pad of very hard packed fine pit run & gravel. Using 12 - 18x18x4" thick cottage blocks on the ground then 3 - 6x6 PT skids.
Basic Structure Plan
- 2x6 24oc floor joists with 4" R-20 foam Panels.*
- 2x6x10 24oc walls with 5" R-22 foam Panels.*
- 2x8 Cathedral roof with 4" & 2" foam Panels.* (covered with vented tin roofing)
- Loft Space 16' w X 8' deep
- Shower & Compost toilet washroom.
- Open Concept as much as possible.
Utilities / Facilities
- OFF-GRID as Power is over $40,000 down the road.
Solar & Generator powered.
- Water from 230' well using 110v Soft Start Grunfos pump to 85gal pressure tank.
- Water heating by Eccotemp FVI-12-LP (Propane On-Demand)
- General Heat with Majestic DVRT-36 Propane Fireplace (thermostatically controlled)
- Composting toilet (with urine diverter) & grey-water system.
What I already have for the build:
- 4" & 5" Foam Panels.
- Ecotemp water heater, with filter & extra pressure accumulator tank
- Majestic Fireplace 36" 25,000 BTU Max
- 32x32 Shower base & wall
- 2, 34" Steel Insulated doors with windows.
- 4, 33x29 single hung thermal Vinyl windows
- 1, 58x33 double "2x single hung" thermal window.
- Small Wedgewood propane 4 burner stove / oven
- Small propane / electric fridge (Dometic RM-660) ~ Don't know if I'll use this.
TOOLS IN USE:
7.5kw Generator, Dewalt 20v full suite ;), LED Floods, Table Saw, 120v Circ Saw, Husky 576-xpat Chainsaw and the other usual's.
--------- OK for the first part LOL ---------
The Questions / Ponderances:
- As I want a loft to accommodate a Queen Bed I have been thinking of 10' walls so that I can gain a couple of extra feet height upstairs. I can't decide if that & lowering the ceiling under the loft to 84" (joist bottom) would be good or not... May feel a bit claustrophobic in the kitchen, shower/toilet rooms.
- As I have excellent southern exposure (property is on the near peak, south face of a hill surrounded by Cedars, White & Red Pine with Scotch pines as well. I intend no windows on the North Side and putting most window surface to the south with a small window on East & West. Think I will have to buy at least 2 more bigger ones. ** Next Year a porch onto the south side too...
- 12 volt / 120 volt. I have many 12v fixtures & fitting that I have collected. Many of the lights could easily be updated to LED bulbs. I have a 12v Range Hood & Bathroom vent as well. SO I would like to incorporate as much of that as possible. The necessary 120v will be minimal, I am thinking at most 6 plugs (15a) with a 1500 watt inverter. The 120 is needed for the Ecotemp, Computer (of course) and satellite system (XplorNet).
?? Is there a benefit to running dual wiring for 12v & 120v and refitting the old 12v fixtures ? Almost everything I use now is low power & lighting is all LED with wall warts. Just me and my lovely GF - no kids, no big power draws...
?? Surface Mounting wiring / plumbing ??
I have been pondering the idea of using BX (Romex) 120v wiring into commercial boxes, all of which I can get dirt cheap. Mounting that on top of 3"x3/4" pine boards "neatly" leaving the armoured cable & boxes exposed. (less holes / gaps in walls).
The plumbing... well... water condensation on pipes in summer happens even on PEX.. unsightly foam over the pipe ? Running what must be run in the floor above the insulation in the 1" air gap ? The water heater will be within 4' of both hot water points (shower & K sink) so it's just the 3/4" cold line coming into the cabin.
---- OK ---- Lot longer than I expected !
Sorry Folks !! The nutter is in the details though.
I have to submit my "FORMAL PLANS" Already approved in principle on Monday November 3rd...
Thoughts, Ideas, Suggestions & Related Ponderances all welcome.
Thanks in Advance
Steve
PS: Yes I will photo the progress, would like to blog this plus the other projects both ongoing and future but haven't a clue yet as to a good blog site which allows a lot of photo's & video links... which does not need to know my First Born's name and all that personal stuff....
|
|
bldginsp
Member
|
# Posted: 29 Oct 2014 12:15pm
Reply
Wow! A lot of work in 6 weeks. Hope you have a helper or two or three.
You don't need separate wiring for DC and AC, so long as you don't use the two systems at once. There are load centers and circuit breakers that will handle either. I plan to use one of these and use my wiring for a small solar DC system at first, later convert to AC using the same wiring and subpanel. Just watch out that you don't overload the wiring on 12 volt DC. With lower voltage you will have higher amperage so you can have a lot less on each circuit than with 120 AC.
Ambitious project. Hope it works out. Ke us posted.
|
|
bldginsp
Member
|
# Posted: 29 Oct 2014 12:18pm
Reply
The Eccotemp water heater is made to be mounted outside. If so it will freeze and be ruined if not drained out. Or, is it a type with a flu so it can be mounted indoors with a flu thru the roof.
|
|
Steve_S
Member
|
# Posted: 29 Oct 2014 09:35pm
Reply
This Ecotemp model is an indoor one with Direct Venting, even came with the DV Kit...
I was thinking of using only 4 circuits. 1) Lighting, 2) Kitchen 120v-20a, 3) Fridge & Water heater 4) 6 std plugs 120v-15a
I'm hoping to have the water tight, windproof shell up and roofed with just Tyvek for exterior this yr. The foam will be cut, glued & spray foamed in (where needed) with working water & heat. Finishing it while living in it over the winter, amongst other things.
I do have a 20' Sea Container on the property & will be setting up my 32L x 11Wx8H "Winter Car Shelter" between the Sea Can & the Cabin... (fits with about 20' of space to spare) so I will have workspace in the dry... and big enough to wield lumber around in for cutting and what not.
Hmmm maybe time to ponder a quick barrel stove to get heat into that shelter... every bit helps 
|
|
creeky
Member
|
# Posted: 10 Nov 2014 01:57pm
Reply
Hey Steve, I just finished my hay rack. I used the "perfect wall" from buildingscience dot com. You should go have a look. Basically you put your insulation on the outside of the building. Saves a lot of cutting, fitting, foaming. And gives a good tight seal.
Good luck. Looks like a great plan.
|
|
Steve_S
Member
|
# Posted: 10 Nov 2014 07:00pm
Reply
Hey again Creeky,
I'm framing 2x6 with 2x6x10 walls. I already have the 5" (4'x4') & 4" (2'x4') foam panels.
I was trying to organize Ez-Sips but lead time at the time was too great _&_ I was thinking "Tiny House" on a 20' Trailer I have (the donor for some of my appliances).
The Grey-Water system is In & Buried ! 4 days of Backhoe & Excavator work. Pipe (house to GW Tank) is encased in 5" of Hard Foam and buried / packed in. Top of Tank has 8" of foam, a 20x20 Foam Box (4") with PT 2x8 box surrounding & Heavy Aluminium Over that... Buried & Marked. The GW System also has 2- 50' Runs of 4" Drainage Pipe with sock... 8" gravel under, 1 foot gravel on either side & 10" over the pipe, buried 6' deep going down hill.
The Fresh-Water lines are run up to the cabin... 5" of Hard Foam box surrounding the O-Pipes from Pump Hose to Cabin (42 feet away), All buried & Packed in.
I also picked up some more / better windows for a terrific price.
AS OF TODAY: The perimeter 18x18x4 Cottage Blocks are down on Hard Pack. The 6x6x12's Terra-Pressure Treated Rails/Skids are Lap Cut, PL Premium Glued & Spiked together.
Dang that PL Premium, that stuff glues EVERYTHING Solid ! I wonder if they have that in the States as it's made by LePage. If Not, they sure are missing out on awesome construction glue (PS It's NOT CHEAP) $10 a large format caulking tube. (with discount)
Taking a couple of days to head into City... Have to clear the house out and close that all up... Have to get what I'm keeping into storage later this month... won't be much... Major Downsize from 3BR with full bsmnt loaded to a < 500 sq feet "shack". LIFE ENEMA = GOOD FOR SOUL !!!
TTFN
Steve
|
|
Steve_S
Member
|
# Posted: 11 Nov 2014 10:37am
Reply
IMAGES from the Build (design stuff) Part-1 Attached file: Site Plan Attached file: Site Plan
| 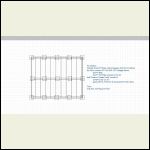
Foundation Layout
| 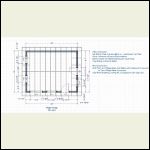
Main Area Detail
| 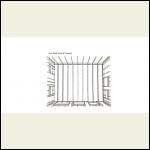
Cross Section ROOF OFF
|
|
|
Steve_S
Member
|
# Posted: 11 Nov 2014 10:40am - Edited by: Steve_S
Reply
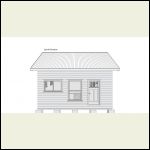
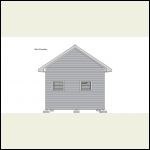
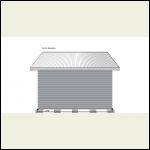
Elevation Views Part-2
NOTE: Upper Windows are NOT shown, neither is Loft Area in these images.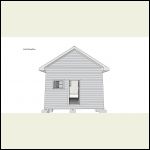
East Elevation
| 
South Elevation
| 
West Elevation
| 
North Elevation
|
|
|
|
Steve_S
Member
|
# Posted: 11 Nov 2014 10:42am
Reply
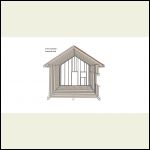
A couple of Cross Sections.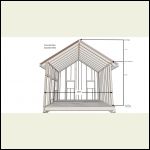
Cross Section from East
| 
Cross Section from West
|  |  |
|
|
Steve_S
Member
|
# Posted: 11 Nov 2014 11:00am
Reply
Pump House Pics (just a couple of many)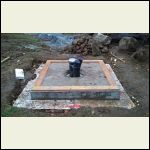
Pressure Treated base plate installed & anchored
| 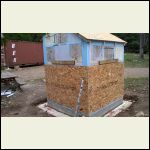
Walls up, foamed, sheathing underway
| 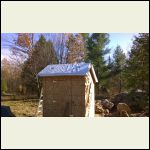
Blueskined edges, typar'ed roof, ready for black tin
| 
The well head & O-Pipes, inside sheathed too after sealing.
|
|
|
Don_P
Member
|
# Posted: 11 Nov 2014 08:44pm - Edited by: Don_P
Reply
Some thoughts,
A 2x12 has a section modulus of 31.6"^3 where a 6x6 is 27.7, higher strength with about half the wood. Or, a double 2x12, using roughly the same amount of wood, would be two and a quarter times stronger than the 6x6.
Look at your cross section from east or west. Imagine pushing down on the roof and the resulting "toggling" or outward thrust on the walls as the rafters descend. The simplest way to restrain this is with ceiling joists on top of the walls tied to the bottoms of each rafter couple. If there is a loft the easiest way is usually to size your ridgeboard as a load carrying ridge beam, usually with a support post somewhere near midspan.
|
|
Steve_S
Member
|
# Posted: 12 Nov 2014 08:25am - Edited by: Steve_S
Reply
Hey there Don_P,
I'm using paired 2x10's for my ridgeboard. What isn't shown in these doodles is the loft sections.
1st Loft Section on the West Side (sleeping loft) is @ 96" height from floor (bottom of joists). A 2x6 wall running centre underneath. Joists for loft will be 2x8 Live Edge (edge down) will be a bit thicker as I am calculating 2x8 nominal without the edge. These will be tied into the outer wall Studs & a ledger board along ea. side. @ the inside centre I intend to put a "log post" going from floor to roof Ridgeboard.
2nd Loft Section will only be to first studs 20" (+/-) deep on the East Side - like a storage shelf of sorts but providing a place to put my ladder to open the small window for ventilation.
This should give me an open space from floor to roof of roughly 8'.
I'm going with live edge 2x8 rough cut Red Pine and post in the centre for the rustic "feel". Even thinking of making my cabinets & other internal goodies with rough cut & live edge where possible. A buddy down the road has a proper small saw mill and he's got some amazing stuff squirreled away in the drying sheds & storage barns for an excellent price.
Attached here is a very simplistic doodle I just whipped up in MS-Paint (man that software sux) which may explain it better.
I'm not sure what your mentioning about the 6x6 skids the "shed" sits on, as this is what was suggested by the building inspector. The outer skids have 2x6 PT sill plates attached to them with the floor framing attached accordingly. The centre skid is getting 2x8 PT sill plate with joists attached with solid blocking up the middle. I will also have sill plates running N-S, so a full perimeter all around.
Not entirely sure yet but was suggested to run one board (sill) N-S across the centre as well as an optional. Not sure if I would gain / lose anything by doing so. The only advantage I could see with that, is when it comes time to drag the building off the pads to the other location when we start the Cordwood Cabin, is it would possible reduce some of the twisting potential of the skids... it will have to move about 100' at that time. (of course without the extras inside, just the shell)
PS: I'm not a builder, so my terminology may be a tad mixed up.
Clarification on lumber being used:
The main structure; studs, floors, roofing etc are all graded / stamped SPF, Plywood / OSB.
The Lofts; rough cut joists with live edge as well as side rails & log post beam in centre. They will not have ceiling under them, they will show the exposed joists & floor boards. Would like to use T&G pine flooring for the sleeping loft.
The internal walls, like the bathroom & centre separator (spf stud) but wall finish under sleeping loft are to be sawn / rough cut with a "quick & easy" sanding. Still pondering possibilities.
Inside Trims like door/window casings would like to use live edge outer side.
Wall finish in general un-determined, budget will drive that but I'm leaning towards pine or something "natural" versus drywall. Exception where the fireplace is going as that will be backed with Cement Board (although not really needed for the zero clearance propane FP) but won't be visible anyways.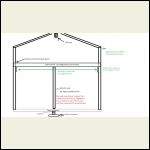
West Loft doodle without central post
|  |  |  |
|
|
Just
Member
|
# Posted: 12 Nov 2014 10:02am
Reply
if u turn your roof 90* and make a 6 \12 roof with 3 2x12 16s for a roof beam you can safely lower your floor joist to give you standing room in your loft . no support post required . IMO.
|
|
MtnDon
Member
|
# Posted: 12 Nov 2014 02:37pm
Reply
Don_P's ridge beam is an excellent idea because of the extended studs at the upper end.
This chart indicates Pembroke's snow load to be 50 PSF.
Rough calculations: 16 x 20 = 320 sq ft. Snow loadof 50 psf + DL of 15 psf = 65 PSF total load from roof.
320 sq ft x 65 psf = 20800 lbs roof load.
Half to be carried by the ridge beam, one quarter by each 20 ft side wall. Call the ridge load 10,000 lbs. I first calculated using only support columns at the ridge ends, no intermediate columns.
Using #2 SPF the calculator I use does not even pass twin 4x12's as a ridge beam. To clear span the 20 ft length a factory made laminated beam would likely be best.
IF there was a support column at the 10 foot central point, then it appears that twin 2x12's would work. That assumes the load can be carried down to the foundation and supported by the foundation and the earth under the footings.
|
|
Just
Member
|
# Posted: 12 Nov 2014 05:56pm
Reply
Or try this to lower roof ties, more loft space .
|
|
Steve_S
Member
|
# Posted: 12 Nov 2014 06:24pm
Reply
So, if I'm following this right...
2-2x12 Ridge Beam onto 2x10 ? Rafters with my Central Log Post @ the inside end of the Sleeping Loft.
What if I also used 2x6 or 2x8 Rafter Ties just below the Ridge Beam ? Exposed of course...
Hmmmm... That would lower my overall ceiling height... BUT it IS a sleeping Loft and not a real "room" as it were.
What if I drop from a 8/12 to 6/12 without BUT NOT changing direction of roof as it needs to stay E-W @ 16' wide 20' long.
-----------------------------------
I'm back to work on the Base & Floor on Thursday and hope to have that completed by next Monday... a Side Track, is that I must setup my 32x11 "Porta Garage" this weekend while the weather permits, so I have somewhere to setup the Table Saw and other equipment needed under cover. The Sea Can at one end (7' from the shelter) and the other end will be a dozen feet from the Cabin Build.
Therefore I have little time to figure these details out and organize accordingly. I can make changes in the "very near future" but with luck, we will be framing walls sometime next week.
NB: The original Window Specs have changed from my initial post... as I managed to get much nicer & bigger windows. The Schematics posted above for "main level are correct. BUT- I do wish to install one of the small Single Hung (33x29) on the East Side "attic" and a 56.0w X 36-1/2h Single Slider in the Sleeping Loft (fire escape route compliant).
THANKS GUYS for the Input & Feedback - Most INVALUABLE & APPRECIATED. I'm certain I am not the only person benefitting for the collective wisdom here.
The Windows I have and where I will be using them:
East Elevation: 34" door with window, 32-1/2x28-1/2h single hung.
South Elevation: 34" door with window, 43-1/2w x66-1/2h Lower Awning, 56.0w X 36-1/2h Single Slider
West Elevation: 2x 32-1/2w X 28-1/2h. (one fogged bathroom) single-hung.
Sleep Loft (west elevation not shown): 56.0w X 36-1/2h Single Slider.
Storage Loft (east elevation, not shown): 32-1/2w X 28-1/2h Single Hung.
|
|
MtnDon
Member
|
# Posted: 12 Nov 2014 06:54pm
Reply
Quoting: Steve_S 2-2x12 Ridge Beam onto 2x10 ? Rafters with my Central Log Post @ the inside end of the Sleeping Loft.
The ridge beam is supported at both ends and more or less in the middle by three columns, equivalent to 6x6. Those load paths traced to the foundation / earth.** The rafters, whatever the size, have their upper end supported by the ridge and the lower end supported by the wall.
2x10 or 2x12 rafters are not needed to carry the load but the larger the better for insulation space. Plan the insulation and any vent space above the insulation now, not later as many seem to do.
Quoting: Steve_S What if I also used 2x6 or 2x8 Rafter Ties just below the Ridge Beam ? Exposed of course...
Those would be called collar ties. They would only need to be 2x4 actually. Their purpose would be to keep the rafters/roof from peeling open at the ridge under stress of high winds. They are too high up the roof assembly to act as a rafter tie. Collar ties can be replaced by metal straps nailed over the peak from one side to the other. That can simplify finishing the interior rafter space.
The loft floor joists are below the top plates of the wall studs and do Not count as rafter ties. This is why the ridge beam is strongly suggested as a means to support the roof loads. It eliminates the horizontal outward force from the rafters on the wall tops.
** I don't know your dirt, what it's load bearing capacity is. The weight of the roof, the walls, the floor and the contents must be spread out over a large enough footing to bear the weight without subsidence. Loads are difficult to spread evenly on piers with pads. Not to mention the frost movement issues. Also not to mention how this building is to be tied to the ground for when the big winds blow.
|
|
Steve_S
Member
|
# Posted: 12 Nov 2014 09:27pm
Reply
My Dirt is as follows:
Top soil removed to a depth of 2', replaced with hard packed Pit Run (CAT DL-390 Excavator packed in SOLID). Even the smaller Excavator & Backhoe had hard time "cracking" the packed Pit Run. Many Tri-Axles & Trailer loads... Pad is 40'x35'.
On Build Spot, soil depth is only 4' on top of solid granite. The Granite is the bedrock and hundreds of feet deep (my well is 230 feet and showed Black, White & Red Granite during the drilling)
------
I already purchased Simpson Ridge Beam ties, so glad I don't have to change that over... Definitely like a "clear" ceiling. Also have the Simpson Hurricane ties for the Top Plate to Rafter connections.
Roof will be sheathed, wrapped (Tyvek Roof Wrap) & covered with Galvalume Tin.
Roof Insulation = 5" thick RoofMate Foam Panels with bonded Fibreboard. Air Space provided between sheathing & foam open @ top with Ridge Vent and of course lower vents. Inside will be 6mil poly wrapped before finish.
Big Winds are a non-issue at the location... No Tornadoes, Hurricanes or such.
-----
So I can stick to 2x8 Rafters but up the Ridge beam to 2x12's should do it then ?
|
|
Don_P
Member
|
# Posted: 12 Nov 2014 09:47pm
Reply
Using Mtn Don's inputs the ridge with a post in the center worked for me with a double 2x12 ridgebeam.
; on the 10' ridgebeam span, the center posted ridge, the maximum bending moment is around 6,000 ft/lbs. When the ridgebeam spans the full 20' the bending moment increases to about 24,000 ft/lbs. When the span of a beam like this doubles the bending force quadruples. The span has doubled AND the load has doubled. That is why Mtn Don suggested checking an engineered ridge if it is clearspan, a double 1-3/4 x 14" LVL would be about the minimum but the lumberyard would check it for you as part of the sales service.
The ridgebeam is a good idea when you cannot tie the lower ends of the rafters together such as with this kneewall loft situation. The use of a ridgebeam removes the problem of horizontal thrust outward on the tops of the walls with untied rafters. When it was mentioned changing the pitch from 8/12 to 6/12 it made me wonder... what if there were no ridgebeam, what would the horizontal force be on the walls at those two roof pitches? At full load 8/12 untied rafters without a ridgebeam would push out on the top of the wall with 390 lbs of force per foot of wall. As the pitch drops the toggling action becomes greater, the force would be 520 lbs per foot of wall.
Red pine is grouped with other similar strength woods under the name "Eastern Softwoods" if you are using the awc calc to size joists and rafters;
http://www.awc.org/calculators/span/calc/timbercalcstyle.asp
|
|
Steve_S
Member
|
# Posted: 12 Nov 2014 10:08pm
Reply
Hey Don_P,
I intended as posted earlier to use SPF #1 for all my structural stuff. The Red Pine Log Post in centre, floors joists with live edge etc are internal. The floors, walls, roof are all SPF Graded & Stamped #1 or better.
At this stage, I don't think I can change roof design, tweak yes but change no. Maybe I should have went with a "Shed Roof" 12' @ South Side to 10' North Side. My original plan for build was Gambrel Roof but time, labour & timeframe to complete (and extra costs) kyboshed that plan. The old Should'ves, could've & would've are glaring away at me now....
Also this is a Me, Myself & I build with very minimal help (Maggie only and she's a City Gal) as those that offered to help with the work have all mysteriously become otherwise engaged... That will be well remembered when they call me later for help again with their projects... I'll be far to busy washing the 7 hairs on my head with great care.
|
|
MtnDon
Member
|
# Posted: 12 Nov 2014 10:25pm
Reply
Quoting: Steve_S My Dirt is as follows: Top soil removed to a depth of 2', replaced with hard packed Pit Run (CAT DL-390 Excavator packed in SOLID). Even the smaller Excavator & Backhoe had hard time "cracking" the packed Pit Run. Many Tri-Axles & Trailer loads... Pad is 40'x35'. On Build Spot, soil depth is only 4' on top of solid granite. The Granite is the bedrock and hundreds of feet deep (my well is 230 feet and showed Black, White & Red Granite during the drilling)
The concerns are:
The dirt having sufficient compressive strength to carry the loads. Especially when some loads like those under the ridge columns may have substantially higher loads than others. And is this bearing capacity reduced when the soil becomes saturated? If the soil gets wet and freezes, what happens?
That four feet between the surface and the granite should have a solid, direct, incompressible, non expanding connection. A dug down concrete block or poured concrete is best. That also helps anchor it all in place. That's the best way, probably the way most conventional homes in the area are built. With concrete pads on the surface it is a guessing / waiting game to see what is going to happen.
Quoting: Steve_S Roof Insulation = 5" thick RoofMate Foam Panels with bonded Fibreboard. Air Space provided between sheathing & foam open @ top with Ridge Vent and of course lower vents. Inside will be 6mil poly wrapped before finish.
I'm not familiar with that product but if it is like similar products I know of, then it is usually installed on top of the structural roof sheathing and a waterproof membrane. Then more sheathing and shingles or purlins and metal panels over that. Is that the plan. No need for airspaces or interior poly when that is done as the insulation on top provides an interior surface that will stay above the dew point temperature. . Maybe I don't understand your plan.
Quoting: Steve_S So I can stick to 2x8 Rafters but up the Ridge beam to 2x12's should do it then ?
Should be okay as previously described.
|
|
Steve_S
Member
|
# Posted: 13 Nov 2014 12:50am
Reply
Typical in the area I am building the preferred foundations are Frost Protected Slab or Pier many have given up on basements and crawl spaces are not in favour at all, they are legacy foundations. There are many places (smaller only) that are built on "Cottage Blocks" 18"x18"x4" cast concrete with 4x4 or 6x6 PT rails / skids. More often than not, that is used on lakesides to prevent damage to the soil layers by the lakes and waterways... They are very "anal retentive" about Septic, Grey Water etc due to the number of water ways, lakes and the watershed in the area. Even Well Regs are tough and spec that no septic or GW system is to be within 75' of a well in my zone.
The soil under the pit run is Sandy loam with clay with glacial deposits throughout and quite dense and compressed. It is the bottom end of the Canadian Shield which is all glacial cut & deposits. I have 5 to 30+ Ton "lawn decorations" left by glaciers (that are visible). The Pit Run is granite gravel with large sands and fine gravel... Really tough stuff. Pit Run varies between quarries but the stuff I got has a mix of 3" river run to fine 1/8" and is very packed. Drainage is excellent and frost heave should not be a major concern. The build is on a natural "step" on a hill with another "step" down about 20' below my level. 2 sides of the "pad area" are down sloping to these natural steps. I have a French drain of sorts on the North Side to west which slopes away quite drastically, so I won't get water on pad from the North Side. Sorry I don't have a photo that would show the terrain layout well, as the area is quite treed. Satellite Images are of no help either.
The foam panels go into walls / roofs and are a commercial use version of the domestic product made by Dow. Similar is avail in USA. It's a high density close cell foam (the hard blue stuff) & at 4" is rated at R22 (I forget offhand) + the fibreboard is R2 on each side (for what I am using on walls & roof).
In Canada, Cathedral Ceilings need to be vented to prevent the sweat. So an airspace between insulation to sheathing is warranted and we still employ 6mil poly interior wrap, sealed tight. Means either having an HRV (mandatory in "houses") but I can compensate with fresh air intake and venting. Venting is even more important for Tin Roofs as I understand it from the Building Inspector. By using the Tyvek Roof wrap, it accomplishes the water shedding and sealing and serves to protect the underside of the tin & top of roof sheathing. Darn hard to explain it.
Tyvek Roofliner
The outside of the cabin will be wrapped in Tyvek House Wrap and BlueSkin WB @ doors, windows etc... Then covered over... haven't decided with what yet... Most Likely 10" Board & Batten as I can get an amazing deal on that (probably in spring sometime).
Sorry, I keep getting the product names mixed up... Info Overload and exhaustion taking it's toll.
|
|
Don_P
Member
|
# Posted: 13 Nov 2014 08:20am
Reply
Quoting: Steve_S I intended as posted earlier to use SPF #1 for all my structural stuff. The Red Pine Log Post in centre, floors joists with live edge etc are internal. The floors, walls, roof are all SPF Graded & Stamped #1 or better.
I'm sort of rambling on for general education as much as anything, there seem to be several people at about the same design point, a good bit of what I've posted is just background. Everything that bears load is structural, the post is supporting the ridge do use one sufficiently stout enough that buckling under that load is not a concern for it's length. Floor joists are also structural, it looks like a #2 red pine 2x8 is good for 8'4" so you should be good if you watch grade. The grading rules are posted on the NeLma website and might be worth reviewing to have a sense of what a cull is in the live edged material. Laying a factory 2x8 on the live edged material might help to sight the board within the material if there are questionable ones. SPF is I believe the only species group that has the same design strength values for #1�, you'll see it listed that way in the span calcs and tables.
Actually for that type of geology the health dept regs sound pretty relaxed. We have a 100' seperation which is common and if over a solid rock septic gets expensive pretty fast.
|
|
Steve_S
Member
|
# Posted: 13 Nov 2014 09:24am - Edited by: Steve_S
Reply
Hey Don_P... It's all Great !
I like to have information that benefits everyone and we all gain by doing so. Heck I am picking up so much new info & getting up to date (haven't done any construction in 8 years) so I "lagged out" a bit.
The sawmill where I am getting the Live Edge stuff from does a lot of stuff and they have drying kilns etc... fair sized outfit. The Graded Lumber I'm using is coming from a local supplier as well... Keeping everything as local as possible.
For example... and possibly clarification for other readers. The Live Edge material I want to use will be 2" thick (not 1-1/2) rough cut. Meaning that it will not be dressed, sanded or milled and saw marks will be visible but fully dried and grade ready (as it were). I will give it a quick sanding to get the fuzzies off, that's it. I only want one side with live edge which is visible with the other side being clean cut. Under the loft you'll see the "edge" but the planking on top will smooth.
The Log Beam / Post will also be dried (these guys do Hydro / Phone poles as well) as I don't want the Red Pine to continue sapping out... it will for years on end, unlike white pine.
I was pondering using Eastern White Cedar which we have in abundance but was advised against going that route for this part of our project... I'll likely be sick of cedar after having to log, cut to size & split in prep for the Cordwood Cabin we intend to build. 25'x25' 1-1/2 stories with 18" thick (long) cords. Even have the Alaska Mk-3 Mill & Husky 576-XPAT all ready to start that over the winter, once I have this cabin done & in it.
The regs even within the county are variable depending on location, I got fairly lucky with our particular property as far as that goes. We have about 3' (avg) of good topsoil on top of 4' or so of sandy loam with a medium clay base over granite on my spot. Had we decided to build 150' east of our site, it would have been directly on top of the granite with 6" of soil cover... If I was right next to a lake, stream or something, things would have been much tougher. A fellow down the road a bit had to go 300' with his well in double casing... OUCH on the $$$. Septic was disallowed as well as GW and had to build holding tanks - all that cost as much as I am putting into our entire build including the cost of the land !
I posted this Pic in another thread (viewing East to West). It shows where the cabin is being put on our "little piece of heaven" Well Drilling ongoing - X marks the "cabin pad"
|
|
|

