| . 1 . 2 . >> |
| Author |
Message |
tcmatt
Member
|
# Posted: 1 Mar 2013 10:40pm
Reply
I need help/advice on how to flash a duravent woodstove chimney through a metal roof (near the top of the roof) on a 12/13 pitch. The guy at the stove shop told me to contact the roof manufacturer to get some type of flashing that would match the ridges of my metal. The gal at the roof manufacturer told me that they don't make anything like that and they recommended this gasket thing from dynamic fastener. Has anyone ever used anything like this? Other suggestions? I was thinking of using one of the dynamic fasteners along with some type of flashing and storm collar, but I'm struggling trying to figure out how it will all fit together and work/not leak.
thanks in advance
matt
|
|
Anonymous
|
# Posted: 1 Mar 2013 11:26pm
Reply
just like the pictures in that pdf shows. Use a sealant that the roof panel mfg approves of. Some do not want silicone caulks used or may void the finish warranty. Carefully fit and shape first, lift a little, apply sealant and screw down with roofing screws. No leaks. I've used a bunch of em.
|
|
Anonymous
|
# Posted: 1 Mar 2013 11:28pm
Reply
there's a dead soft aluminum ring in the base of the boot.
|
|
tcmatt
Member
|
# Posted: 1 Mar 2013 11:46pm
Reply
Anonymous,
How long do you suppose they last? 5-10 years, then replace?
Also, nothing else? No storm collar or anything?
thanks
matt
|
|
toyota_mdt_tech
Member
|
# Posted: 2 Mar 2013 12:36am
Reply
Mine was a flashing that was molded or bent to match the roof. It uses a sealer under i t and lots of screws. There is a ring above it to keep water from running under the joint.
|
|
tcmatt
Member
|
# Posted: 2 Mar 2013 07:08am
Reply
toyota,
Yours sounds like the dynamicfastener. Is it? Also, do you have a picture?
thanks,
matt
|
|
bldginsp
|
# Posted: 2 Mar 2013 08:36am
Reply
Weird that the roofing manufacturer wasn't more helpful with this. I've been researching chimney components for my woodstove chimney through a 8/12 pitch roof, and Simpson makes the soft aluminum flashings for a bunch of different roof pitches. Here's one for a 12/12 pitch, 6" flu
http://www.ventingpipe.com/duravent-9050dsa-6-adjustable-dead-soft-aluminum-flashing- for-a-7-12-12-12-pitch/p1761194
Properly installed, should last as long as the roof or until snow or tree branch damages it.
|
|
bldginsp
|
# Posted: 2 Mar 2013 08:45am
Reply
Matt- you also asked about other components. Simpson has a few brochures that show all the components, such as the weather collar that goes above the flashing, caulk for the the weather collar, support struts to hold the chimney up, cap, several different ways of holding the chimney up in the ceiling, etc. They explain it all very well. the link above has pdfs with the basic drawings
|
|
|
toyota_mdt_tech
Member
|
# Posted: 2 Mar 2013 11:23am - Edited by: toyota_mdt_tech
Reply
If you have your chimney close to the lower part of the roof, add a snow slicer as it slides off, it will cut the slab of snow and divert it around the chimney, otherwise, it shears it off. The outfit that installed mine made 2 large supports, 1" inside tube (electrical EMT pipe) and next size up so they slide into each other. Mashed the ends flat with a press for mounting on the top of the pipe and at the roofline and a jamb bolt to lock them down after sliding them apart to the right length. The chimney needs to either extend 2 feet about the highest point (ridge) or be 10 feet away from the roof. If you have a steep pitch, chimney down low, this makes for a tall chimney and will need the support. Mine is a 7.5/12 pitch. I'll round up a picture. I have no snow jack at the bottom, installer said he makes his supports himself and never had an issue. So far, he has been right. A snow jack would be a wide piece of flat stainless anchored to the chimney with a strap clamp, then it goes down at an angle (just like a gusset) to a chunk of stainless (or AL) angle iron bolted to the roof, then the gusset bolted to it.
I assumed I had a spark arrestor on the cap, but was shocked to see a dead bird in my woodstove when I went there last spring. What an awful wait to have died. So I will put up a coarse mesh this season to save the birds.
The flashing looks like galvanized metal, its very moldable and you form it with a mallet around roof tin ridges.
|
|
tcmatt
Member
|
# Posted: 3 Mar 2013 09:11am
Reply
Another member here emailed me this photo of his and it helps a lot. I think I get it now.
Bldginsp & toyota, thanks for the info. I didn't know that the flashing material came in "dead soft aluminum" and could be molded around the ridges.
toyota, my chimney will be about a 12-18 inches below the ridge and as close to the top as I can get it without blocking the top gable-end window (and light). I'll probably still install a snow splitter. The cabin is close to Lake Michigan (lake-effect snow) in northern MI.
so, my pitch is slightly steeper (by a couple of degrees) than 12/12. Do you think I'll have any problems using a 12/12 flashing? I can't seem to find a 13/12 online made from dead soft.
Thanks for everyone's feedback.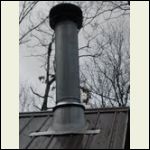
flashing_example.jpg
| 
IMG_1012.JPG
| 
IMG_00491.JPG
|  |
|
|
toyota_mdt_tech
Member
|
# Posted: 3 Mar 2013 12:08pm - Edited by: toyota_mdt_tech
Reply
Matt, you may not need the snow jack. Close enough to the top and a steep enough pitch. Just make sure its well supported (support box). You may not have much room on the roof for supports or if you do, be short. You can make them out of EMT and flattening the edges. Good galvanized stuff so it wont rust. The slicer would be just extra HD and a good secure feeling.
Do you have a vaulted ceiling?
Matt, I might add, the picture of the flashing above this post where it slides under the roof tin, mine is not like that. Mine lays over the top of the metal. I guess that is just extra HD and doable if the chimney is in place before roofing is laid in place. Mine was done after the roofing metal was all on.
I had pros come in and install everything. I had already had the hearth, stone work, mantle and stove setting in place. He did just the total flu install. It took 2 guys about 5 hours while I was setting in cabinets. We fed them nice burgers and potato salad for lunch. They really enjoyed that. I knew they was hungry.
It was spendy. The labor and materials was $1,900. I didnt have time, nor have I ever installed a flue through a tin roof before. I just wanted to know it was right.
|
|
tcmatt
Member
|
# Posted: 4 Mar 2013 09:19am
Reply
Toyota,
Dumb question....what do you mean when you say "extra HD"?
I'm an over-doer usually, so when you see mine done it will likely have a snow slicer, two flashings - one under, one over and about 3 gallons of sealant. 
thanks
Matt
|
|
toyota_mdt_tech
Member
|
# Posted: 4 Mar 2013 02:43pm
Reply
Quoting: tcmatt Toyota, Dumb question....what do you mean when you say "extra HD"?
As in adding the sno jack anyway, even as close to the ridge as you are.
|
|
DIYhome
Member
|
# Posted: 12 Mar 2013 09:41am
Reply
I've been in this same type of situation... who would have thought every chimney would be so different? I called the guys at Rockford Chimney Supply, they answered all my questions. I ended up needing a Class A pipe, pitched ceiling kit. If you decide to purchase online, I'd recommend them.
http://www.rockfordchimneysupply.com/
Good Luck!
|
|
Trapper
Member
|
# Posted: 21 Mar 2013 07:47pm
Reply
I have searched for the best type of chimney flashing and best method for installing it on metal roof lately and most suggest the bendable soft metal/rubber flange from duravent or others.
I went to local hardware store today to check for availability and price. The sales person who used to install roofing for a living a few years back made a different suggestion that he swears is more effective and last longer.
He suggests using regular metal flashing and bending it to the shape of your metal profile. Place this directly on top of the roofing, screw it down and then caulk it with the caulking/sealant that they use to install car windshields.
I am in no way promoting this idea but am interested if anyone has heard of or has used this method.
|
|
Martian
Member
|
# Posted: 21 Mar 2013 10:54pm
Reply
You'd be a lot better off if you cut the metal roofing and slid the top flange under it. Then, you only have to worry about caulk sealing the tiny little holes at the two points where the flange comes up over the metal roofing and down the sides. All caulking fails...eventually, but if your felt paper runs under the jack, then any water that gets in will run off.
Tom
|
|
ArkansasCabin
Member
|
# Posted: 22 Mar 2013 01:28am
Reply
I too was struggling with figuring out the best way to install the chimney pipe through a metal roof. After doing some research, it seems there is no clear answer and there are various ways to do so. I was just at my cabin last weekend to install the roof and woodstove, so I'll give you an idea of what I did.
To start, I installed the woodstove first. I cut a hole in the roof that fit the "cathedral ceiling support box" perfectly, and then trimmed the CC support box to fit with the angle of the roof.
Secondly, I took the metal flashing, and dry-fit it over the cutout. (The flashing is plenty large enough to cover the "cathedral ceiling support box." )
After dry-fitting, I lifted the metal roof flashing, used a roofing caulk sealant and dispensed a thick bead under the entire flashing border. I then pushed the flashing onto the sealant, and proceeded to fasten the flashing to the roof with roofing screws. (the self tapping, washer screw type)
For even better waterproofing, I then used the same sealant and dispensed a thick bead around the exterior of the flashing, and smeared it flat to ensure a complete seal around the metal.
Tar paper was the next step, followed by starting the tin roof.
**Prior to going to my cabin, I saved myself time by making a template of the round hole of the roof flashing. (I simply placed cardboard underneath the flashing and traced out the circle from the top of the flashing)
When it came time to install the tin around the flashing, I simply laid out the template, double checked the measurments, and proceeded to to cut the hole in the tin for the flashing (tin snips worked well). The tin fit snuggly around the flashing, and all that was left to do was secure it down.
Upon installing the entire roof, I used another roofing sealant to lay a thick bead around the entire cutout to ensure no water leakage.
Hope this helps.
-Rob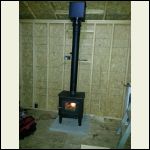
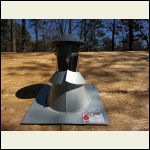
Cathedral Ceiling Support Box-top square box at roof line
| 
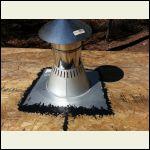
dry-fitting the chimney and flashing
| 
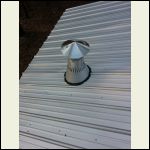
Flashing secured down and sealed
| 
Sealant around cutout
|
|
|
Steve961
Member
|
# Posted: 22 Mar 2013 11:29pm
Reply
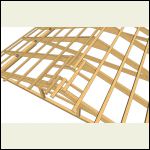
If you don't mind doing some extra roof framing, you can exit the chimney at the peak. This is what I did and it has worked very well. All I needed to do for flashing was to install a standard storm collar with some silicone sealant. Here are a couple of pics that show the chimney and the extra framing I had to do.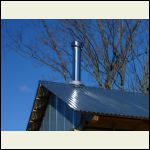
Chimney.jpg
| 
RoofFraming.jpg
|  |  |
|
|
bldginsp
Member
|
# Posted: 23 Mar 2013 01:43pm
Reply
I agree strongly with Martian that getting the flash under the roofing above is essential. Sealant loses its seal, and default shingling of layers has gravity working for you.
If ArkansasCabin's installation will never see snow, it may hold up, but snow loads year after year bearing against the flashing will eventually push it away from the seal. Looking at various roofs in the area where I'm going to build, I've seen numerous roof penetrations that have been moved by snow. A snow splitter above the jack helps, but I prefer Steve961s approach of putting the penetration, all penetrations, close to the ridge so they will never see heavy snow or ice loads.
|
|
Trapper
Member
|
# Posted: 23 Mar 2013 08:31pm
Reply
I have to agree that getting the flashing under the roofing above is the right thing to do. I have always been leery of placing it on top, even with the rubber flexible duravent kits.
Thank you everyone for your comments.
|
|
ArkansasCabin
Member
|
# Posted: 24 Mar 2013 10:25pm - Edited by: ArkansasCabin
Reply
Snow isn't much of an issue where I'm located. An occasional snow storm every 10 years or so, and never repeat snows.
I agree that eventually the sealant will need to be replaced, but then again what roof out there eventually doesnt need maintenance?
Lucky for me, my cabin location allows me to install the roof this way.
On another note, has anyone ever tried using "flexSeal" on metal roofs? I thought about getting a can to bring to the cabin just in case there were ever leaks. Has anyone tried using it on a metal roof where the summer temp reaches well over 100 degrees for months at a time?
|
|
Martian
Member
|
# Posted: 25 Mar 2013 12:10am
Reply
AC, the basic problem with your installation is that it allows water to get to the OSB when the caulk fails. The felt paper, or whatever underlayment you wish to use, doesn't go under the jack.
A metal roof should go for years without maintenance. Building in problems doesn't make sense to me, but then, I can't afford to go back and fix the metal roofs I put on.
Tom
|
|
bldginsp
Member
|
# Posted: 25 Mar 2013 07:44am
Reply
I think ACs instal will work just fine for a long time with no snow, and if it does leak he'll see it in a hurry. But just as a matter of course, I would prefer a method that depends far less on breakable sealant and can work by default with gravity long after sealant fails. With the flash tucked under it sheds water by itself, no help from caulk.
I'm trying to build everything at my place so that it requires a minimum of repair/maintenance in the future, so I don't get backlogged in ten-20 years with needed repairs because I chose methods at the time that were not the longest lasting.
But, this is a philosophical choice, I suppose. I want to climb a minimum of ladders at age 75.
I'm even regretting a few small PT retaining walls I put in- considering replacing them with concrete blocks, so I don't have to bother with it when the wood rots. Should have done that to begin with......
|
|
oldgringo
Member
|
# Posted: 25 Mar 2013 09:29am
Reply
I've gone through the wall on two different installs, just to avoid this issue. I know it's not the best choice, for a couple of reasons, and did it with some trepidation, but they both function perfectly. I would do it again.
|
|
241comp
Member
|
# Posted: 25 Mar 2013 02:32pm
Reply
I did the same as oldgringo. Went through the wall to avoid the need to put a hole in my new metal roof (and all the headache associated with it). I realize this may not be much help in answering the original question, but thought I'd share.
I used a wall kit made by the manufacturer for penetrating a combustible wall and it worked out well. So far, no trouble, and the stove seems not to be any worse off for it. Best part is, no holes in my roof, so no chance of leaks from doing it wrong.
|
|
bldginsp
Member
|
# Posted: 25 Mar 2013 03:16pm
Reply
Best way to deal with a problem is to avoid it
|
|
tcmatt
Member
|
# Posted: 25 Mar 2013 03:26pm
Reply
oldgringo and 241 comp,
How wide were your soffits from the exterior wall? I considered going through the wall, but I'd need to go another foot to get past the edge of the roof on the outside (see the pic on the first post here) and I'm not sure how to support the chimney properly. do you have pictures?
|
|
241comp
Member
|
# Posted: 25 Mar 2013 04:13pm
Reply
I have about an 6-8" overhang on my roof. I spaced my chimney out by attaching a couple layers of 2x material to the wall with lag bolts through to the studs. I did this at the base of the chimney and higher up at the top brace. You could do this, or just go through the roof at the overhang. The advantage to going through the roof at the overhang is that any leaks are just onto your chimney, not into your cabin.
Unfortunately, I checked and have no photos of my chimney. I'll try to get one next time I'm at the cabin and post it (provided I remember).
|
|
oldgringo
Member
|
# Posted: 25 Mar 2013 05:40pm
Reply
My solution was to run stove pipe all the way to the ground, where it rests on a concrete pad. It is secured to the roof with a stand off I fabricated. There's a tee located where the horizontal run from the stove intersects the "chimney."
These cabins are located in the back country, where there is some risk of wildfire, so I went with steel siding. The penetration is just a hole in the siding, sealed with high temp silicone. Pretty straightforward.
When you run through a wall, there's a loss of heat that would otherwise be captured from a vertical stove pipe, and the draft will be somewhat impeded by every twist and turn in the pipe. Also, I would imagine in really cold situations, the difference between a "hot" inside pipe and a "cold" outside pipe will limit draft, as well. I haven't encountered this in Oklahoma, but it's something to consider. Compromise is a *****.
|
|
TheWildMan
Member
|
# Posted: 26 Mar 2013 07:59am
Reply
I always used a through a wall setup, with T joints at the angle (remove the caps to run a brush through, makes for very easy cleaning) and does not interfere with roofing, so unfortunatly i can't offer much advice except to consider a wall setup and avoid the roof problems
|
|
| . 1 . 2 . >> |

