|
| Author |
Message |
trollbridge
Member
|
# Posted: 24 Oct 2012 09:49pm - Edited by: trollbridge
Reply
We would like to make two cabinet doors for our area under the counter in the kitchen. Neither of us have done punched tin before and thought it would be fun to try. It seems easy enough but are there any helpful hints any of you have? What is the best thing to lay it down on while punching the holes? Any tips are appreciated!
|
|
Montanan
Member
|
# Posted: 26 Oct 2012 12:36am
Reply
Wish I had some advice, but I have no experience. I love the look though, and it will look great in your place!
|
|
Kudzu
Member
|
# Posted: 26 Oct 2012 05:52am
Reply
If you use the ceiling tile type tin, be sure to wipe it down real good after you finish. Sweat will oxidize and you end up with black splotches. Learned this the hard way.
|
|
rayyy
Member
|
# Posted: 26 Oct 2012 06:03am
Reply
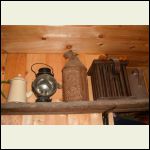
here is a panel I made for my jelly cabinet.and the punch tin lantern I made from a pattern I bought.The candle mold is my favorite though,but not my work.would like to try one someday.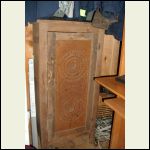
punch_tin_002.JPG
| 
punch_tin_006.JPG
|  |  |
|
|
TheCabinCalls
Member
|
# Posted: 26 Oct 2012 08:15am
Reply
If you haven't made the doors yet the easiest thing (to hide imperfections) would be to make the tin actually slip in with the panel to get the look rayy has above. This is instead of trying to cut it exact to place on top. Just make sure the tin and panel you slip into the groove isn't too snug and can still move freely.
If you go this route all you need is some tin snips and possibly a file to prep the tin. The rest is just building the door.
If you don't have the tools to make the groove in the styles/rails of the door you can place the tin behind them like a picture frame and then put a thin piece of wood to support.
|
|
TheCabinCalls
Member
|
# Posted: 26 Oct 2012 08:20am
Reply
If you are trying to reuse an existing door you can also carefully router out the back of the styles/rails and remove the existing panel. If it is a flat panel you can reuse it to support the back. Obviously if it is a raised panel you will need to replace with flat.
Since they are base cabinets you really need a support behind the tin. Although if you did it for uppers it might be cool to not have the support behind the holes of the tin and backlight it.
Anyway sounds like a good project and should fit nicely with the collection of cool things you have.
|
|
trollbridge
Member
|
# Posted: 26 Oct 2012 08:58pm - Edited by: trollbridge
Reply
Thanks for the help! Quoting: Kudzu If you use the ceiling tile type tin,
I never thought to use that!Quoting: rayyy here is a panel I made for my jelly cabinet.
Whoa...intricate pattern. Did you order it or free hand it?? Did you tape it on the tin first? How did you do the longer lines? Yikes...I think I will need a fairly simple pattern if I am going to keep my wits intact!!!
We have not made the doors yet. I definitely like the idea of creating a groove to slide the tin into. I am picturing a more solid panel on the bottom half of the door made out of wood and the tin panels on the upper portion of the doors. However, my mind could change a million times between now and when we finally do this!! We do have the tools we will need.
Originally I was thinking a fabric curtain would cover the opening but now I am really excited to do this instead. I wanted to originally do a punched tin back splash above the whole counter but decided that may have been too difficult and besides that we had the left over bead board from doing the ceilings...I'm pretty frugal, so whenever I can use something we already have on hand I'm happy. 
|
|
rayyy
Member
|
# Posted: 27 Oct 2012 07:09pm
Reply
Lol,the slots are made with a 1/2"sharp chissle and the holes are just a sharp small center punch.The pattern can be made with a piece of string and a pencil(used like a compouse.)The hardest thing is to find sombody to sell you real tin panels.There are so many neat things you can make with tin.
|
|
|
trollbridge
Member
|
# Posted: 27 Jan 2013 02:44pm
Reply
Well, after being away from the cabin for 2 months and losing the measurements we took before we left, we finally were able to re-measure and build the door frames. Today the tin is getting punched! What a fun little project...easy and awfully addicting too.  I hope it turns out! I hope it turns out!
|
|
rayyy
Member
|
# Posted: 27 Jan 2013 03:06pm
Reply
Awesome,can't wait to see it!
|
|
trollbridge
Member
|
# Posted: 10 Apr 2013 06:03pm - Edited by: trollbridge
Reply
All done!
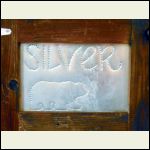
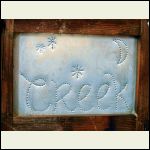
Well, except we forgot the paint for the hinges...they will be black. Not a traditional pattern, but it is custom for us. Silver Creek is what we call our getaway.
The tin is new tin that we dulled with vinegar to age it a bit. It was an inexpensive and fun project!
Thanks for all the tips and encouragement! I would definitely do more of this...it is easy, fun and addicting! Drawing it out first, I would recommend, if you're particular...we just free-handed this.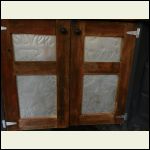
and_cabin_loft_raili.jpg
| 
and_cabin_loft_raili.jpg
| 
and_cabin_loft_raili.jpg
|  |
|
|
|

