|
| Author |
Message |
TomChum
Member
|
# Posted: 9 Jul 2012 06:05pm - Edited by: TomChum
Reply
I'm in the planning stages of a shower house on the 27 degree slope near my cabin. The slope provides some privacy, as the floor of the house will be about 7 feet above the slope. In the summer its open to the wilderness. There will be doors for taking winter showers. Also I get 2 feet of snow, could be up to 4 feet.
I plan to frame it with log posts, and setting on boulders for foundation. I want the construction to look like it could have been built "100 years ago". It should look like a "post on a rock". Probably willlook precariously perched.....
Since it's on the slope, extra thought is in order, to be reliable & get the look I want. I bet there's nothing like this in the code books. Anyone have suggestions to make this foundation better, or an easier way to achieve the same look?
It's a 10x10 platform, and 5x7 of that is enclosed shower house. There will be solar panels on the roof.
|
|
Sustainusfarm
Member
|
# Posted: 9 Jul 2012 06:15pm
Reply
 .......Nope, I thought I had an idea but all I can think of is how convienient it will be to look down on unsuspecting showerees.... .......Nope, I thought I had an idea but all I can think of is how convienient it will be to look down on unsuspecting showerees....
|
|
TomChum
Member
|
# Posted: 9 Jul 2012 06:23pm
Reply
Sustainusfarm
....must be TALL!
|
|
VTweekender
Member
|
# Posted: 9 Jul 2012 07:41pm
Reply
The drawing looks like it would be solid......thats going to look really cool!
What would look cool to is building a winding flat stone stairway in the ground leading to underneath it, and have stairway entrance from underneath. Maybe some sort of stone look siding on the structure as well, so it looks like a log and stone structure and really really old look.
|
|
TomChum
Member
|
# Posted: 9 Jul 2012 07:59pm - Edited by: TomChum
Reply
Thanks for the ideas but may be too short for a stairway under. Was thinking a gangplank to the bank. Plus I don't have any rocks nearby I have to bring them all in - which can be done of course. Also I wasn't going to put a 'drain', just let the water drip thru the deck boards and distribute onto the ground like heavy rain does.
One side will be about 2 1/2 feet above the slope. Ten feet out, the far side will be 7 feet above the slope. So it's not that high, just that you need to be 7+ feet tall to get your eyes over the edge. It will be wide open to the world on that side with double french doors and glass. While I feel sorry for anyone unlucky enough to see (or hear) me taking a shower; I've found that if a shower is not to their liking, the girls start wanting to go home.  Maybe a sheer curtain inside the glass door. The opportunity to shower butt-nekkid to the world should be readily available for a proper wilderness shower. Maybe a sheer curtain inside the glass door. The opportunity to shower butt-nekkid to the world should be readily available for a proper wilderness shower.
Shower room size is 5X7 with cedar inside, and a cedar bench. Will use a propane heater for winter. Probably start with the type that blasts from ontop of a 20lb tank.
I haven't figured out how I'm going to brace it for shear yet... Maybe have to put Xs in all the railings. I'm hoping to avoid knee braces below, but that's an easy to add option if it shakes at all. I'm hoping that it will poke up out of the snow looking like it's on trees. Solar panels on the roof will be four-seasons adjustable.
|
|
bobbotron
Member
|
# Posted: 13 Jul 2012 10:46am
Reply
That looks a bit sketchy to me, it seems like the boulder could be a point of failure if it ever cracked. Maybe you would be better off to dig holes for the posts, put them right into the ground, and mound boulders up around them at the ground level?
|
|
TomChum
Member
|
# Posted: 14 Jul 2012 12:47am - Edited by: TomChum
Reply
bobbotron
Thx, I thought about the boulders cracking if water got in the holes; but the holes (hopefully) will be sealed. I think the boulders will be cradled well by the concrete below, won't crack by forces. Maybe by time, but the boulder could outlast the concrete, which has 100 years life I think. The footprint of this little structure is only 7x10.
Having concrete, rebar, epoxy below is "faking" the rocks-foundation somewhat. I expect to hear "that things gonna tip offa them rocks someday". I bet the logs will rot first.
|
|
bobbotron
Member
|
# Posted: 16 Jul 2012 12:54pm
Reply
Looks like it'd be a cool look.
I'd stick some braces on those legs if I were you, that's a lot of post to be unbraced.
Are you trying to recreate a historical footing method? I haven't seen that kind of thing around here.
|
|
|
TomChum
Member
|
# Posted: 16 Jul 2012 01:02pm - Edited by: TomChum
Reply
Quoting: bobbotron Are you trying to recreate a historical footing method? I haven't seen that kind of thing around here.
HAHA I guess because it doesn't last long enough, and then codes happened (60s, 70s?) so what's available to see now has been rebuilt to conform to code. And the rest is gone without a trace. But I'm pretty sure I can make it last 50 years, 20 years past when I'm all stinkbones.
We can shake on it in all directions & at several stages of it's creation (to get an idea how stable its going to be). The two rear posts at the upper end of the bank will have 7 feet of post extending above, forming the corners of the showerhouse. When the walls are framed in that will add huge shear strength.
Moving on past the planning stage......
As of yesterday the foundation is done, and the rocks all potted in. I pounded 5/8 rebars into the ground spiking outward from each concrete plug. They are 40 inch rods, so there is about 32" of engagement for each rod, 4 to 5 per hole. Some went in hard, others easy. If i could do it over I'd pound in twice as much rebar. Every spike is a lot of added insurance for about $2 and not much effort
Next step is to erect the log-frame....and start a proper build thread!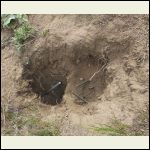
Two-step hole, spiked with 5/8 rebar, 40in long. If I could do again I'd put twice as much rebar.
| 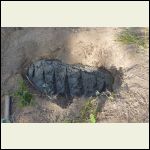
Concrete poured, surface furrowed for next pour
| 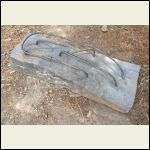
Underside of the rock, with 3/8 rebar pounded in, bent over
| 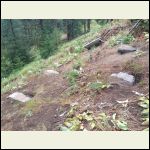
Boulders (rocks, actually) potted over hidden concrete foundation
|
|
|
bobbotron
Member
|
# Posted: 19 Jul 2012 04:12pm
Reply
Rock on Tom! Keep posting photos as you go. Bending rebar is fun eh?
Those boulders look nice and flat, a good base for posts!
|
|
DaJTCHA
Member
|
# Posted: 19 Jul 2012 05:48pm
Reply
Ironically, minus the foundation creativity challenge, I'm going to be starting a similar project at my camp shortly! I'm definitely watching this topic!
|
|
bobbotron
Member
|
# Posted: 19 Jul 2012 05:57pm
Reply
I'm also thinking of making a shower area, but faaar less elaborate. I have one of those shower bags, need to make an outdoor stall for it.
|
|
DaJTCHA
Member
|
# Posted: 19 Jul 2012 05:59pm - Edited by: DaJTCHA
Reply
Quoting: bobbotron I'm also thinking of making a shower area, but faaar less elaborate. I have one of those shower bags, need to make an outdoor stall for it.
That's exactly what I had in mind. A very nice and sturdy "stall" / "portable potty" unit on premises to allow the ladies to be comfortable camping.
|
|
bobbotron
Member
|
# Posted: 19 Jul 2012 06:11pm
Reply
Nice!
The only problem in my case is that we're about to go 110% full speed ahead on cabin building, not sure when I'll find the time to build a shower stall. :P
|
|
TomChum
Member
|
# Posted: 28 Jul 2012 11:23am
Reply
Moving ahead with the shower house project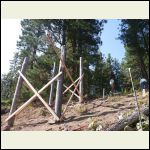
Shower house foundation posts
|  |  |  |
|
|
TomChum
Member
|
# Posted: 4 Aug 2012 12:28am
Reply
Since this is now past the planning stage I've moved to "Member projects" for the rest of the construction.
|
|
TomChum
Member
|
# Posted: 11 Sep 2012 11:30am - Edited by: TomChum
Reply
Looking for advice what to do about board & batten nails in 7/16 OSB. I got into a time crunch and decided to try nailing the B&B to OSB. Obviously this won't hold the battens down if a board wants to cup. Some 2x2 nailers inside would have been better, and the board would have hammered down tighter. I'll do something different on the other 2 walls.
Does anyone have experience with options 'after the fact' (for the nails on this wall)?
Currently my plan is to put a blob of construction adhesive on every shining nail so it can't pull back thru. But this doesn't add any tension to the hold-down force. Would be ideal if there was a way to tighten some of them then freeze in tight. I might try bending them over with a vice-grip to add some pull.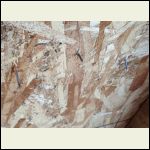
Nails shining thru
| 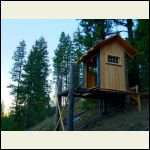
Board & batten Siding
| 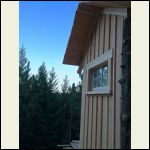
Board & batten & window
|  |
|
|
VTweekender
Member
|
# Posted: 11 Sep 2012 04:53pm - Edited by: VTweekender
Reply
For the battens, you could use screws from the inside and draw them in, I would say 1 1/2 inch screws maybe won't poke out through the outside of the battens, maybe 1 1/4 inch?
|
|
sabiggs
Member
|
# Posted: 11 Sep 2012 05:15pm
Reply
Looks great TomChum. I'm always excited to read and appreciate your posts.
|
|
TomChum
Member
|
# Posted: 11 Sep 2012 11:20pm - Edited by: TomChum
Reply
Quoting: VTweekender use screws from the inside and draw them in
Now why didn't I think of that?
Battens are @ 7/16 + 1/16 tarpaper + 3/4 + 3/4 = 2"! If they poke thru I think a touch with the angle grinder will solve it. I can put screws halfway between each nail then there's a fastener every 6".
Thanks VT & SA!
|
|
TomChum
Member
|
# Posted: 19 Oct 2012 04:40pm - Edited by: TomChum
Reply
I've been avoiding knee braces because I didn't like the look. I wanted to leave the option to do the bracing above the deck, possibly with x-braces within the railing. And I was hoping that some other inspiration would come, but it hasn't, and winter is coming.
I'd like to avoid visible lag bolts in a simple shear connection. Traditional post&beam style is too much work for me. I would rather have the posts notched at 45deg, and just stick a flat-ended log brace fit into the pockets. Anyone have ideas how to cut this notch? I'm thinking about using a holesaw with an extra-long pilot bit. Then chip it out a couple times as it reaches cup depth.
|
|
|

