|
| Author |
Message |
trollbridge
Member
|
# Posted: 29 Feb 2012 11:39pm - Edited by: trollbridge
Reply
We have a wall that we will be doing stonework on hopefully soon. I have two questions I am looking for advice on.
The first is would the rough side of cement board work just as well as plywood with the metal mesh over it?
And the second question I have is will real stones that are smooth all the way around stick to mortar with out having to rough up the back side? We will be mostly using stone veneer but I was hoping to add in some natural silt stone too. It is flat and light weight but smooth so I want to make sure it will bond well.
This is the wall we will be doing (both sides). We need to finish the log work first and the framing but then will continue from there...never done this before so any thoughts will be appreciated.
|
|
TomChum
Member
|
# Posted: 1 Mar 2012 11:01am - Edited by: TomChum
Reply
That looks great.
Quoting: trollbridge will real stones that are smooth all the way around stick to mortar with out having to rough up the back side?
Cement sticks pretty good to your shovel and your wheelbarrow, as you can find out if you lend tools to someone doing cement work.....
If you have a few days, test it. Cement a stone down and let it cure a week then whack it with a hammer. Wet the stone, but let water drip off before you stick it on, and lay wet newspaper over the test area while it cures.
|
|
toyota_mdt_tech
Member
|
# Posted: 1 Mar 2012 05:03pm
Reply
I'd use the hardi panel,. I know it sticks good to that. Just put a scratch coat on it before you start, then backbutter the stone, thick, plop it in place. When you have it all in, take a bakers squeeze deelie (dotn know what its called) and fill in the voids as thick as you like, then dress it up with a hand tool. This is how the stone mason did my stone work behind my woodstove. I think wood backer maylead to moisture and rot.
|
|
trollbridge
Member
|
# Posted: 1 Mar 2012 05:41pm
Reply
Thank you for the advice both of you.
Tmt... You are thinking of a pastry bag. That should work well...we did our brick fireplace at home years ago that way but I remember we felt pretty klutzy during the process.
The other thing I am wondering is how warm should it be while everything is curing. My thoughts are to wait until spring because when we leave the cabin it is unheated and freezing temps cannot be good...I wouldn't think... but what would the minimum desired temps be?
|
|
hoosiercabins
Member
|
# Posted: 2 Mar 2012 08:28am - Edited by: hoosiercabins
Reply
If you use plywood, which you can, you will have to staple 15 pound roofing felt down first then your mason screen. The moisture and lime in the mortor will cause the plywood to start to delaminate and you will have issues after time. I have done many real and veneer stone walls and have recently been using Durarock cement board and it has been working great. No more dealing with screen, which makes it nice. Just put mortar on the cement board (scratch coat) and then back butter the stone and stick it on the wall. The cool thing about stone, it is a total do it yourself project because there is no way anyone can see a mess up. All stones are irregular. Also, you get that feeling of accomplishment when someone makes a comment on how good that stone looks. Not sure if you did the log work in the photo, but if you did you will have no problem at all doing the stone. Looks awesome! Also, as far as heat for drying, you will want it to be at least 50 deg when it is curing. If the water in the mortar freezes you will block the bonding agent and the stone will fall off. Good luck!
|
|
BlaineHill
Member
|
# Posted: 3 Mar 2012 07:44am
Reply
I have no prior experience with this, but I am in the middle of applying StoneCraft brand stone veneer on my own project. Since I didn't have a feel for what I could get away with and what I couldn't, I decided to follow manufacture's strict recommendations.
I asked StoneCraft tech support if I could apply the stone veneer directly to the concrete board. They told me if there are seams where concrete board panels come together, there will likely be cracks in the final product. They also told me that during their own testing, they have had adhesion problems applying the veneer directly to concrete board.
They told me I could use plywood or concrete board as a subsurface, but OSB was not recommended. Whatever I chose for the subsurface had to be covered with 2 layers of tar paper, metal lath, then a scratch coat before applying the veneer.
It sounds like the tarpaper isolates the plywood subsurface from moisture. The lath and scratch coat work together to create one continuous and seamless surface. And the surface properties of the scratch coat provide good adhesion with the veneer. That's what I have been able to gather.
I would have liked to cut a couple of corners on this one as it has been a real pain. I should have it done after next weekend and I will update my own construction thread with a photo sequence.
|
|
trollbridge
Member
|
# Posted: 5 Mar 2012 04:16pm - Edited by: trollbridge
Reply
thank you for the excellent thoughts!
Blainehill I look forward to seeing your photos and hearing more details about your stone work. I always enjoy your thread so I can't wait to see what you are doing with the stone!
|
|
brokeneck
Member
|
# Posted: 5 Mar 2012 10:05pm
Reply
In my experience cement-board is the best substrate. Attach wire mesh -- you'll find it in the same scetionof the store. For cultured stone I've always worked from the top down to better protect the rock below -- they suck right in and are light enough to stay put. For real stones or a mic of both I work from bottom to top -- much harder to keep the rocks nice and clean of mortar -- looks great already --post some pics of yor work,
|
|
|
trollbridge
Member
|
# Posted: 6 Mar 2012 11:12pm
Reply
Just found out there is a special mesh tape to use on the seams of the cement-board that keeps it from cracking...that will be more convenient than using the wire mesh over the whole thing!
I can't wait to do the stone. This past weekend we worked on that wall section a little...and eliminated the need for any of the "corner" stones. This made me happy cause we don't have any and don't want to spend $$$ for any! We have the other log to put up for supporting the other side of the arched log and then we will get to the rest of the 2x4 studs and the cement board. After that we just need mother nature to cooperate with some warmer temperatures and we will be ready to have fun!!!
I will for sure post pictures during and after for you to see. Thanks much!
|
|
brokeneck
Member
|
# Posted: 3 Apr 2012 09:44pm
Reply
Any new pics?
|
|
rayyy
Member
|
# Posted: 4 Apr 2012 05:26pm
Reply
Yes please do.I'm gonna build a veneer stone wall behind my old wood cookstove than A fireplace on the back side of that.It's on my "to-do"list somewhere down a few pages though! lol.
|
|
toyota_mdt_tech
Member
|
# Posted: 4 Apr 2012 07:49pm - Edited by: toyota_mdt_tech
Reply
I mentioned I used hardi board, it was the 1/2" thick cement board. I went 5 feet long, 4 feet high from a corner on each side of the corner, so I have no seams in it and was screwed in well, so no flexing. We just applied the stone right over the top, no mesh, no screen. Was done in October, no heat. Mine was done by a professional stone mason (also a good buddy). No issues, turned out real nice. Scratch coat, then backbuttered the stones.
|
|
Bzzzzzt
Member
|
# Posted: 4 Apr 2012 08:12pm
Reply
I don't have anything of value to add but a smile ÷)
|
|
trollbridge
Member
|
# Posted: 4 Apr 2012 09:02pm - Edited by: trollbridge
Reply
Quoting: Bzzzzzt I don't have anything of value to add but a smile ÷)
We all know why you are smiling too.......ugh,sickening newlyweds..........always have a smile on their faces!!!!! Better watch out Rayyy....you'll be the next one walking around like Bzzzzzt!!!! Better watch out Rayyy....you'll be the next one walking around like Bzzzzzt!!!!
We got the other side done-the wood supporting the other side of the curved log this past weekend and I decided that I want to use all real stone from Lake Superior because the scale is better I think. The cultured ones are pretty large and besides I have a place they can go outside on the front porch....ssshhhhhhhh....don't tell Mr. Troll! More work, but in the realm of this whole project I really don't think it's gonna matter. LOL!
So toyota what you are saying is interesting-what would you say the temps were when yours was done in October? It is still getting below freezing here at night but shouldn't for too much longer.
I think the screen for us will be wise to use because we won't be able to do it in large expanses-it will have to be a bunch of smaller pieces fit together simply because of the shape but we'll see....the less individual pieces the better but trying to cut irregular shapes...what a nightmare! Just getting the logs to fit together was a time consuming challenge 
I'm gonna get the pictures on the computer and then I'll post a couple.
|
|
trollbridge
Member
|
# Posted: 4 Apr 2012 09:37pm - Edited by: trollbridge
Reply
Here are a few: We went to collect more rock from the beach this past weekend. Got as much as I could carry back to the car,so I'll probably need a few more trips because even though each stone is fairly light as far as stone goes...it still adds up when carrying it. My "beach bag" is going to rip across the bottom one of these trips! It was also kinda hard to find because so much new sand had washed ashore burying the rocks that the waves also brought in!
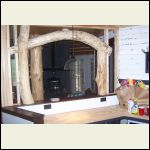
I was trying to find a good picture showing the trim piece that we put up on the end so that we would not need "corner stones". It sticks past about 3/4" so the cement board will be inside that- am I making any sense? Below the rock on the lower section of wall will be tin----would love to have stone the whole way down but we worried about the weight. Besides the tin will be the same as what is behind our wood stove so hopefully it will look nice.
We brought a piece of cement board home and some stones so we could see how well they stick and hold. Probably play around with that this weekend....I'll be crying if they don't want to hold tight! 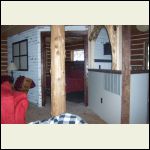
100_8212.JPG
| 
100_8466.JPG
| 
Lake Superior shore
|  |
|
|
BlaineHill
Member
|
# Posted: 4 Apr 2012 09:55pm
Reply
Type N or S. Press. Wiggle. Press and hold for a little while longer. Release slowly. I think you will be okay. Real stone is a lot heavier than the fake stuff I used. You might need to press for a little while longer. It looks like you have extra helpers for that part. Good luck. It will look great.
|
|
trollbridge
Member
|
# Posted: 4 Apr 2012 10:03pm
Reply
Thanks BlaineHill!
The stones are pretty small and flat though so I'm hoping they stick as well as the cultured ones.
Yes...I'll tell everybody to come hold a stone in place for a while....they can each take a shift! Hee hee! Funny though...none of them ever volunteers to carry the heavy bag back to the car for me!!!
|
|
trollbridge
Member
|
# Posted: 4 Apr 2012 11:15pm - Edited by: trollbridge
Reply
Well, decided to try this tonight while waiting for our newly licensed (just today!) 17 year old driver to get home from her date with her boyfriend. A parents worry is never ending
We used mastic which is what we used for our fireplace at home (that is thin brick). troweled it on and pushed the stones in. They are stuck good and solid. It is hard to break the suction! The heavier ones want to slide a little but Martian suggested putting in screws to support them and I don't see why that would not work.
I'm really excited to get working on this...so much more fun than some of those other boring jobs!
Whew...my daughter Shannon just walked in!!!!! She's made it through the first day of driving without crashing!!!! So relieved Now I get to go to bed!! Now I get to go to bed!!
|
|
toyota_mdt_tech
Member
|
# Posted: 9 Apr 2012 06:30pm
Reply
Quoting: trollbridge o toyota what you are saying is interesting-what would you say the temps were when yours was done in October? It is still getting below freezing here at night but shouldn't for too much longer. I think the screen for us will be wise to use because we won't be able to do it in large expanses-it will have to be a bunch of smaller pieces fit together simply because of the shape but we'll see....the less individual pieces the better but trying to cut irregular shapes
It was in October, late. Temps maybe belwo freezing at night, but probably not inside the cabin. Wasnt heated, just well insulated (its heated now)
As for stone cutting, lok into "cut rite" or maybe right. My brother in law owns this design and sells all over the world. He has them made. Wifes side of the family is all stone masons going back several generations.
|
|
trollbridge
Member
|
# Posted: 9 Apr 2012 07:15pm
Reply
Thanks toyota! I will look into that cause it could really come in handy!
on a side note I cleaned my purse out today...it was so full of receipts and junk(no money- sniff!) it weighed a ton and now I know why. At the very bottom I pulled out a rock that I had picked up at some point while up north and forgot that I had shoved it into my purse!! I could have left it in there in case I'm ever mugged - I could knock someone unconscious with a single whack over their head!!! LOL!
|
|
trollbridge
Member
|
# Posted: 26 Apr 2012 02:59pm
Reply
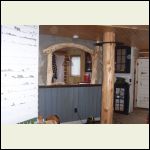
We got the cement board up...that was fun to cut in odd shapes-NOT! and then we used the mesh tape for the seams. That was easy. The seams were then covered with the "mud" coat as well as all the cracks along the logs. In hindsight we should have used a thick coat first for larger gaps and then more of a thinned skim coat over that. It was very messy but nothing that can't be cleaned up. I know I need to go collect more rock but as soon as I have enough we will be going for it! I am very excited cause I think it will add a lot of character and charm to our oddly hodge-podged looking cabin and it is always fun doing something new to challenge ourselves. and then we used the mesh tape for the seams. That was easy. The seams were then covered with the "mud" coat as well as all the cracks along the logs. In hindsight we should have used a thick coat first for larger gaps and then more of a thinned skim coat over that. It was very messy but nothing that can't be cleaned up. I know I need to go collect more rock but as soon as I have enough we will be going for it! I am very excited cause I think it will add a lot of character and charm to our oddly hodge-podged looking cabin and it is always fun doing something new to challenge ourselves.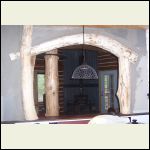
kitchen side
| 
living room side
|  |  |
|
|
Sustainusfarm
Member
|
# Posted: 29 Apr 2012 05:35pm
Reply
I think I like that stucco- like look too! I am in Central Wisconsin, you must be relatively close if you are by lake Superior??
|
|
trollbridge
Member
|
# Posted: 30 Apr 2012 10:45am
Reply
Awesome another Wisconsonite!!! I'm always surprised there aren't more of us since everybody seems to have a cabin "up north"! We have our place south of Lake Superior near the town of Hawthorne. Where are you located? I was reading your timeline and it sounds about like our pace! Would love to see photos of all your hard work!
Our walll does look pretty cool with just the "mud" coating on it. A stucco would be really easy to do. I am very excited to get some stone up-I was tempted to start yesterday cause it is going to be warm this week but then I just knew it would be hard to stop and I had promised I would do some drawings for my daughter in college so we wanted to be home early enough. She has to write and illustrate a paper on cystic fibrosis. Sooo instead I vacuumed every nook and cranny of our screened porch which was full of saw dust from cutting out there all winter! Now it will be clean and ready for "sittin' a spell" next time we have a moment!
|
|
Sustainusfarm
Member
|
# Posted: 30 Apr 2012 02:39pm
Reply
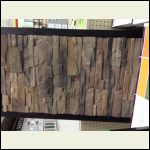
Trollbridge , How do you read someones timeline?? Or their profile for that matter? Our place is located near Wautoma in central WI. Waushara county. Love it there...we are doing some major cleanup after we had the Amish go through and log our plantation pines...so far 3 semi loades have been taken out and all with their horses... Cant wait to get paid as it will be the money that FINALLY pays for a well!! WooHOO! They cut down close to 300-400 trees and clear cut a few of the areas so we can start an orchard, berry patch and garden...tough to get used to the openess of it all! We are also geting ready to put a veneer stone behind our woodstove...pics below...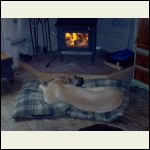
boat_100.jpg
| 
Stone_for_behind_Woo.jpg
|  |  |
|
|
trollbridge
Member
|
# Posted: 30 Apr 2012 03:19pm
Reply
I just read your timeline under the "how long did it take you to build your cabin thread" that another member had started. Your profile you can see by clicking the word "member" right under Sustainusfarm above on the left.
Sounds like you have been busy with the Amish. It would be interesting watching them work without the heavy equipment!
Your veneer will look real nice behind your stove oh...and your dog certainly looks comfy there! Are your plans to live at your cabin full time or do you already? I am going to have to look on a map and see where Wautoma is...must be a smaller town.
|
|
trollbridge
Member
|
# Posted: 30 Apr 2012 03:24pm - Edited by: trollbridge
Reply
Ahh, I see Wautoma---more south than what I was thinking originally. That is a very pretty area of Wisconsin
oh and your cabin I saw before and tried to comment on and my computer died but what I was going to tell you is that I really like the design. love those big doors that form a whole wall!!! Very nice!!!
|
|
Sustainusfarm
Member
|
# Posted: 30 Apr 2012 04:34pm
Reply
Thanks I designed it myself... And presented the building plans to the county on a napkin! Really!! That was in 1995...I bet I couldn't do that now! When I asked what type of foundation they required they laughed as said" it doesn't matter a tornado will probably take it away anyways!" sure enough, last summer we had a tornado that did a lot of damage, cabin was fine though! We only have an outhouse as well as an outdoor shower. I am currently working on getting hot water into the shower as I am finished with the "shower bag shower" hassle!! Lol. Just looked up your location and we know that area well!! My partner Jason is from Moquah which is east of you off 2 closer to Ashland! We will be up there in June to visit his family and blueberry pic! The biggest attraction in Moquah is a bar called The Plywood Palace!
|
|
trollbridge
Member
|
# Posted: 30 Apr 2012 05:15pm
Reply
Wow-well I hope a tornado never takes it away and I'm glad you didn't have any damage last year as well!!! Now I know where Moquah is. Who says I didn't learn anything today! LOL! It is funny these little towns and their bars but I'll bet The Plywood Palace does quite a business with snowmobilers...at least on a "good" snow year...not like this year!!!
|
|
trollbridge
Member
|
# Posted: 11 May 2012 11:44am
Reply
Going to the cabin this weekend to put up the stone!!!!
Saturday morning we will drive up to the lake to collect more rock so that we have enough and then...big breath....stick them up and pray they stay up!!! LOL!!!
I'll post pictures next week. So excited!
|
|
trollbridge
Member
|
# Posted: 15 May 2012 07:34pm
Reply
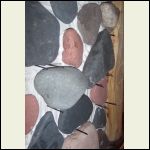
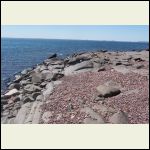
Got one side covered in stone! Went well----grouting will be fun! I can see the mess now! LOL! It took more rock than we thought. We put small finishing nails under the stones to keep them from sliding on us. We will pull them out when it has all cured. Here are some photos...We went to the beach to collect rocks...this time we went to the Minnesota coast where it is all rock instead of walking the Wisconsin coast where it is mostly sand but has more of the sile stone that I like...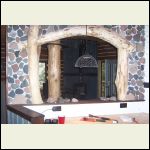
100_8759.JPG
| 
100_8760.JPG
| 
100_8755.JPG
|  |
|
|
|

