|
| Author |
Message |
sh10134
Member
|
# Posted: 27 Feb 2012 06:54pm
Reply
I intend to break ground on my cabin in a couple months in Michigan's Upper Peninsula (snow has been relatively light so far this year). My experience here is extremely light, as I'm sure will be evident by particulars in my design, though I hope the overall idea is sound. I'd appreciate any advice, though I have specific issues/questions in mind to pose at the end.
My overall design goals are:
1. < 200 sq. ft. main room footprint
2. Two separately enclosed loft bedrooms (family of four) where an adult can stand in the center. Option for small closet space built into the center common/hall area
3. The small incorporated porch is a bonus arising from the other two goals, but I definitely like the idea
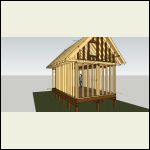
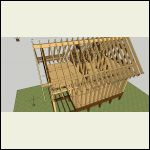
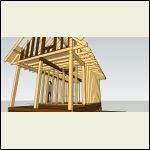
Almost everything is 2x6 16" OC. The ridge board(s) is/are 2x8 and the floor frame is 2x10. It's balloon framed with three walls (North, West, South) ~10' high and the East wall 8' high. The loft flooring is held up by a combination of joist hangars, the front 8' wall and, where possible, 2x4 bearing studs inset in the walls.
The soil is well compacted and sandy at least as deep as 8', with plenty of trees and undergrowth. For the main foundation, I intend to dig 2x2x4' holes and fill them with compacted crushed rock or gravel and then set pyramid blocks on top of those which will hold some number of pressure treated timbers, as shown at http://coyotecottage.com/cabin/cabinconstruction/foundation.htm. The floor framing shown in the model will then be attached to the PT timbers. I'm not set on the orientation of the floor framing; that's just what the component in Sketchup created. If it makes more sense to run the framing in the other direction (12' span) I'll do so. Also, I'll have to work out something else for the PT 6x6 porch posts in front.
Though it's not roughed in yet, the door will probably be on the porch's stage right. The porch itself will look generally eastward. I intend at least one window on each wall, and probably 2-3 on the south wall.
Other to-be-realized aspects to the model include:
- Better formed corners for 2x6 framing (probably boxed).
- A third 6x6 post in the center of the front of the porch so there's a direct line from the ridge board to the ground. However it shakes out (see questions below), the same should be true on the back wall.
- Interior walls built 8' in from the gable ends (shown by two vertical studs outlining the doors) which will also, I hope, provide bearing for the ridge board(s).
My main questions so far:
- The front wall is, as noted, 2' lower than the other three. I did this so that the loft floor can extend outside of the main floor and afford a second 12x8' loft bedroom. Is this going to be problematic for joining the corners or any other reason?
- On the front gable end, I was able to frame in a rough window opening of 28-1/4" x 38". The 10' wall on the other to-be gable end precludes this. I could similarly drop that wall to 8', or maybe I should just bite the bullet and platform frame with the main floor walls at 8' and separate 18" knee walls up top. Somehow this seemed less sturdy than the simple 10' bearing walls and certainly it is more complicated.
- Is it OK how I've extended the double top plates on the long walls beyond the main structure to create a 1' eave, or do I need to do something different there? My own mid-century modern house has vertically aligned 4x6 boards extending thus, but far enough out to create 4' eaves.
- Similarly, is it OK where the double top plates span between the main walls and the 6x6 posts on the front side of the porch? There are 3 rafters there supported on the bottom by only those boards with nothing bearing underneath.
- Other problems notwithstanding, is 16" OC too close?
Finally, if it would help answer my questions or if anyone is otherwise interested, I can upload (or maybe share through the program?) the Sketchup file. It's 10.1M but only 3.9M zipped.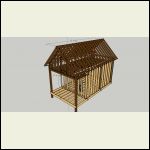
From NE
| 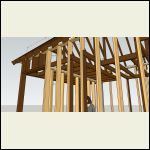
From NW
| 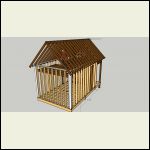
From SW
| 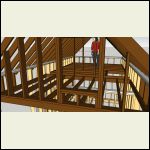
From ENE
|
|
|
sh10134
Member
|
# Posted: 27 Feb 2012 07:00pm
Reply
The images appear to have been reprocessed to be only 800 pixels on a side (and perhaps converted to JPEG) so the quality is less. Knowing these limitations, I can post better or different images as requested.
|
|
sh10134
Member
|
# Posted: 27 Feb 2012 07:54pm
Reply
Also in the to-be-added-to-the-model department are collar ties to the tops of the rafters. I'm hoping that the way the loft spans and connects the bearing walls in most places will serve as good-enough substitutes for the missing rafter ties.
|
|
brokeneck
Member
|
# Posted: 27 Feb 2012 10:41pm - Edited by: brokeneck
Reply
Like it a lot --any calculations on the cost yet?
|
|
sh10134
Member
|
# Posted: 27 Feb 2012 11:23pm
Reply
Quoting: brokeneck Like it a lot --any calculations on the cost yet?
Not at all, but I'll definitely post estimates once the design is finalized and then later follow up with how close I was. I should really be watching what's going on in the lumber market, but I must confess that I have no idea. I have a vague notion that I can do this for $5k based on what friends have managed in summers past. I'd love to do it for less, but I can also go over that if necessary. Whatever it takes.
|
|
brokeneck
Member
|
# Posted: 1 Mar 2012 10:42pm
Reply
Keep us posted -- I'm staring to getan itch to build my son and his wife a place --
|
|
soundandfurycabin
Member
|
# Posted: 2 Mar 2012 09:19pm - Edited by: soundandfurycabin
Reply
I have a few suggestions for you. There is more than one way to do things so this is not the only way, but it is what I'd do based on my understanding of your description and model....
I would run the first floor joists in the 12' direction. That way the loads from both floors and the roof can bear on beams running along the 16' sides.
You do not need a post or other bearing under the ridge board. A ridge board, unlike a beam, does not support any weight. It is just there to hold the upper ends of the rafters in position. With a ridge board, the roof load is carried entirely by the side walls, and the loft joists tie the side walls together so they don't get forced apart by the weight. Note that this method may not be adequate if you get very heavy snow loads. Run it by your inspector to make sure it will be allowed.
To adequately tie the walls together, the loft joists should rest on top of the ledgers and be nailed into the sides of the studs. That will hold the side walls together much more securely than using joist hangers. If you are getting inspected, you will need fire blocking in the walls at the loft floor level.
The mix of wall heights isn't a problem. Normally walls are tied together in part by overlapping the top plates at the corners. Instead, make sure to nail the neighboring studs together well and also use the wall sheathing to tie the walls together.
I'd either balloon frame the back (west?) wall all the way from the first floor deck to the ridge, or keep it to 8' like the porch wall. I would NOT build separate 18' kneewalls at the sides as they would not be able to resist the outward force exerted by the roof load.
Unless you have heavy snow loads, a 1' eave can be supported just from the overhanging roof sheathing, along with horizontal blocks between that last "false rafter" and the wall. The extended top plates will add a bit of extra support but probably aren't needed.
On the other hand, I would not count on the double top plates to support the porch roof. My suggestion would be to have a small beam at each side running from the porch post to the main cabin wall, supported by the corner studs at that end. Then run the loft framing from side to side, which will make sheathing the loft floor a bit easier. It will also keep all the loft load on the side beams.
16' o.c. framing is fine. You might want to go 24' on the roof. Rafters are often over-sized structurally in order to get more room for insulation, so spacing them a bit farther apart is usually no problem.
I hope that helps....seems like a nice project.
|
|
Retired
|
# Posted: 4 Mar 2012 06:44pm
Reply
Looks like your pretty much building a Kenora II with the exception it is 168 on the ground floor and 200 upstairs. I would suggest you buy the Kenora II plans and simply extend the building to give you the 200 you want. The plans will save you alot of scratching your head. It will show you how to build beam pockets in the front wall for the pourch. You can stand up, up stairs. You can build the dormer without the full walls to gie you a more open feel. I had my trusses pre made and set on the building i hired a couple cartpenters to set them and help me sheath the roof. You really nead a skilled carpenter to do the dormer and tie it in properly. The plans are readily available on the internet for around $28. Add a framing book, and you can pretty much ask questions from the lumber yard you deal with. Here is a link to the Kenora II I have been building. I have the gutters on now and only need to wrap the front columns and its pretty much done outside
http://s1233.photobucket.com/albums/ff385/LegendProducts/
|
|
|
sh10134
Member
|
# Posted: 6 Mar 2012 05:08pm
Reply
This is in the Upper Peninsula of Michigan, so snow loads are definitely a concern. If I'm reading correctly, I'm seeing 50 year loads between 85 and 100 pounds. Based on that and what you've said, I'm now investigating having a full ridge beam that would span the ~22 feet between the gable ends, supported down to the foundation. I'd like to support it in the middle as well (down the middle of the loft door frame planes), but am almost certain that what I have specified so far underneath will not suffice. If I can work that out, I can do a smaller beam, which will be good because a crane is almost certainly out of the question.
|
|
soundandfurycabin
Member
|
# Posted: 7 Mar 2012 01:46am - Edited by: soundandfurycabin
Reply
Here's another option if you want to avoid a ridge beam....
Extend the loft joists so they stick out a couple of feet past the walls on each side. Then extend the rafter tails so they overlap (side by side) the joists and nail them together with at least four 3" nails. Check local codes for requirements; four are required where I am but that's only up to ~62psf snow load. Obviously you'll have to keep the rafter spacing at 16" to do this. That will be much stronger than depending on the walls alone to transmit the roof spreading force to the loft joists.
|
|
Anonymous
|
# Posted: 7 Mar 2012 02:00am
Reply
we're in Alaska and familiar with UP kinda snow levels. Look at extending your eaves out farther (unclear from the drawing, but they look short). It will put your snow slide farther from the cabin walls/foundation, same with rain, and give you a drier path to walk around the building.
Looks like you have short loft walls (maybe a foot or two) under the rafters. Good for you. We bought a cabin with zero and if I could change one thing, that would be it. For $50 more wood, it could have had another 100 square feet of usable space.
|
|
jrbarnard
Member
|
# Posted: 7 Mar 2012 06:15am
Reply
What program did you use to make the photos? I'd sure like to punch my specs into something like that... heh
Russ
|
|
sh10134
Member
|
# Posted: 22 May 2012 10:37am
Reply
I've been busy with life and, when I can find time, with updating the design based on things written here and elsewhere. I dug eight of sixteen post holes last weekend. With help this weekend I hope to get at least the posts set, possibly the beams and even floor joists placed.
My guess at $5k in materials was fairly close, perhaps a little low. That's for the completed shell; no interior finishing. We'll see at the end of the summer.
jrbarnard: I used Sketchup to make the model and exported the images from there.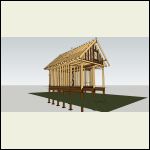
cabin1.png
| 
cabin3.png
| 
cabin4.png
| 
cabin5.png
|
|
|
doo-drew
|
# Posted: 22 May 2012 07:07pm
Reply
I'm not sure where your at in the UP but some places have over 100lb snow load rating for code. I'm in the NW lower in an area with a 70lb rating. There is a chart out there that lists it per county and some places specific townships because of how much they get. If you want I could find it. As you know... Light this past year on snow could mean we get hammered next year (hope so anyway).
Great cabin idea though.
|
|
sh10134
Member
|
# Posted: 11 Sep 2012 05:01pm
Reply
As I suspected would be the case in my more sober moments, everything takes longer than one thinks/hopes. Combined with other limiting factors (overall available time and labor), I only got as far as the floor joists. Still, I'm happy with how they turned out (relatively square and level) and will resume work on the walls and roof next spring/summer.
|
|
241comp
Member
|
# Posted: 13 Sep 2012 08:58am
Reply
I totally get the "everything takes longer than one thinks/hopes" as my cabin project is only 30% or 40% of where I'd hoped to be today, but it looks like you're making great progress and when you resume work, you'll have a solid foundation to build upon.
|
|
OwenChristensen
Member
|
# Posted: 13 Sep 2012 06:09pm
Reply
So will it look like this?
Owen
|
|
trollbridge
Member
|
# Posted: 13 Sep 2012 06:10pm
Reply
Quoting: sh10134 As I suspected would be the case in my more sober moments, everything takes longer than one thinks/hopes.
Yep! It is Oh so true! On the bright side you are off to a great start and once the snow melts next spring you will be able to really start seeing progress!
Best of luck to you...use your "down time" to really think through your design and interior layout. It isn't such a bad thing to have the extra time. 
|
|
|

