|
| Author |
Message |
GoneCountry
Member
|
# Posted: 20 Jun 2024 02:27am - Edited by: GoneCountry
Reply
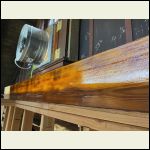
I'm still confused what everyone is doing for a finish on their pine tongue and groove shiplap. Nobody seems to know the exact answer but I see it all the time so there has to be a norm. I hear the answer clear coated all the time but in my experience, that didn't change the look of my T&G. Only thing I can figure out is I probably should've got yellow pine to achieve that look (lesson learned) I had white pine to work with. So here's the big question, I've attached a pic...what product would you guess was used to get this tone/finish?
Thanks in advance
|
|
Brettny
Member
|
# Posted: 20 Jun 2024 10:53am
Reply
That's prob gloss polyurethane but about 20yrs old so it changed color quite a bit.
|
|
Fanman
Member
|
# Posted: 20 Jun 2024 11:35am
Reply
Looks like amber shellac to me.
|
|
Steve_S
Member
|
# Posted: 20 Jun 2024 11:43am
Reply
Pine changes colour as it ages regardless of what's on top. If exposed to UV that will also affect it. UV can actually have a "bleaching" effect even with clearcoats with UV protection in them still get affected but much less.
White Pine will tend to yellow - amber in colour over time. Red Pine will darken and the reds will come out with a burgundy-ish highlight.
Valspar, Minwax are most commonly used. ore & more are water based and not oil anymore and they work really well. Some of the clear coats do have some colour stain (limited). TIP, BEFORE USING IT LARGE, get a small "sampler" can and a scrap piece of the same wood you want to coat & do 3 coats to see what it comes out like. Remember that regardless, Pine will change colour over time too... What is "blonde" when built will be Sandy-Blonde to Light Brunette in 5 yrs.  Don't tell Missus. Don't tell Missus.
Hope it helps, Good Luck.
|
|
gcrank1
Member
|
# Posted: 20 Jun 2024 11:56am
Reply
I agree the pic color(which can be deceiving) looks like the amber shellac'ed wide pine windowsill beside me.
We also wanted to get that 'vintage' varnished look.....it can be done but is like the patina on real antiques, earned over time and hard to duplicate. For me the amber shellac came the closest but it was 30ish years ago. I expect formulations, and options, are different now.
Maybe look on some furniture 'fefurb & restoration' forums?
|
|
GoneCountry
Member
|
# Posted: 20 Jun 2024 03:06pm
Reply
Thanks for the input so far. I applied one coat of amber shellac to mine a little over a year ago and it was way too yellowish for me at the time, almost like John Deere yellow, but I knew it would darken with time. It's still not quite the shade I want but I suppose time will help. I wanted a bit more of a golden look than yellow look.
|
|
Aklogcabin
Member
|
# Posted: 20 Jun 2024 03:27pm
Reply
I have 200 boards of pine TnG to finish up for our cabin too.
I believe that you can use a stain on the wood first to achieve something pretty close to the color in the picture. I believe that the wall in the picture has probably been stained.
From my experience operating a custom woodworking shop for over 10 years I would recommend using Minwax brand stain. Because the grain structure in pine can tend to stain unevenly. Minwax uses pigments and dies in their stain that makes applications easier. Although it probably is colored by age from US and age also. You should be able to find something close in color. Although matching what natural tones accure is not easily done. I will be using golden oak stain, it will make it grain pop out more.
As a topcoat I will be using a laquer as it dries fast and can be reapplied in a short time, less than an hour usually. The manufacturers state no sanding required, but the topcoat will raise some grains and I like to sand it quickly with green scotchbrite pads. Then apply another coat of laquer. I would recommend that you use a foam roller or get an inexpensive spray gun. Laquer goes on very easy. I like to use the gloss tone because in a year or so it will be a somewhat semi gloss, it does fade out a bit over time.
Polyurethane is a better product for something like a table that requires a tough finish. But for walls n cieling on the pine the laquer is a great choice.
It's important to apply the stain and topcoat before you install the TnG pine as it moves, shrinks n expands with the relative humidity in the air. Or you may end up with lines of unstained areas. Good luck n have fun, your project will look great.
|
|
GoneCountry
Member
|
# Posted: 20 Jun 2024 03:42pm
Reply
Thanks for the info Aklogcabin. My one coat of shellac turned out a bit blotchy but still looks decent. If I'd known what I know now, I would've used Minwax as you mentioned...or better yet pay the extra $ for pre-finished t&g.
|
|
|
Brettny
Member
|
# Posted: 21 Jun 2024 12:31am
Reply
Quoting: GoneCountry .or better yet pay the extra $ for pre-finished t&g
Better than that apply what lasts and is easy to apply or re apply.
I used 2 quick coats of satin water based poly sprayed through an airless sprayer for interior wood covering. Everyone who sees it asks if we are going to stain it. So clear and flat that you cant even see it.
|
|
Fanman
Member
|
# Posted: 21 Jun 2024 01:41am
Reply
If you buy shellac flakes instead of the premixed shellac from the big box store, you can get a range of colors from clear to dark brown.
|
|
ThisOldCabinNJ
Member
|
# Posted: 8 Aug 2024 12:11pm
Reply
I've become a big fan of shellac in the last year or so however Lacquer is good and so is polyurethane. Oil-Poly tends to be yellow regardless and take a longer time to dry. Shellac and Lacquer dry as soon as the solvents evaporate.
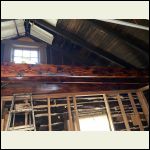
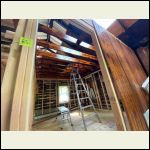
I did a lot of the new wood in my cabin with Shellac. I bought flakes from ShellacShack (not Amazon...you want to make sure you buy good **de-waxed** shellac flakes - the dewaxed part is important because if it has wax in it, you'll never be able to top coat the shellac unless you strip it first), mixed up the flakes, pour in a spray gun and go to town. FYI, shellac is used as a sanding sealer. It will raise the grain of the wood and provide a little 'texture'.
It was very easy and it my new go-to for clear on beams and trim work; just a little messy with the sprayer overspray so do this in a basement or outside. The spray mess is there with anything you will spray, not just shellac. Also, I used a cheapy Hazard Fraught HVLP sprayer and it worked great. You can also fine-tune the "cut" of shellac by adjusting how many Lbs. of flakes you add to 1 gallon of alcohol. For spraying I've been using a 1.5 to 2 lbs / gallon cut. Lay a lot of thin layers to build up a nice coating letting them flash in between. If it's not dry, the worse that happens is it may run a little.
Anyhow, you can buy a variety of colors of shellac. It mixes very easily with DeNatured alcohol (or Everclear grain alcohol which is consumable if you so dare (my poor attempt at a joke) - but everclear is also 2-3x the price. In all seriousness though, Everclear is also "safer" because there are no denaturants in the alcohol especially if you're spraying it and have airborne concerns...do your homework if you're concerned about this kind of stuff is all). It also cleans up very very easily with the alcohol.
I digress: back to shellac. It repairs easily, can be easily sanded and will leave a finish that (in my opinion) looks better than oil polyurethane.
I wouldn't use shellac on a floor, counter top, or anywhere you need better protection from water/traffic, etc. It will turn milky-white if it gets wet. I'd hope your millwork and ceiling shouldn't be getting wet.
Sorry for the long ramble... I did exposed beams in my bedroom by burning the board, scraping the char then several layers of shellac. 2x layers of clear, 2x layers of "garnet" shellac and then 2x layers of clear on top....for what it's worth.
IMG_4489.jpg
| 
IMG_4512.jpg
| 
IMG_4616.jpg
|  |
|
|
gcrank1
Member
|
# Posted: 8 Aug 2024 09:18pm
Reply
 
|
|
Fanman
Member
|
# Posted: 8 Aug 2024 11:28pm
Reply
Quoting: ThisOldCabinNJ I did exposed beams in my bedroom by burning the board, scraping the char then several layers of shellac. 2x layers of clear, 2x layers of "garnet" shellac and then 2x layers of clear on top....for what it's worth.
Looks beautiful. What's the finish on the wainscoting leaning against the studs in the last picture?
|
|
|

