|
| Author |
Message |
GoneCountry
Member
|
# Posted: 8 Aug 2023 03:58pm
Reply
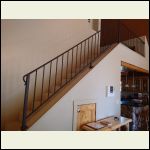
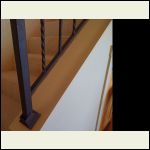
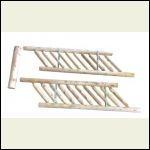
Our cabin loft has a wrought iron railing and we want to replace it with a wooden railing. I've attached pictures of the existing railing and a sample picture of the new railing. What has me curious is how the new white cedar posts will need to attach to the 6" wide existing trim board where the existing railing is attached now. I don't think toenailing screws is the ideal way for this, or is it???
Thanks in advance.
IMG_20230730_1417567.jpg
| 
IMG_20230730_1417204.jpg
| 
Screenshot_20230808.png
|  |
|
|
travellerw
Member
|
# Posted: 8 Aug 2023 04:31pm
Reply
When it comes to railing, I'm all about going WAY overboard. Fat people are inevitably going to lean on it and put more weight than you think (I'm one of those fat people).
If it was me, I would approach this from the bottom. Lags from the bottom is one way. However, I think it would be better to use a threaded rod and nut pocket though.
|
|
curious
Member
|
# Posted: 8 Aug 2023 05:37pm
Reply
https://buystairparts.com/product-category/hardware/newel-mounting/
|
|
GoneCountry
Member
|
# Posted: 8 Aug 2023 06:30pm - Edited by: GoneCountry
Reply
To put lags in from the bottom, are you talking about taking the existing board off to do this and screw upwards from the bottom side of it?
And the second option you mentioned, could you find it on the parts page that Curious posted above? Or maybe post a link for it?
Thank you both so far!
|
|
travellerw
Member
|
# Posted: 8 Aug 2023 07:46pm - Edited by: travellerw
Reply
Quoting: GoneCountry To put lags in from the bottom, are you talking about taking the existing board off to do this and screw upwards from the bottom side of it?
Yes, that is exactly what I was describing. Then using an anchor system like this.
https://buystairparts.com/product/hardware-series-3071-toggle-bolt-mounting-kit/
However if you have a good solid beam underneath you can use something like the link below. However, you have to be careful and ensure you aren't compromising you end joist (most likely a doubled up joist). A bunch of lags down through one of the joists will surely weaken it.
https://buystairparts.com/product/hardware-series-101-11-newel-anchor-kit/
|
|
Brettny
Member
|
# Posted: 8 Aug 2023 09:04pm
Reply
Dont lag screw from the bottom of a trim piece. Remove the trim piece and attach the guard post to the actual framing. Then make the trim piece fit again.
|
|
GoneCountry
Member
|
# Posted: 8 Aug 2023 10:58pm - Edited by: GoneCountry
Reply
Brettny, what kind of fasteners would you recommend to attach it to the actual framing?
|
|
Brettny
Member
|
# Posted: 9 Aug 2023 06:01am
Reply
Structual screws through the stair stringers with blocking behind it to the next one. Unfortunately it can become a rework of the stairs real quick just to change the look of the hand rail.
|
|
|
Nobadays
Member
|
# Posted: 9 Aug 2023 08:40am
Reply
As it appears you are using round poles/logs, I'm wondering if some kind of a "pocket" might be a better solution.
Something like this, but you could have any welder build these to match the angle of your stairs.
https://www.cuttingedgemetals.com/round-log-post-brackets#1
|
|
Grizzlyman
Member
|
# Posted: 9 Aug 2023 02:35pm - Edited by: Grizzlyman
Reply
Can you notch the posts so they hang over the side of the wall slightly? Then fasten through the side like in the photo below? Of course you would have to cut the shoulder of the notch at the appropriate angle so it sits flush.
If you did that, Would that shift the post and railing too far over the edge?
Most of the examples I’ve seen are done either this way or they use much bigger posts that extend to the ceiling. I don’t think over ever seen big posts just flush mounted to the floor or on that lip like that.
|
|
travellerw
Member
|
# Posted: 9 Aug 2023 04:02pm - Edited by: travellerw
Reply
Quoting: Brettny Dont lag screw from the bottom of a trim piece. Remove the trim piece and attach the guard post to the actual framing.
There would be no harm in lagging the posts down to that trim piece IF there is a structure under it (from the bottom up). At least along the stairs it looks like a 2x4 wall with a top plate. I would back the lags up with a metal plate and washer (i.e. washer on the lag, going through a metal backing plate, then through the 2x4 top plate, then through the trim piece and into the post). You would need to cut a block for underneath that is the right angle to keep the lag straight (block would sit under the metal plate).
If for some reason you didn't want the trim sandwiched. Then you could mark your post locations and use the appropriate size forstner bit to drill through the trim piece and still have it look pretty when the posts are attached to the top plate underneath the trim.
Again, I'm not a super fan of that solution and would rather see the bolt with a pocket in the post. This applies a much better clamping force down to the surface. Lags are prone to error, loosen as the wood shrinks and swells, and are really a 2 person job for install.
The solution Grizzleman posted is good, but you have to be careful of the bottom horizontal and how high you set it. Because that solution pushes the railing out past the edge if you set the horizontal too high it will leave a gap that will fail code (a childs head/leg/arm could get stuck).
Of course all of this could be totally wrong as we are just looking at 2 low resolution pictures and guessing. Your strategy needs to change based on the structure you have to work with (and you may need to build more).
|
|
GoneCountry
Member
|
# Posted: 9 Aug 2023 07:00pm
Reply
Nobadays, good idea. My brother is a welder and I may see if he could at least weld a long vertical rod to a plate that fits the existing hole pattern...and then drill a hole in the bottom of the post so it could slide over it???
Grizzlyman, notching the post and letting it hang over would be a good idea if there would be anything to attach it to but there's just a lip there for the most part.
Travellerw, good info. I may end up replacing that top trim board and stain it to match the railing because I won't have matching touchup paint after its pryed loose etc. The original owners picked the color it is now in 2006.
|
|
travellerw
Member
|
# Posted: 9 Aug 2023 09:25pm
Reply
Quoting: GoneCountry Travellerw, good info. I may end up replacing that top trim board and stain it to match the railing because I won't have matching touchup paint after its pryed loose etc.
You need to think of a strategy for that top trim board. It really has to go on before the posts, or be drilled routered with the post holes (or both). Otherwise you will need to cut the board at each post location to get it installed (that would look super ugly, especially if its stained). There is no way you could put the posts in and slide that trim board over those rough posts with any precision. The holes would need to be way bigger then the posts for that to work, that would leave ugly gaps between the trim board and the posts.
Quoting: GoneCountry My brother is a welder and I may see if he could at least weld a long vertical rod to a plate that fits the existing hole pattern...and then drill a hole in the bottom of the post so it could slide over it
This would be a great strategy if he can do it for you.. but you will still need a pocket in the post with a washer and nut to clamp the post down (top of the rod needs to be threaded). You can't just put a post over a long rod, no matter how tight the fit. Wood swells and shrinks over time, steel does not. Eventually the railing will wiggle and not feel stable (would still be safe, just not "reassuring"). There needs to be a force clamping it to the floor to keep it stable for years and years.
At least that is my opinion!
|
|
ICC
Member
|
# Posted: 9 Aug 2023 09:45pm
Reply
I must comment that IMO a newel post should be anchored to the floor with an anchor lag bolt as illustrated in the links of curious. Or the post should extend down through the flooring and be anchored by bolts sideways through the newel post and through a joist or beam. We have also used all-thread rod through sistered floor joists at the lower end with the upper end in a drilled horizontal cavity as illustrated, when access was readily available to the underside of the floor.
I would not screw or bolt any post to what is a decorative trim board. The upper end of the post and banister is a three-foot, or so, lever arm. If a heavy person, or two, leans or falls against it ... well that is a lot of levered force that must e resisted to avoid injuries or worse.
|
|
travellerw
Member
|
# Posted: 9 Aug 2023 10:41pm
Reply
Quoting: ICC I would not screw or bolt any post to what is a decorative trim board
Sorry.. I seem not to be coming across correctly (words are hard). You are %100 right, you cannot bolt to a trim board. You need structure underneath, whether that is sistered joists with bolts/threaded rod, span board between joists with steel backer plates, ect ect. I didn't mean the trim was to be part of the structure, only that its ok to sandwich it (and has advantages if you do it that way).
My other point with lag bolt is that they rely on the flutes of the lag to pull the post downward (the clamping force). This can change with the environment the post is in. However a nut and washer clamping down is more "reliable". The clamping force remains more constant with changes in the wood. It is my preferred method.
In a perfect world, you extend the post through the subfloor and build a box around it below, where the box extends to 2 joists (again, words may not be conveying this correctly). Its then bolted to the joists horizontally (the bolts go through the post and the joist horizontal). Done like that, you could literally have a 300lb guy/girl take a running start and couldn't move it!
|
|
|

