|
| Author |
Message |
WILL1E
Moderator
|
# Posted: 5 Nov 2021 12:59pm
Reply
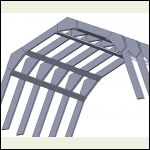
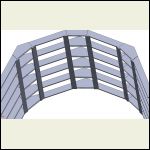
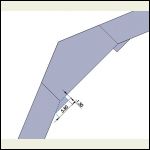
Sometime in the future i need to finish out the inside of the gambrel roof on my cabin. My question is around dealing with the plates that are on either side of the rafter joints since they hang beyond the edge of the rafter board. Do you somehow frame out the area between the plates on each rafter assembly so you have something to fasten drywall or T&G to? Any visuals would help!
Picture from earlier in my build so you can see the plates i'm referencing in case it's not clear.

|
|
travellerw
Member
|
# Posted: 5 Nov 2021 03:04pm - Edited by: travellerw
Reply
If you did like I did, and DIDN'T use a jig to place those templates, then each one will be slightly different from the other ones. This would make your finished roof "wavy" if you just screwed up drywall to the bottom of those (2x2 inset).
So, this weekend I will be insetting 2x2 and using a 6ft level to get them all at the same level as each other (all will stick below the plates, some lower than others). A PIA and a ton of work that could have been avoided, but I don't have a time machine so gotta suck it up. There are only 3 rows of them... sigh..
Pretty sure I settled on drywall as its meets all the firecode, is affordable and somewhat easy to work with. I will be using battons at all the horizontal joints to avoid having to mud and tape all that.
Not sure if you have seen this website. It will give you an idea of what the building would look like all finished out in drywall. If you look close at his pictures you can see he didn't quite get everything level and the ceiling is slightly wavy.
https://tinyhousetalk.com/jasons-800-sq-ft-gambrel-roof-small-home/
|
|
Brettny
Member
|
# Posted: 5 Nov 2021 03:40pm
Reply
You can insert 2x material in the slot. Prety cheap and easy.
When your hanging the drywall on a ceiling with a joint like that find two points at opposite ends of the building, snap a chawlk line where you want the joint to be then screw on a long 2x4 or 2x2. This gives you something streight to butt the sheets of drywall upto.
Also where you have butt joints that arnt beveled (the cut edge). Take a hand plane and shave that stud down by about 1/8-1/4in. It will make that butt joint disappear after spackle.
|
|
travellerw
Member
|
# Posted: 5 Nov 2021 05:40pm
Reply
Quoting: Brettny Also where you have butt joints that arnt beveled (the cut edge). Take a hand plane and shave that stud down by about 1/8-1/4in. It will make that butt joint disappear after spackle.
They actually make a tool just for this. It can be bought at the big stores for pretty cheap (like $10) or Habour freight (princess auto here in Canada) for like $5. Saves dulling your hand plane
|
|
Brettny
Member
|
# Posted: 5 Nov 2021 08:19pm
Reply
What's it look like?
|
|
travellerw
Member
|
# Posted: 6 Nov 2021 01:21am
Reply
Quoting: Brettny What's it look like?
Its called a Drywall Rasp.. Works really well if you cut the drywall a little too big. It will eat 1/4" in just a few strokes (but makes a huge mess).
|
|
Brettny
Member
|
# Posted: 6 Nov 2021 09:36am
Reply
You remove the paper or wear through it with that. That's prety rough drywall work to me. After doing a whole house I only use a sanding screen 1x now, then finish with a sanding sponge.
|
|
travellerw
Member
|
# Posted: 8 Nov 2021 05:56pm - Edited by: travellerw
Reply
Quoting: Brettny You remove the paper or wear through it with that. That's prety rough drywall work to me. After doing a whole house I only use a sanding screen 1x now, then finish with a sanding sponge.
LOL.. Its only for the ends.. You never use a rasp on the face of the drywall (or taped seams. Its for when you are hanging the drywal. Only the ends (like if you want to taper like you said)... or if you cut like 1/4-1/2" to long. You can rub this along the edge and it eats the drywall super fast (shockingly fast). Turns the paper to dust. Pro drywallers always have one in their pouch. Its really useful to get around a slightly curved shape.
However, it just turns the drywall to dust.. and that dust goes everywhere.. Really messy!
|
|
|
WILL1E
Moderator
|
# Posted: 9 Nov 2021 08:32am
Reply
I think Brett was saying to shave down the wood stud where you have two cut edges forming a butt joint. This way the drywall dips down a bit thus forming a taper at the butt joint so you can mud it better.
After looking at my ceiling a little more yesterday, i had a different idea. I'll try to sketch it up and see what you guys think about it.
|
|
travellerw
Member
|
# Posted: 9 Nov 2021 09:01am
Reply
Quoting: WILL1E I think Brett was saying to shave down the wood stud where you have two cut edges forming a butt joint. This way the drywall dips down a bit thus forming a taper at the butt joint so you can mud it better.
Ahh.. Ok.. Hmm I think it would be very hard to get every stud shaved the exact same. Then it would be hard to get a perfect straight line (and my OCD would go nuts). I think its easier to just do a standard 16" fair on each side of the joint. Easier to keep that arrow straight line and a wide fairing disappears..
Like I said.. I will be using ripped down MDF battons to cover the horizontal joints at all the roof "hips". I will caulk all the joints with latex caulk and paint them the same color as the ceiling. I think it will add a nice visual affect and save a whole lot of mud and taping. I have done too much mudding and taping in my life and anywhere I can reduce it, I'm gonna try.
|
|
gcrank1
Member
|
# Posted: 9 Nov 2021 09:27am
Reply
You only 'shave' the stud where the thick-edge drywall sits so it will screw down to emulate a bit of taper (leaving room topside for mud).
|
|
WILL1E
Moderator
|
# Posted: 9 Nov 2021 01:31pm
Reply
Here's what i was thinking. Take 2x6's and rip the angle into it and then nail it to the rafters. Gives a nice flat surface for the drywall, any also acts like blocking for the rafters. My plates are 24" wide so the spacing between the 2x6's would be around 22".
gambrel_Inside_2.JPG
| 
gambrel_Inside_3.JPG
| 
Gambrel_Inside_1.JPG
|  |
|
|
travellerw
Member
|
# Posted: 9 Nov 2021 04:19pm - Edited by: travellerw
Reply
Quoting: WILL1E Gives a nice flat surface for the drywall, any also acts like blocking for the rafters. My plates are 24" wide so the spacing between the 2x6's would be around 22"
Should work fine as long as your plates are all set the same. If not you will have a section that will bow in or out! You will get a wavy ceiling that you will see with the naked eye..
I'm doing an inset 2x2 between the plates. If I cut all the 2x2 the same and I put them the exact distance from the center point, then they all have to be the same. I will just screw from the sides. Thats my plan anyway!
|
|
WILL1E
Moderator
|
# Posted: 10 Nov 2021 07:59am
Reply
After sleeping on my idea, not sure i like it as much. I was trying to kill 2 birds with 1 stone by making a good surface for the ceiling finish material (likely drywall but not certain yet) but also to give some blocking since i don't have any yet.
You 2x2 idea might be the best option especially using a string across the length of the cabin to get straightness.
|
|
travellerw
Member
|
# Posted: 10 Nov 2021 10:50am
Reply
Quoting: WILL1E You 2x2 idea might be the best option especially using a string across the length of the cabin to get straightness.
Yup, there are about 10 ways to kill that cat.. I found it easier to measure down from the peak (where the 2 upper rafters join). If I make every 2x2 the same length and put them at the exact same location from that measurement, they will all be symmetrical (and its an easy 1 person job).
That will work to set 2x2 for both lower "hips". For the peak hip, I will pick one side of the cabin and measure back up, then set that 2x2 based on that measurement (again, every one the exact same length).
|
|
Brettny
Member
|
# Posted: 10 Nov 2021 04:08pm
Reply
Yes, shave down the stud a bit to make your cut drywall ends bevel across 2 bays. You wouldnt only shave down the stud where the cut drywall ends meet. It is a bit more work but the end product is better. My preferred choice is to use full length drywall. With a long gambrel roof like this it may be impossible. They do sell 20' drywall how ever I have only ever used 16' on a ceiling.
|
|
WILL1E
Moderator
|
# Posted: 27 Dec 2021 01:39pm
Reply
Hoping to head up for a long weekend and hopefully make some progress on getting the roof insulated.
How soon after insulating the roof do i need to get the vapor barrier up? Just wondering for planning purposes as i wasn't sure if it needed to be done immediately or just as long as it is up before drywall.
|
|
Nate R
Member
|
# Posted: 27 Dec 2021 03:56pm
Reply
No need to rush as long as it's before drywall....in your case any moist air getting through the insulation can dry through the roof venting easily. Just will lose more heat without the VB.
|
|
gcrank1
Member
|
# Posted: 27 Dec 2021 04:47pm
Reply
Regarding blocking, etc for ceiling runs:
For about anything over distance Ive come to prefer a laser over a string.
|
|
WILL1E
Moderator
|
# Posted: 28 Dec 2021 08:11am
Reply
Quoting: Nate R in your case any moist air getting through the insulation can dry through the roof venting easily.
But if i'm building my roof baffles out of pink foam and spray foaming the cracks between pieces, will the moist air still be able to escape?
|
|
Nate R
Member
|
# Posted: 28 Dec 2021 08:31am
Reply
Hmm, I forgot that yours will go all the way up the roof.....
In that case, then no, it won't be able to...From my reading, one season of this, especially partial use, no big deal. You'll also have almost zero stack effect pushing air through the insulation, too, since it's sealed above, making this a smaller problem... So, from my understanding, you'll be fine. If you were there full time, heating all winter and cooking/bathing inside, and had a concrete basement that was <1 yr old releasing water yet...... might be a bigger concern.
|
|
|

