|
| Author |
Message |
Grizzlyman
Member
|
# Posted: 24 Sep 2021 12:15pm - Edited by: Grizzlyman
Reply
Calling wood stove experts!!!!! This is something I know nothing about…. But have done a lot of research.
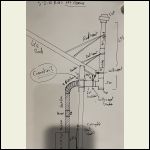
This is my plan- see photo below. Clearances are by the book.
Thoughts on the plan? Im not concerned about the stove/hearth area. I got that.
Im concerned about the pipe/chimney section. Am I missing anything?
Couple of points before replying:
1. I am not going straight Up through the roof- that ship has sailed.
2. I cannot use a standard wall support base as the pipe needs to extend further than standard wall support base. Plan is to go around the edge of eave rather than through. In another thread suspending the tee/pipe from rafter tails was suggested and I like that idea a lot. An upside down wall bracket will be ideal to hang the pipe.
Specific questions in addition to setup.
1. What connection do I need to connect black pipe to insulated pipe for going through the thimble? Ideally I’d like black inside the cabin up to the thimble.
2. My stove has an oval collar. The stove manual says female end goes over the collar. That means the male end is then up. From what I do know - male end should be down. How do I reverse this trend…. Is there a double female adaptor I can find to flip the trend or do I even need to bother with it and just leave it.
3. Can I spray foam insulation inside the wall cavity to the edge of the thimble? Of course I could stuff Batton insulation up to the thimble but like the idea of spray foam as additional support for the thimble as well as getting it tight around it. To be clear I am talking about the edge of the thimble in the wall- not the pipe. The edge of the thimble is 2†from the insulated pipe of course.
4. I assume I’ll need snow retention in front of the chimney as well.
5. My chimney will clear the roof by 6’ with cap. 3-2-10 rule calls for 7 ft. Does this matter in all practicality? Or should I make it 7ft.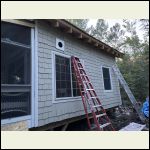
507928EA21AC49B19.jpeg
| 
2CC81AE6725843C0A.jpeg
|  |  |
|
|
Nate R
Member
|
# Posted: 24 Sep 2021 01:10pm
Reply
Not sure exactly on the answers to some of your questions....But curious as to why you did NOT just go through the roof? Like you said, that ship has sailed.... I see you're not going back to that....
I just did mine last week...

|
|
scott100
Member
|
# Posted: 24 Sep 2021 01:44pm
Reply
The ship may have sailed, but consider bringing it back into port 
Not a huge deal to patch the hole and fix the siding. If you run straight up through the roof the install will look much better, the draft will be better, and you'll have much less chance of creosote buildup by getting rid of the horizontal section and the elbows. Hanging it that far off the side of the building might require you to build a shelf under it to hold it. Also, it is unlikely you would need an inline damper with a modern stove.
Do consult the owner's manual for the stove you are installing. There may be a minimum flue length to get the right draft. You may be ok with the height, but once you add 2 x 90 degree changes and the entire flue outside of the building, you could have draft issues. Maybe consult with an installer to make sure it's right??
|
|
Brettny
Member
|
# Posted: 24 Sep 2021 02:55pm
Reply
You didnt really leave enough room to attach the chimney to the wall and you cant just attach it to the roof like that either. Your chimney will need a base mount
You need something like this to properly support the base of the chimney...but it wont fit past the over hang like that.
https://www.northlineexpress.com/6-duratech-adjustable-galvanized-tee-support-bracket -6dt-tsb-7087.html?utm_source=googlepepla&utm_medium=adwords&id=&gclid=CjwKCAjw7rWKBh AtEiwAJ3CWLGsyQ4r4LIwAdTy9zYsXzUBJx7worO1bE3NQfnmmZaBKcGr7-oMBBRoCD60QAvD_BwE
If you have ever got to a cold cabin with a chimney that has two 90* bends like that it SUCKS. You will always have draft problems and big time starting from cold problems much less more creosote. Go through the roof and you will fix all these problems and have a way easier off the shelf install and use brackets/mounts to manufacture specs.
|
|
NorthRick
Member
|
# Posted: 24 Sep 2021 04:45pm
Reply
Is your roof metal and do you get much snow? If yes, the snow will do it's darnedest to take out your chimney.
|
|
FishHog
Member
|
# Posted: 24 Sep 2021 05:21pm
Reply
Another vote for go through the roof. If for some reason you want to deal with all the problems going through the side will cause you at least go out an end so sliding snow won’t take out your chimney like it will where you have it. If you have no snow in your area I guess that isn’t an issue but I still think your not going to be happy with your plan
|
|
ICC
Member
|
# Posted: 24 Sep 2021 05:45pm
Reply
I understand you have said the straight up through the roof chimney is not going to happen.
However, after a lifetime of heating with wood stoves I will say that I will never install a wood burner with 90 degree bends.
Each 90 degree elbow reduces draft efficiency. Each bend acts like a brake, slowing the flow. Each 90 is like shortening the vertical chimney run by about 2 feet when it comes to how the chimney will draw. It is worse with EPA approved stoves as they have less air flowing through. A modern stove has less than one-half the flow through compared to an old pre-EPA stove.
Straight up and out makes for the best chimney and the happiest users. I do not see there is any reason to not put the chimney straight up and through a roof. The chimneys purpose is to pipe the smoke out of the home and to make operation of the stove as user friendly, and safe as possible.
If the out the wall choice was made because of roof penetration concerns that is a needless worry, IMO.
There are wonderful silicone rubber high temperature boots that can be used on ribbed metal roofs and provide excellent water sealing. We have installed dozens of them and never had a single callback.
There are metal snow diverters that should be installed along with metal brace rods in snow country. Diverters are also known as crickets and sometimes are framed into the roof structure as rainwater diverters. The ski condos near us all have wood burning stoves or fireplaces and are invariably installed on exterior walls, which means lots of exterior chimney height. With snow diverters and some framed crickets plus proper bracing the chimneys stay in place. And there is usually a good amount of snowfall.
I also think the "Rube Goldberg" chimney mount hanging off the eve of the roof is literally playing with fire.
|
|
ICC
Member
|
# Posted: 24 Sep 2021 05:51pm
Reply
I also believe that the chimney damper is un-necessary. Old stoves and fireplaces often needed dampers but moern stoves are much more efficient and would seldom need to have the exit flue blocked with a damper.
Control of the airflow into the stove is what is used to control the fire in a modern stove. More often there will be times when one might wish to increase airflow out the chimney than reduce it.
|
|
|
ICC
Member
|
# Posted: 24 Sep 2021 05:55pm
Reply
Quoting: scott100 Do consult the owner's manual for the stove you are installing. There may be a minimum flue length to get the right draft.
There usually is a minimum overall length. As well there is often a maximum length given for the black pipe that exits the stove. Too long there can cool the flue gases too much and be detrimental to the draft.
|
|
gcrank1
Member
|
# Posted: 24 Sep 2021 07:55pm
Reply
The modern air-tight woodstoves dont require a traditional damper.
But...one still may have a value.
They are easy and inexpensive to install and IF you ever have a chimney fire you may be glad you have it there to snuff the draft/kill the fire.
I consider one a safety device.
|
|
scott100
Member
|
# Posted: 24 Sep 2021 11:11pm
Reply
You will only have a chimney fire if you don't clean your chimney. Shutting down the wood stove will also shut down the flow through the chimney. The only reason for a damper in a wood stove chimney would be if the chimney had such a strong draft that you couldn't keep a fire burning long in a modern non-cat stove with a secondary air supply that you couldn't regulate. In that case, the damper would be a band-aid fix for a chimney that had too much draft for that stove. Shouldn't be necessary if the stove and chimney are matched properly, though.
|
|
ICC
Member
|
# Posted: 24 Sep 2021 11:32pm
Reply
Quoting: scott100 You will only have a chimney fire if you don't clean your chimney. Shutting down the wood stove will also shut down the flow through the chimney. The only reason for a damper in a wood stove chimney would be if the chimney had such a strong draft that you couldn't keep a fire burning long in a modern non-cat stove with a secondary air supply that you couldn't regulate. In that case, the damper would be a band-aid fix for a chimney that had too much draft for that stove. Shouldn't be necessary if the stove and chimney are matched properly, though.
 I agree with all that. Dampers are old tech. Put a modern wood burner on the bottom end of the chimney and a damper is just in the way when it does come time to clean the chimney. I agree with all that. Dampers are old tech. Put a modern wood burner on the bottom end of the chimney and a damper is just in the way when it does come time to clean the chimney.
Speaking of cleaning a chimney... I meant to post this before. I have three wood burning stoves. Each one has a straight up black pipe that transitions to insulated pipe before passing through the ceiling, and roof. For the black pipe from the stove up to the insulated pipe I use a telescoping length of pipe. The bottom end just slips/pushes into the collar on the stove top. The upper end uses an adapter that is held to the telescoping pipe with screws and that bayonets into the insulated pipe.
I think the telescoping pipe is superb, and many people seem to have not heard of them. When it comes to cleaning the chimney I wiggle the pipe and slide it up enough to be able to remove the bottom from the stove collar. Then I twist the bayonet upper loose and carefully remove that piece of pipe and take it outdoors.
Then I tape a heavy duty plastic bag to the insulated pipe at the ceiling. Up on the roof I remove the chimney cap and push the brush down with the flexible fiberglass "wands" that screw into the cleaning brush. I can feel when it begins to exit the lower end, plus I have the wands marked. The brush is extracted out the top. One down and up push-pull is all that is usually required. At the bottom the bag has collected all the debris.
I use a shop vac to clean out the stove smoke chamber before re-installing the telescoping pipe. I run the brush through the telescoping pipe outside before the reinstallation. Hardly any mess. The metal roofing has ladder rungs permanently screwed to the ribs to make walking about easy and safer.
telescoping black pipe.
|
|
scott100
Member
|
# Posted: 25 Sep 2021 10:37am - Edited by: scott100
Reply
I've used the telescoping pipe on all 3 of my stove installations. The one in our cabin is double wall pipe, as well. It transitions to insulated chimney about a foot down from the ceiling. Duravent sells short lengths of insulated chimney in black, so the section inside the cabin matches the stovepipe.
For cleaning, I slide the pipe up, put a bag on the end, and go from the bottom up with a Sooteater chimney cleaner on a drill. I just poke a hole in the bag for the flexible wands to go through. I had my doubts about the Sooteater, as I've always used standard chimney brushes in the past, but I'm impressed with it. It helps that the newer stoves don't creosote the chimney up like the old ones did. Just a small amount of ash comes out.
|
|
toofewweekends
Member
|
# Posted: 25 Sep 2021 07:21pm
Reply
My wood stove setup (old Vermont Casting Resolute) looks a lot like yours with a couple exceptions. Mine's on a gable side, so no exposure to sliding snow, and it's well-anchored to the outside wall at both the base and part way up the pipe. The horizontal section of mine may be a bit shorter, but not much.
I've had no issues with getting it fired up and heating a 16x20 north of Anchorage. Draft might be better going straight up, but that would have put the pipe thru the middle of a bed... awkward. Draft might be improved if the chimney top is higher than the roof peak, couldn't tell from your drawing.
I do sweep it at least once a year, both the horizontal and vertical pipes.
|
|
snobdds
Member
|
# Posted: 27 Sep 2021 11:14am
Reply
To be honest, I don't see a whole lot of difference in draft between a through the roof chimney and one that exits through the side. I have a through the roof chimney at the cabin and a side vent at the shop...neither one puffs back in the the building and both will pull paper up when starting a fire. I think the most important part is an outside air kit on the stove. That will have more of an impact on fireplace function than anything.
Now, I would never put a chimney on a eve wall. There is height limitations and the snow and water always pounding on it. I would do what you can to support it, you don't want that failing on a snowy day in the winter.
The male ends point down. That is the rule. However that rule is vague when in the horizontal position. The "L" on the outside should be the place where you start both sets of pipe . Going up from the "L" the male ends should all go down. Going into the building from the "L", The male ends should be inside of the pipe and terminate in the female end of the wood stove.
|
|
Grizzlyman
Member
|
# Posted: 11 Oct 2021 03:47pm - Edited by: Grizzlyman
Reply
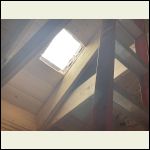
Ok. Well I bit the bullet and put a hole in my roof. Everyone happy now??  jk. jk.
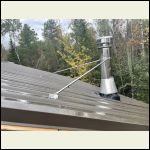
I put the chimney in this weekend.
The roof work absolutely sucked. It was too close to the edge to be comfortable and too far away for a ladder. Everything was muddy so my shoes were not great for roof work either. I harnessed up and basically just held on to the rope while doing it. It was as bad as I had hoped it wouldn’t be.
It turned out well and it did rain that night a lot with no leaks so I guess it will hold. The chimney extends 4 ft above and is not quite 3-2-10 compliant but whatever.
I have another 2’ section I could put on but probably won’t. If I did I’d put on another set of supports as well.
I also have a snow splitter that I didn’t install yet either.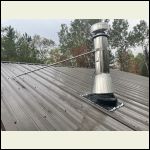
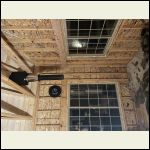
B81F81D5212147A6B.jpeg
| 
C068C3AAE4FD43EFB.jpeg
| 
930A953590194C71B.jpeg
| 
A0F2EDE7B3684D9F9.jpeg
|
|
|
FishHog
Member
|
# Posted: 11 Oct 2021 05:31pm
Reply
Well I'm happy, but in the long run you will be as well.
Looks good.
|
|
gcrank1
Member
|
# Posted: 11 Oct 2021 05:47pm
Reply
You made the right move! Too bad you didnt get the Gecko Feet shoes.....
But you wont know how much trouble you have avoided by doing it right. Still might have to get that pipe above the peak, depends on how the air moves over the roof in differing winds. That will be relatively easy.
|
|
Brettny
Member
|
# Posted: 11 Oct 2021 08:13pm
Reply
Looks great...however did you use any sealant under the boot edge? I dont see any pushing out. You may also want to look at the specs for how many screws you should use in it. If I remember right it was about one every inch and at the bottom of every rib.
|
|
Grizzlyman
Member
|
# Posted: 11 Oct 2021 09:04pm
Reply
Quoting: Brettny Looks great...however did you use any sealant under the boot edge? I dont see any pushing out. You may also want to look at the specs for how many screws you should use in it. If I remember right it was about one every inch and at the bottom of every rib.
Of course
|
|
scott100
Member
|
# Posted: 11 Oct 2021 10:39pm
Reply
Congrats! In the future, on a metal roof, tape your shoes. If you reverse tape with duct tape around the shoe at the balls of your feet, you'll slide less.
Just don't use electrical tape. This summer, I was adding a snow splitter to my chimney (metal roof) and my shoes were super slippery. All I could find was electrical tape so I went with what I had. It was hot, and I left black foot prints where I was working. Asked my wife to bring me up a gal of mineral spirits and a rag so I could clean things up. I slipped and spilled some, and then stepped in it. Then I left black streaks where I slid almost off the roof. It looked like a Buggs Bunny cartoon. There may still be some tell tale foot prints up there, but I lived to do stupid stuff another day.
|
|
Grizzlyman
Member
|
# Posted: 18 Oct 2021 07:37am - Edited by: Grizzlyman
Reply
Finished this weekend. Found rock- mortared. Sealed up the stove seams. Finished the surround (no trim yet) and hooked up stove. Ran great and kept us warm on a 34* night. We didn’t run it too long- just a few hours but it took the chill out of the place and was toasty in that part of the cabin. Used ceiling fan to circulate air but want to get one of those stove fans..
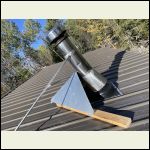
Also put snow splitter on roof. Splitter install is not great… but it’s good enough! It’s solid and that’s all that counts! It’s not centers perfect and off the 2x4 base unfortunately because I have purlins under the steel. So I am limited as to where I can screw the 2x4 down- it has to span 24†from purlin to purlin- otherwise I’m screwing into nothing.
It’s funny how meticulous I am about everything except the roof. Roof work sucks so much I just want it functional and then done! Lol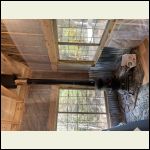
FF647BA077D04B5AB.jpeg
| 
19526228AA7C42AA8.jpeg
|  |  |
|
|
Brettny
Member
|
# Posted: 18 Oct 2021 10:02am
Reply
I wouldnt use wood up there. Even some aluminum square stock or possibly even aluminum angle would last way longer. PT wood has chemicals that can corrode non galvanized metals...then there's the fact that its wood and will rot.
|
|
Grizzlyman
Member
|
# Posted: 18 Oct 2021 10:31am
Reply
Quoting: Brettny I wouldnt use wood up there. Even some aluminum square stock or possibly even aluminum angle would last way longer. PT wood has chemicals that can corrode non galvanized metals...then there's the fact that its wood and will rot
Agree. This is a band-aid for the winter
|
|
|

