|
| Author |
Message |
tcmatt
Member
|
# Posted: 25 Nov 2013 08:15pm
Reply
Well, I finally got my woodstove installed and thought I'd show you a few pictures.
Also, here's a link on the metal roof flashing method that I found useful (from about 2:00-2:30 is when its the most informative).
http://www.youtube.com/watch?v=UvvIFIIvhuI&list=PLfF-PuvxOfVGa4efJ4vheEv6-D0JjgyRG
|
|
tcmatt
Member
|
# Posted: 25 Nov 2013 08:22pm - Edited by: tcmatt
Reply
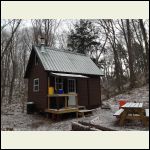
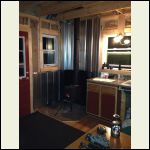
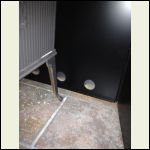
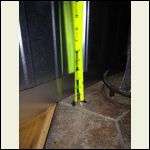
Here's the pictures. On the inside, I used metal studs as spacers for a 1.25" airspace gap. After I installed the galvanized metal (w/gap) I got nervous about the galv metal heating up too much and off gasing, so I bought a heat shield from northern tool. I had the stove ragin a few times and would feel all around the galv metal (on both sides of the stove, behind the heat shield and above the heat shield to see if it got hot. I'm happy to report that even when the stove was really, really hot the galv metal was never more than luke warm to the touch. The black heat shield got hot, but the galv metal never did.
outside
| 
IMG_1056.JPG
| 
IMG_1060.JPG
| 
IMG_1062.JPG
|
|
|
bldginsp
Member
|
# Posted: 25 Nov 2013 11:07pm
Reply
I'm no expert with this, but I have discovered that they make woodstove roof jacks out of what is called dead soft aluminum. The idea is that the soft aluminum can be shaped over the contours of the piece of steel roofing that it overlaps on the downhill side. In the video the flashing they are using is rigid, standard-type flashing which leaves holes under the flashing where it rides on top of the ridges of the roofing profile.
Has anyone done a lot of this type of installation, and can you tell us if the soft aluminum flashings are worth it? They cost like $100-$150, pretty unbelievable for a piece of flash.
|
|
MtnDon
Member
|
# Posted: 25 Nov 2013 11:46pm
Reply
Dead soft aluminum is used in the silicone boot types of flashing (like DekTite). The EPDM or silicone is molded around the aluminum. Those work very well. We've probably used dozens in the last 10 years in various sizes; 1.5" to 10" OD pipes. Have never had a leak. Take a little time to nicely form it to the ribs, apply a little silicone to the boot underside and screw down.
|
|
bldginsp
Member
|
# Posted: 26 Nov 2013 12:04am - Edited by: bldginsp
Reply
I've seen the boots with molded silicon on soft aluminum, those look like the thing to use with plumbing vent penetrations. Here's a link to a soft aluminum chimney flashing intended to be installed as a shingled flashing rather than sitting on top of the metal roofing, like the boots. In the video shown above in this thread they use a shingled flash, but not being soft it cannot be shaped to the ridges of the metal roof. Supposedly these soft flashings can, like the boots, but have the advantage of being shingled, so don't depend as heavily on caulk for their water seal.
http://www.ventingpipe.com/duravent-9449dsa-6-class-a-chimney-pipe-dead-soft-aluminum -roof-flashing-for-0-12-6-12-pitch/p1761158
Pricey at $100. The non-soft aluminum are a lot cheaper. Wondering if there are disadvantages to these soft aluminum chimney flashings. Seem to be the ticket.
|
|
tcmatt
Member
|
# Posted: 26 Nov 2013 07:38am
Reply
bldginsp and MtnDon,
I actually had purchased both a boot (from Dynamic Fastener) and the dead soft aluminum flashing. After researching all three (those noted above and a standard galv metal one) and talking with a local woodstove chminey supplier and installer I decided to use the galv metal one for the follwing reasons...
1. my pitch is 13/12 others I foudn online had problems with a tight fit on slopes greater than 10/12. In fact, I think on boot manufacturer even disclaims that their boots only fit up to 10/12 pitches.
2. the duravent dead soft flashing was pretty flimsy. It was also $160. When I discussed my options with the local supplier (who was also a duravent distributor) he agreed that going with the galv metal would be just as good if not better (given it has a little "structural intergrity to it").
He suggested and I did - caulk the heck out of it. two lines of thick beads. one at the seam and one inside. Also, the area at the bottom where the flashing comes out has metal roof foam tape inbetween the high ridges on the roof and two lines of caulk as noted above.
|
|
bldginsp
Member
|
# Posted: 26 Nov 2013 07:54am - Edited by: bldginsp
Reply
thanks tcmatt and mtdon. I'm planning on an 8/12 pitch. From what your installer friend said, do you think it was your steep pitch that weighted the decision? In other words, to answer my situation, would I be better off with soft aluminum with my lesser pitch? Or perhaps a soft boot?
Thanks for the good picture- worth 1000 wds
Looks to me like you may not have needed all that caulk, although of course it can't hurt. But the point is that when you have the flashings set up to shingle water away, you aren't depending on caulk to begin with. Caulk dries and cracks, galvanized flashing rusts but remains intact for many decades. The soft aluminum worries me cause one good smack with a falling branch (or stupid chimney sweep) could penetrate it. Boots worry me because while they work well on the short term (first decade), their seal depends on caulk and so must eventually fail.
One argument against all that caulk is that if water makes its way in it may not be able to get out, in other words it creates a back dam and prevents it weeping out and down along the shingled layers.
Maybe I'm over-thinking this, but I like to plan as much as possible.
|
|
tcmatt
Member
|
# Posted: 26 Nov 2013 08:14am
Reply
oh yeah, the flashing I used was from Selkirk and cost $40 from Menards
|
|
|
tcmatt
Member
|
# Posted: 26 Nov 2013 08:25am
Reply
knowing what I know now, I think I'd go either a boot on a lesser pitch (I'm installing one next month on my outhouse vent pipe) or the galv metal. When I had the dead soft flashing in my hands, it just seemed really flimsy.
re the caulk. I cabin gets a lot of snow. Here's a pic of just an average visit. On most of my roof the snow slides off, but the area above the porch roof the snow sits longer, so I was afraid of water seeping up under the seams.
|
|
SFCLYNCH
Member
|
# Posted: 26 Nov 2013 06:46pm
Reply
Nice job.
|
|
MtnDon
Member
|
# Posted: 26 Nov 2013 07:50pm
Reply
Yes, the boots I have used all come with a 10/12 max pitch disclaimer. I love them when they can be used. They are my #1 choice for ribbed metal roofs.
Never have liked gobs and gobs of caulk. One thing to remember if you use silicone caulk is that new silicone caulk does not stick to old cured silicone caulk. If you ever have to repair/redo an old silicone caulk job you won't be a happy camper. Not unless you're being paid by the hour 
|
|
davey25
Member
|
# Posted: 26 Nov 2013 09:51pm
Reply
Used the rubber boot on mine worked pretty good and my roof is pretty steep..probably maxed out
|
|
LDamm
Member
|
# Posted: 27 Nov 2013 06:44am
Reply
Heres my rubber boot. 12/12 pitch roof. As you can see, that's probably the max as its starting to bunch. Still, very easy to install and I doubt it will ever leak.
|
|
bldginsp
Member
|
# Posted: 27 Nov 2013 07:32am - Edited by: bldginsp
Reply
A Simpson Duravent double wall chimney for woodstove requires 2 inch clearance to combustibles. I wonder whether the boot is considered a 'combustible'.
As well, you'll notice on the metal flashings that they have dimples in them at the upper apperture where the chimney comes through. Not sure, but I think the intent of those dimples is to allow air to pass so that heat dissipate that builds around the chimney where it penetrates the roof.
LDamm's boot install looks carefully done and water tight, but I wonder if that type of boot is made specifically to handle a hot chimney.
Can anyone provide a link to that or similar product?
Edit-
Here's link to instructions for installation of such a rubber boot. It shows a metal spacer around the flu itself, and the rubber boot contacting the spacer, not the flu. Then a metal storm collar is installed over the boot, contacting the flu above the boot.
http://www.northlineexpress.com/media/wysiwyg/pdf/5se-urbak.pdf
LDamm- does your boot contact the chimney itself?
|
|
tcmatt
Member
|
# Posted: 27 Nov 2013 08:58am
Reply
LDamm,
That looks good. I think this just goes to show us all that there is more than one way to skin a cat.
bldginsp,
Dynamic Fastener had two grades of boots - one was silicone and rated to 450 F and cost about $86. Their other boot was rated lower around 212F, I think. Below is a link to their catalogue...see pages 56-58. Also, when I had the stove really burning hot (and for awhile), I climbed up on the ladder and felt the chminey pipe just to see how hot it was. It was warm, but not so hot that you couldn't out your whole hand on it. My chminey was a 6" Selkirk Supervent from Menards. That spacer looks like a lot of extra work that might not be necessary if your boot is temperature rated to a high degree.
http://www.dynamicfastener.com/wp-content/uploads/2013/09/FullHG2013_webV2.pdf
|
|
bldginsp
Member
|
# Posted: 27 Nov 2013 10:24am
Reply
thanks tcmatt. Hadn't seen temperature rated boots like that. I wonder what the chimney manufacturers think about their use.
|
|
tcmatt
Member
|
# Posted: 27 Nov 2013 10:50am
Reply
bldginsp,
a couple of thoughts.
1. the chimney manufacturers are going to want you to use their flashing products and not someone else's boot product.
2. my roof manufacturer is who originally told me they recommend the boots.
3. I know a lot of guys here (on the forum) use the boots with a lot of success. My pitch and snowload made me nervous, so I went the route I did.
IMO, I think given your 8/12 pitch either would work. Like I said before and how LDamm picture shows, there's more than one way to skin cat.
|
|
|

