|
| Author |
Message |
Kirk
Member
|
# Posted: 1 Sep 2011 10:55pm
Reply
Here is a fun project that is 95% done. Logs are 8". I milled all logs except the long sills and summer beam. Mix of lodge pole, fir and spruce. I used standing dead -mostly due to access and the majority of shrink already absorbed. The construction method allowed me to build with short logs - which only required muscle and a good back. The long logs were strategically placed on pallets app 3' high - which allowed me to lift from one end. We did use a skid steer to lift the sill logs in place. I used a floating slab with app 15 yds of fill - which created a thermal mass - allowing for 20 degree cooler summer temps and opposite in winter. I did allow all logs collected an additional year in my log yard to dry. I used a small bandsaw mill to shape the cants to 8". 12:12 pitch allows for a nice loft. The ceiling is t/g 3" and accents the logs quite well. One objective with this project was to use as many salvagable materials as possible. A feat only accomplished because I had the time and storage to do such. I did include a compost toilet which we have been very happy with. I also tried to use as much outside lighting as possible. This building is built and built tight. No movement with wind storms - no air leaks. I am very glad I used this method and hope to build again using this same construction. If you are in the area - contact me as I am planning a one day workshop - an introduction to building with short logs in Oct. My father - late 70s was a tremendous help. Just should have taken more pictures during the construction phase. I had no previous log building experience.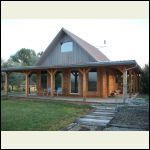
Modified Post and Beam 20 X 24 Cabin
| 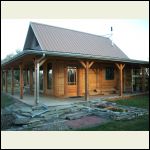
Entry View
| 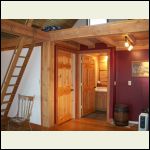
Door Way - Bedroom and Bathroom
| 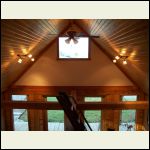
A View From the Loft
|
|
|
LakeSuperior5
Member
|
# Posted: 2 Sep 2011 02:46pm
Reply
Awesome!
|
|
Nirky
Member
|
# Posted: 2 Sep 2011 04:26pm
Reply
Looks like a wonderful cabin. Wish I could attend the workshop...where will it be located?
And on behalf of those who are interested in such a workshop but could not attend, I ask this: have you ever thought of making an e-book on this type of construction?
By "e-book" I mean writing this construction process up, step by step, including pictures & diagrams, and then converting it into a popular computer format such as a PDF and selling it online.
I'd buy one. Possibly many others would as well. If the response was sufficient, you could even find an affordable publisher to market a real book. Just a thought.
I'd really like to have an e-book on this building method. :)
|
|
Erins#1Mom
|
# Posted: 2 Sep 2011 06:49pm
Reply
This looks amazing! Would like to see more photos of interior as this is currently the size I am thinking of building. For some strange reason and I have NO concrete reason why: I want a loft but with my husband and my ages, I want real stairs.
Questions:
Where are you located?
Size of the loft?
Depth of porch?
|
|
Kirk
Member
|
# Posted: 2 Sep 2011 08:56pm
Reply
Apologize for the delay ... here go answers to all questions...
1. I am located near Three Forks, MT.
2. Love the thought of the e-book. Sounds like a good fill for the winter dark and cold! Might pick your brain for further Rx to make that happen. A teacher at heart.
3. Depth of porch - 7' of deck space - a full 8' of overhang. This allows for protection of logs (very important) and plenty of walking room with others seated on the porch or in the hammock!
4. Loft is 20 ' x 12' which allows plenty of head room and walk around room.
5. The steps to the loft came out of an old phone company office. The type of ladder per se that had rolling mechanism attached. Easily adapted to steps. Might suggest incorporating a landing one half way down.
6. The workshop will be a hands on and mix of class type instruction using this building as a guide. I have a number of large logs that need milled so will include milling with a bandsaw, use of a chainsaw, large circular saw, large drill, hand tools, finish options, etc. working from the foundation up. Participants will receive instruction on establishing a construction plan of their own project along with skill acquisition.
|
|
Kirk
Member
|
# Posted: 2 Sep 2011 09:01pm
Reply
I will try and take some other pics of the interior and post over the weekend. Finishing this project was fun ... I particularly enjoyed the challenge of running electrical wire and lighting. I almost made this cabin completely green ...ie no electricity but running it from an existing building I had built about 15 years ago was a no brainer. I did opt for the compost toilet though as adding to an existing septic permit is pretty costly in our county. There is a gray water option - and the cabin is plumbed should I decide to pipe water into the unit. As of now - the compost toilet is serving guests well, bottled water to drink, bucket to catch water used for face washing, etc. Baths and showers are available in our big house also on the property. This cabin is super quiet (the 8" logs). Many guests over sleep do to the quietness. Guess it helps being out in the country too.
|
|
Kirk
Member
|
# Posted: 7 Sep 2011 11:47pm
Reply
Here are the interior pics promised. Sorry for the delay.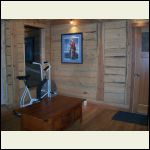
Living room area and west wall
| 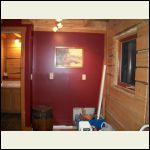
Small kitchen area - not finished but plumbed
| 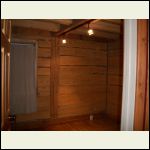
Bedroom
| 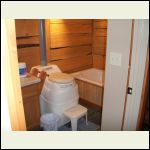
Bathroom including compost toilet
|
|
|
Kirk
Member
|
# Posted: 7 Sep 2011 11:53pm
Reply
More interior pictures.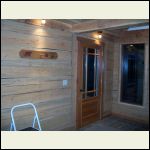
Front Entry Door
| 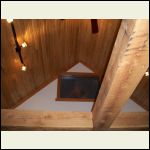
View looking up beyond summer beam
|  |  |
|
|
|
hattie
Member
|
# Posted: 8 Sep 2011 01:07am
Reply
Kirk - This is just so beautiful!! Congratulations! Can't wait to see more pictures of when it is all furnished!!!
|
|
Montanan
Member
|
# Posted: 10 Sep 2011 12:14pm
Reply
It looks great! What a gorgeous place. I love your lighting. Question: how did you run your wiring on the exterior (log) walls? Did you drill the logs to run electrical, or simply conceal them along floor trim, etc? We have a log cabin too, with only 2 interior framed walls. We're having to be creative with the wiring and looking for tips. Thanks!
|
|
hattie
Member
|
# Posted: 10 Sep 2011 01:01pm
Reply
Beautiful....So many talented people on this site!!
|
|
Anonymous
|
# Posted: 11 Sep 2011 10:55am
Reply
Regarding the wiring question... plan plan plan...before the logs begin to pile high. I did drill vertical on a switch just inside the front door - using a 1" bit as the logs assembled on each other. I believe all other wiring had an origin from a conventional source - ie either the interior walls (stud) or from the rafters, and extension to lighting under the porch eaves. I ran the wiring into the cabin from a conduit that originated from the slab - making sure it was in place when we poured concrete. This came in underground from another building on property. I brought it up with a 45 degree sweep that dead centered the stud wall between the bedroom and bathroom. A breaker box is located in the bedroom. Obviously the stud walls are easier to work with vs the large 8" logs but was able to hide unsightly wiring. I did run some base board wiring for outlets in the living room running it along the base - hiding it underneath the sill log overhang (used a treated 2x8 which isn't 8"). Hope this helps.
|
|
Kirk
Member
|
# Posted: 11 Sep 2011 11:00am
Reply
Not sure how the last post appears as anonymous...but it was indeed mine! Regarding the switch location inside the front door - it was easier to bring the wiring from the top down vs floor up for this switch box. Kirk
|
|
Montanan
Member
|
# Posted: 13 Sep 2011 12:13pm
Reply
Thanks for the info. We'll have to run ours along the baseboard. We are on piers, so we'll run some underneath the cabin (using conduit for protection.) Our biggest challenge is that the ceiling for the main floor is the flooring for the loft, so there's no way to conceal the wiring for overhead lights. We'll just have to get creative with making it look less ugly. ;o)
|
|
Kirk
Member
|
# Posted: 13 Sep 2011 05:52pm
Reply
If you live in MT or region and would like a tour please contact me. Otherwise here are some thoughts; as with my lighting ... the new trac systems are (in my opinion) very cool looking = far removed from the first trac lighting that appeared on the scene years ago. You have so many options. When viewing others' projects - look and see where they originated their power - and how they transfer this to the actual light. Another option - is to "channel" via a routered or dado type cut a groove into your log particularly if it is going to get covered up (on top). Note - probably need to cover this groove with a lightwt piece of metal to cover and prevent a srew or nail from penetrating your wiring. Usually covered in any how to wiring book and can meet code. Lastly - I was going to take a 1x2 and run it through my table saw with dado blades - create my own channel per se of wood - that covered up code sufficient channel for exposed wiring. At least it would look complimentary - and think about hiding it from view. Stand in your room and cast a view in a direction that can conceal as much as possible. These efforts are worth it. My take is unsightly wiring detracts from the beauty created by the wood. Get creative while staying in code and safety. Hope this helps. K
|
|
Montanan
Member
|
# Posted: 14 Sep 2011 12:57pm
Reply
Absolutely! Thank you! Yes, I looked into the new track lighting systems and they are really quite attractive. We are going to use them for sure. We are also going to make use of already existing channels to conceal wiring as much as possible (along the purlins in the loft, for example, and in the gap between the top log in the side wall and the slope of the roof line.) Thanks for the tips about concealment and code. I'm a little nervous about the electrical inspection.
Oh, and yes, we are in Montana- in the Little Belts.
|
|
Montanan
Member
|
# Posted: 14 Sep 2011 01:03pm
Reply
Here are a couple of photos that show what we're working with. If you have specific suggestions, I'd love to hear them. Thanks!
|
|
Montanan
Member
|
# Posted: 14 Sep 2011 01:06pm
Reply
Oops- they were too small when I tried to paste them in. Here's the link to our project, if you get a chance to take a look.
http://www.small-cabin.com/forum/6_1184_0.html
|
|
Kirk
Member
|
# Posted: 14 Sep 2011 06:50pm
Reply
Your cabin project appears to be well done. Congrats- a dream becoming reality. Where in the Little Belts? I am located near Three Forks so if travels bring you near please contact me and we can compare notes.
In looking at your pics (thanks) I would take advantage of the stud walls in the bath area.... even bringing a GFI into both the bath and kitchen area if you have elec / water source. Otherwise - looks like the baseboard idea (did you run a pressure treated 2x? underneath your sill log) is the best bet - and along the top sill log as you mentioned. I have seen both used and if done correctly can be very functional and not deter from the beauty of the logs. No need to fear the inspection. Keep it to code - don't cut corners, do a good job with wiring connections, main breaker box, etc. This all adds up to a "job well done" appearence. Keep an up to date how to book near - make sure it meets code! Not sure if your inspector has "cabin" experience - this can be either good or bad depending on those who have gone before you! Where is your primary source of energy coming from?
|
|
Montanan
Member
|
# Posted: 15 Sep 2011 11:09am
Reply
Thank you! Yes- we are definitely making use of those stud walls and are running GFI in both bath and kitchen. We haven't installed the baseboards yet, but that's how we plan to conceal most of the electrical for the main floor. Outlets can then be installed in the baseboards.
We are located up near Showdown ski area (Neihart area.) But the company who did our log shell is actually out of Whitehall. Will definitely get in touch if we head that direction- would love to see your place. Thanks for offering.
We'll be on the grid, so we're dealing with Northwestern Energy. Even though there are power lines on our property, the pole near the cabin was old and didn't have a transformer, so they've been up there putting in a new pole and a transformer. We had installed the meter and breaker box, the mast and the grounding rods, but they told us they wouldn't run the power until the circuits were all in. So, my husband was up there last weekend putting in enough to call it "done." Fingers crossed that NWE will be up there this week to run power. We have a good book and a local electrician friend who is giving us advice, so hopefully the inspection will go smoothly.
Thanks again for your help.
|
|
cowpiesnhorseap ples
|
# Posted: 28 Sep 2011 05:38pm
Reply
Great cabin Kirk and Montanan! we are actuallyin the process of buying and building cabin off the beaten path by three forks, so thanks neighbor for the ideas. We cannot wait to get started with our cabin.
|
|
Kirk
Member
|
# Posted: 1 Oct 2011 09:08am
Reply
If you are in the area you are welcome to set up a time to tour. I have moved the workshop from this fall to next spring. Stay tuned and stop by!
|
|
neb
Member
|
# Posted: 1 Oct 2011 09:43pm
Reply
Very nice and looks great.
|
|
Malamute
Member
|
# Posted: 2 Oct 2011 10:43am - Edited by: Malamute
Reply
Quoting: Montanan ...We had installed the meter and breaker box, the mast and the grounding rods, but they told us they wouldn't run the power until the circuits were all in....
Interesting. I wasnt dealing with Northwest, but every place I've built, they hooked up power as soon as I had the state permit, nothing else required. I needed power to build, a temporary panel. They never flinched. I ran everything from the meter to the house, on my own, and my electrician ran them in ones I was building to sell, but had nothing but a small temp panel for the first several months. My meters have all been on the pole or a pedstal tho. Still, so long as you had the meter loop on your outside wall, you should be good to go for a temp panel to build with.
|
|
Kirk
Member
|
# Posted: 30 Sep 2013 02:49pm
Reply
To All - A one day introductory workshop;"Building With Short Logs" will be held onsite - near Three Forks, MT, October 26, 2103. This workshop will introduce; Project Design, Project Management, Tools, and Construction Methods. I will include demonstrations with a portable sawmill, and offer practice sessions using tools used in short log construction.
All skill levels welcome! Workshop hours; 10 AM - 2 - 3PM. Class size is limited. $45. Contact me at kkeller145k@gmail.com for more information. Rain or shine - I have enough indoor space in the event of inclement weather.
|
|
Nirky
Member
|
# Posted: 1 Oct 2013 01:54am
Reply
Kirk-sent you an email.
|
|
cscmtp
Member
|
# Posted: 25 Apr 2016 09:02pm
Reply
Kirk do you mind me asking how much you have into this cabin? I am looking to build a cabin as a rental property on our campground, and we first had thought about 16x24 but now leaning towards 20x24, and I really like yours!! If you would rather not post publicly I'd love to chat by private message or email about your costs if you're willing. Thanks!!
Christopher
|
|
|

